
Slack bots are useful for both work and play, but they can be incredibly rigid in the tasks they can perform and how they perform them. That’s why people often want to build their own bot. Until recently this was an incredibly daunting task for those less technical, and a new frontier for developers. Today, however, Slack bots can be surprisingly simple to create, even for the non-technical among us thanks to no code tools and automation solutions like Workbot.
This guide will help you create a Slack bot—no IT or coding knowledge is needed.
What is a Slack bot?
Before you tackle building a bot, it’s important to understand what they are and the different kinds. Fundamentally, bots are software systems that can perform automated tasks. Only three things are needed to build one: a place to type your text, a bot to read the text, and an app to do something with that text.
Chatbots—a subset of bots—are digital entities that are rapidly transforming the way consumers behave. These bots “live” in chat apps like Slack, Facebook Messenger, and Telegram. They’re often (but not always) powered by artificial intelligence (AI), which enables them to provide intelligent answers instantaneously. When they’re embedded with Natural Language Processing (NLP), they can interact with humans using colloquial language instead of strict commands. Slack bots are chatbots that are already built into Slack. Users can access a variety of pre-made Slack bots or build their own customized Slack bot to handle specific tasks.
While chatbots are a prominent type of Slack bot, other types are worth exploring. Notification bots, for example, deliver updates and alerts within Slack. Slash command bots also trigger actions within Slack by typing specific commands preceded by a slash (/).
Related: 3 productivity bots that can help your employees work from home more effectively
What can I do with a Slack bot?
Slack bots can execute a limitless range of tasks. But every workflow essentially boils down to three main actions: curating responses, pushing notifications, and slash commands.

- Creating Slack bot responses.
If you want to provide answers to generic questions, you can easily customize your Slack bot’s replies by telling it how to respond to specific keywords in a Slack channel.
- Pushing notifications.
You can also use your Slack bot to monitor data from other apps. When changes are made in another app, your Slack bot will push the updates to your personal Slack channel. You can choose from over thousands of bots in the Slack App Directory.
- Executing slash commands.
If you want your Slack bot to perform a specific task, you can use a slash command to trigger an action.
Building Your Own Slack Bot with Workbot for Slack.
Now that you know what Slack bots are and what they can do, it’s time to build your own. But you don’t need to create one from scratch. Instead, you can leverage Workbot—a bot we’ve built for Slack—to execute some pretty cool workflows without compromising on customization. You can customize commands and notifications, and Workbot will provide the information you need in real-time.
Because it’s so customizable, Workbot easily fits into any workflow, no matter how complex. All you have to do is consider these seven factors: who, which, what, when, where, why, and how.First, you must identify who will use Workbot and which applications you will integrate it with. Then, you need to consider what pain point you’re trying to solve, along with when and where the command or push notification will be executed. You also need to figure out why your users need this bot. Only then can you work on how to customize Workbot.
Imagine that your sales team—the who—wants a 360° view of all your customers, but the right information is scattered over multiple platforms like Salesforce, Intacct, and JIRA (the which). By customizing Workbot, the team can streamline their data and save valuable time and effort (the why) by eliminating the need for context switching. For example, they can invite Workbot to their dedicated #Sales-Squad channel, where they can ask it to perform tasks by typing in commands or receive scheduled KPI reports when they want.
Related: How an enterprise chatbot can help you manage your apps
Setting Up Workbot in Slack
Once you’ve nailed down the other specifics, the process of customizing Workbot (the how) using the Workato platform is relatively simple.

First, you’ll need to log into your Workato account—or create a free one if you don’t have one yet. Then add Workbot to Slack. You’ll be greeted with a screen to help you set it all up.

Click on the Add To Slack button, and a pop-up will ask for your authorization and show you which channel you’re connected to.
Once you’re authorized, you’ll see a confirmation screen. Click on the Got It button, and Workbot will be added to your Slack, along with a list of pre-built apps.

You can enable access to the apps you need and click on the commands link to see the list of available commands for each app. Now you’re ready to start chatting with Workbot!
To talk to Workbot, invite Workbot to a Slack channel. Type @workbot to ask Workbot about available notifications and commands.
Constructing a Workbot-centric Workflow
Once you’ve added Workbot to Slack, it’s time to create recipes—plain English instructions for getting work done between your apps. Workbot is its own app, so you’ll need to select it from the list of available apps first.

To start, select how you want to ask for (or trigger) Workbot.
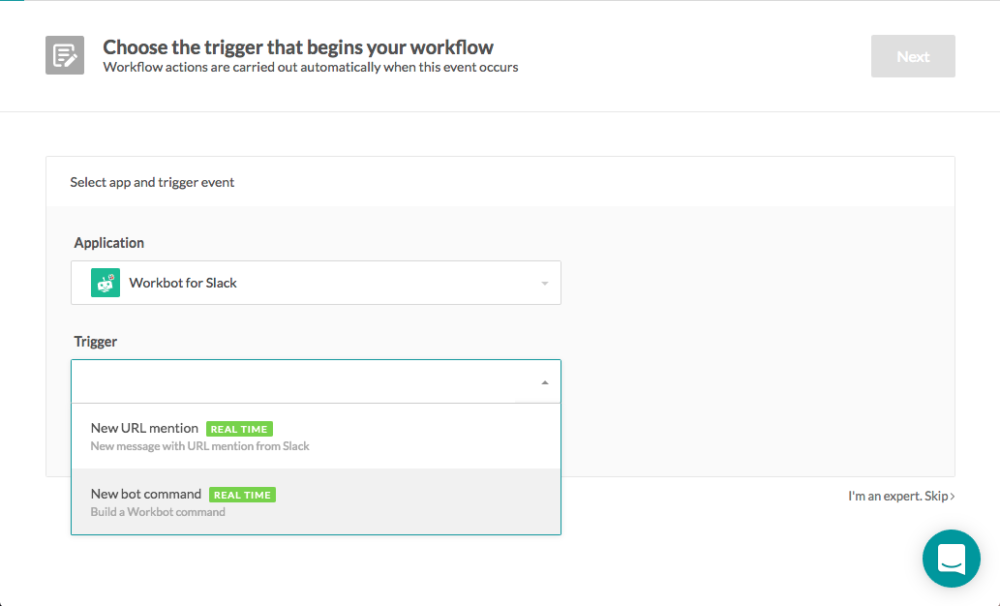
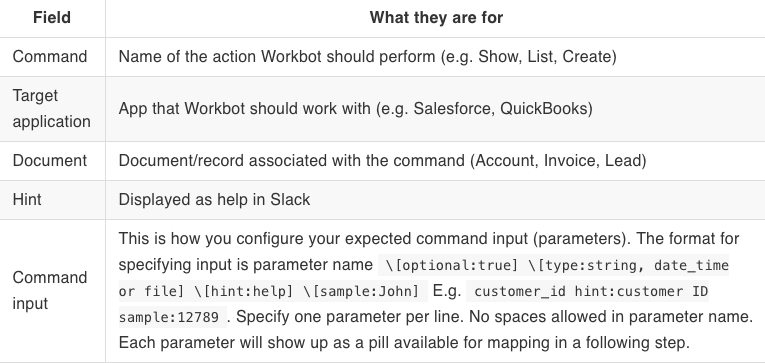
The first option is to create a formal command. In this method, you trigger Workbot by typing a command corresponding to the workflow you want to execute. This trigger allows you to customize your desired command (e.g. the information you need to provide, what app you will be using) and configure what Workbot should do with data that comes in via the command. There are four elements Workbot looks for in a command:
- Addressed to an application (e.g. Salesforce, QuickBooks)
- A specific document type to be processed (e.g. Account, Lead, Invoice)
- A certain command to execute – (e.g. Show, Create, Update)
- One or more parameters. For example, parameters may have the file type, which takes as input file content (e.g. text or binary content) that you upload into Slack.
When creating a recipe with a command as the trigger, you’ll see these fields listed in a table.
Alternatively, you can set up the recipe so that Workbot fetches information when you send a URL via Slack.
From here, you must decide what recipe you want to create. There are two basic types of Workbot recipes: notifications and commands. If you want to receive information from another app via Slack, you want to build a notification recipe. You’ll need a command recipe to get Workbot to execute actions in other apps.
Receiving Notifications via Workbot
Let’s talk about notification recipes first. Workbot can monitor your apps for important events and notify you about them. You can invite Workbot to any channel and configure notifications to be posted to that channel. To set up notifications in your channel for specific events, you must first invite Workbot to the channel you want to receive notifications in.
Then, you need to choose a trigger—the event you want to receive notifications about. For example, you might choose to receive a notification every time a Salesforce opportunity is added or created.
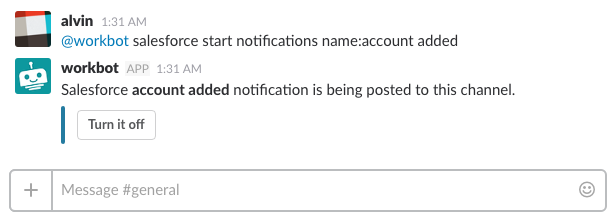
From there, you can turn on notifications via the Workbot command. The command should follow this format: @workbot app name start notifications name:[document] [event]. If the app hasn’t been turned on yet, you won’t be able to start notifications. But if the app has been turned on, Workbot will confirm that notifications have started.
Executing Workflows Using Commands
Building a command recipe is similar. You need to select your apps and your trigger.
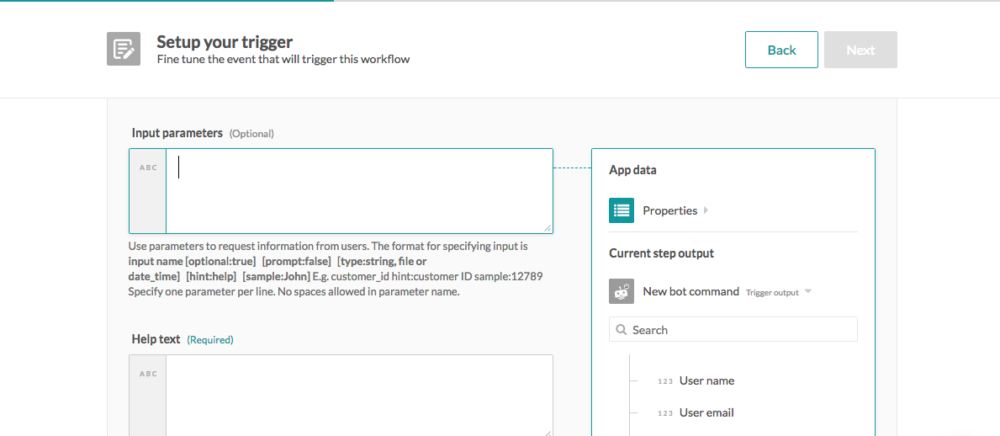
You also can set input parameters if the action you want to execute requires a filter, like a date range or account name. This way, you can tell Workbot to access and work with specific information. For example, you can specify that the command must include a Salesforce Account ID or Opportunity Name.
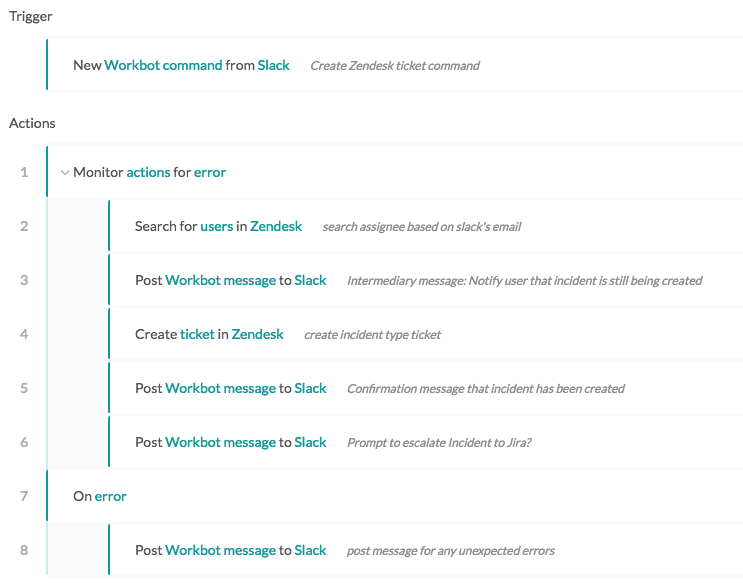
From there, you can build out the recipe logic according to the workflow you want to execute. Imagine, for example, that you want to build a recipe that allows you to create new Zendesk tickets directly from Workbot. The workflow logic would look something like this:
Finally, you’ll probably want Workbot to circle back with you after it executes a command. You can set your preferred reply channel while building the recipe. If you’re using Workbot to create new leads in Salesforce, for example, you may want it to send a message to the #Sales-Squad channel with the appropriate link every time it creates a new lead.
Quick Start: Leveraging the Workato Community
If you don’t want to start from scratch, you can draw from our repository of over 150,000 public recipes. With the power of our collaborative community, it’s easy to tweak or build on existing recipes. For example, you might use this recipe as a starting point—but then customize it to incorporate the apps or data fields you want to see. Within the repository, you can sort recipes by the apps they connect—like “Salesforce” or “Zendesk”—so you can always find the integrations you need!
It’s also easy to start with simple recipes and add bells and whistles as you go along. Workbot makes iterative design incredibly straightforward, so as your needs change, you can also alter your Workbot recipes. The key is to learn from your bot’s users over time.

Ready to build a Slack bot?
You can start using Workbot to build your Slack bot risk-free by signing up for a free trial.