Workato recipes are powerful integration flows that help you integrate data and processes between your apps. They are simple-to-build, and flexible enough to handle customizations in the different systems. But how exactly should you go about creating one, and what exactly do you need?
In this first installment of our tutorial series, we are going to show you how you can build and run your first successful recipe. It should take about 10 – 15 minutes, depending on your scenario and how well you know your system. Learn how from Amlan – our resident recipe guru – in the tutorial video below, or if you prefer to read, keep scrolling!
https://www.youtube.com/watch?v=b3-eRuKMyGs
Here are the steps involved in building your recipe:
Step 1 – Planning your recipe
Step 2 – Create recipe and define app connections
Step 3a – Define trigger
Step 3b – Define actions
Step 4 – Start recipe!
Step 5 – Check recipe jobs
Step 1 – Planning your recipe
A recipe consists of a trigger and one or more actions. In this example, a high level idea is to create an invoice in QuickBooks when an opportunity is ‘Closed Won’ in Salesforce. Keep this in mind as this would be the key objective of our recipe.
The first thing we recommend you to do when building a recipe is to plan out with a pen and paper – literally! Many people skip this step and choose to build the recipe iteratively. You can do that too, but planning your steps will ensure that you meet with lesser errors along the way, and you can get going faster.
Plan 1
In our very first stage of planning, our broad statement would look something like this:
Trigger:
When an Opportunity is created in Salesforce,
Action:
Create an invoice in QuickBooks.
Plan 2
We will soon realize that we may not want to move all our Salesforce Opportunities to QuickBooks. And if it’s not a ‘Closed Won’ opportunity, we want to skip it, and stop the recipe.
Also, when we create an Opportunity, it does not necessary start at a ‘Closed Won’ stage. Most of the time, Opportunities are updated to a ‘Closed Won’ stage later in the lifecycle. At this point, we will modify our plan and it should look something like this:
Trigger:
When an Opportunity is updated in Salesforce,
Action:
If it’s not ‘Closed Won’, stop recipe.
Create an invoice in QuickBooks.
Plan 3
If we dig a little deeper, we will then realize that the Account that the Opportunity was created for may or may not exist in QuickBooks. Therefore, we should delete the step that creates an invoice in QuickBooks and replace it with a conditional step to check if the Customer exists in QuickBooks.
Our plan at this stage should look something like this:
Trigger:
When an opportunity is updated in Salesforce
Action:
If it is not ‘Closed Won’, stop recipe.
If Customer exists in QuickBooks,
– Create invoice in QuickBooks
If Customer does not exist in QuickBooks,
– Create Customer in QuickBooks and then
– Create invoice in QuickBooks
Step 2 – Create recipe and define app connections
Now that we’ve got a concrete plan, let’s now go ahead and start the creating the recipe! Click on ‘Create recipe’ and you’ll be presented with our recipe creation wizard.

Before we do anything, let’s check if our app connections are defined, or hooked up to Workato. On the top right, click on the gear icon beside your name, and click on ‘Connections’. From here, you will be able to see what connections you have already defined. We recommend you do this first so you don’t have to define them again when you’re creating your recipe.

Now, back to our recipe building.
Step 3a – Define trigger
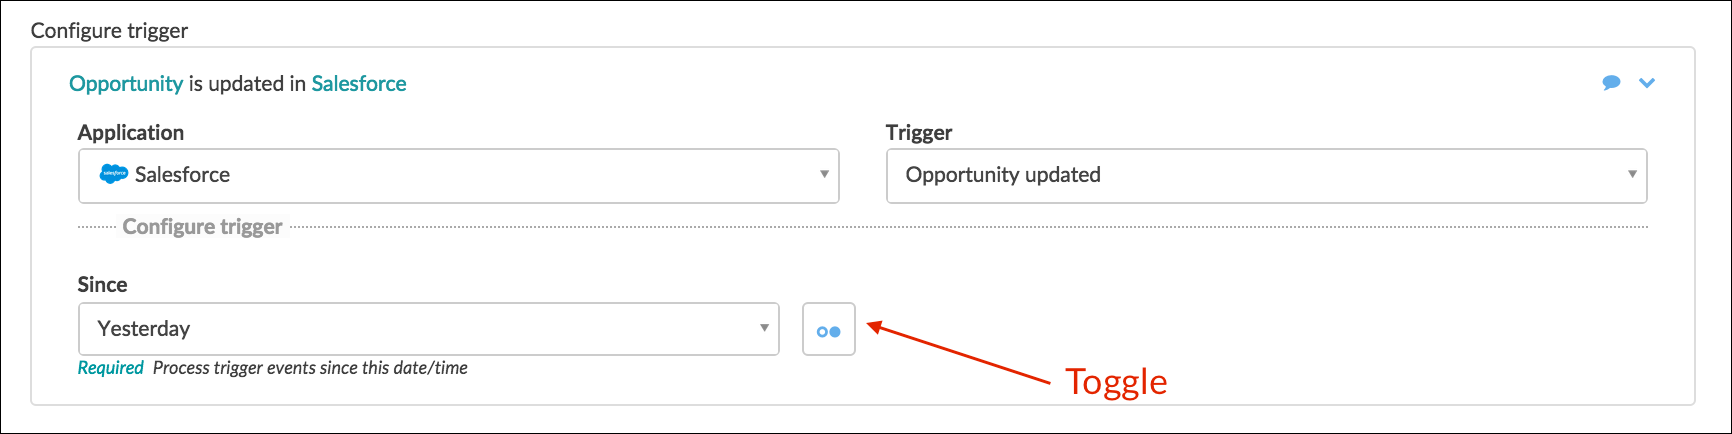
According to our plan above, the trigger is when there is an Opportunity updated in Salesforce. What this means is that any time an Opportunity is updated in Salesforce, this activity will be picked up by this recipe.
We can define the time period we’re interested in. This mostly affects the first time we run it, because after that items get picked up continuously from there. However, for the first time we run our recipe, we usually try to define this at a very short time period because we don’t want all our items to be picked up and processed into the other app.
‘Since’ parameter
There are many options on this ‘Since’ parameter. This is defining which updated opportunities we’re looking at. For example, we can choose to pick up opportunities that are updated in the last hour. We can also go to the toggle and select a specific date and time to get a finer range control over what items to be picked up. For now, let’s just pick up trigger since ‘Yesterday’.
Step 3b – Define actions
Conditional Stop
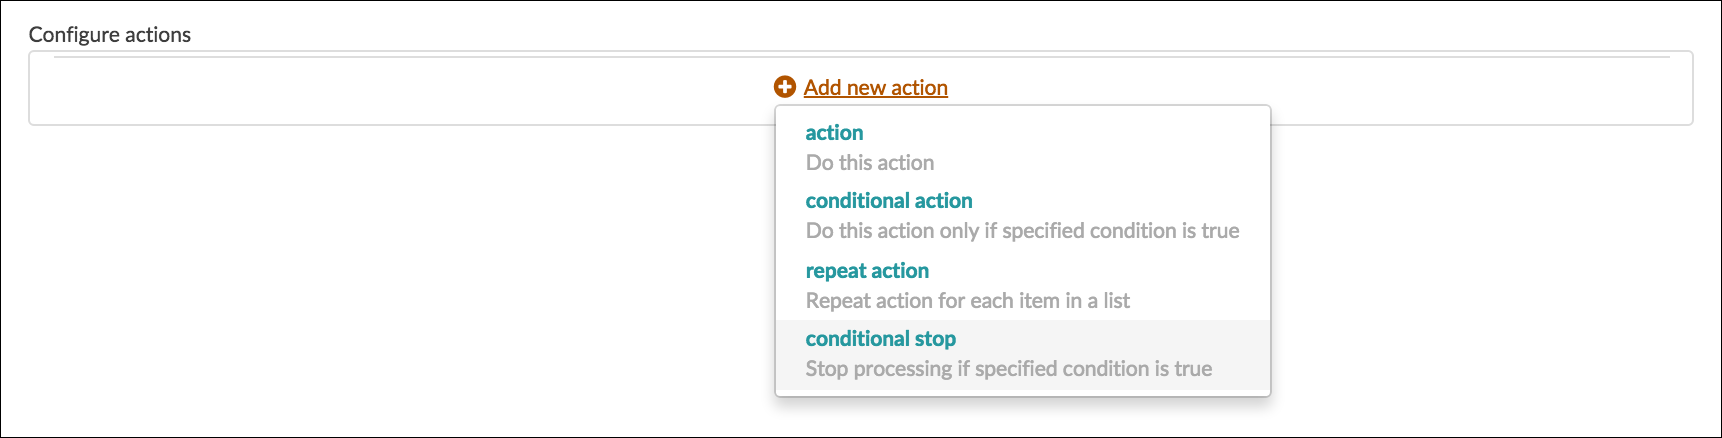
Once we’ve defined the trigger, the next thing to do is to define the actions that have to be taken when this trigger fires. According to our plan, we have to create a conditional action. The default action is a basic action, so we should delete it (from the ‘x’ on the right) and create a conditional action from the button in the middle.

In this case, our plan is to create a ‘conditional stop’ that says that “If updated opportunity does not equals to ‘Closed Won’, then stop/finish recipe”. This means that nothing happens to the updated opportunities that are not ‘Closed Won’.

‘Search’ Action
Looking back to our plan, we wanted to check if the Customer exists in QuickBooks – only then will we create the invoice in QuickBooks. Before we do that, we will have to fetch some information from QuickBooks, which is not available to this recipe at this point of time. Therefore, we’ll have to add a ‘Search customers’ step to retrieve details from QuickBooks.
For a ‘Search’ function to work, we will need a specific piece of information (eg: ids or Account name or First name etc) that corresponds with both the apps. In our case here, we know that the Customers in QuickBooks usually correspond with Accounts in Salesforce, and we can see that the Opportunity updated has an associated Account and Account name. Account name from Salesforce would be ideal for us to map as a search criteria for the ‘Search customers’ action in QuickBooks.
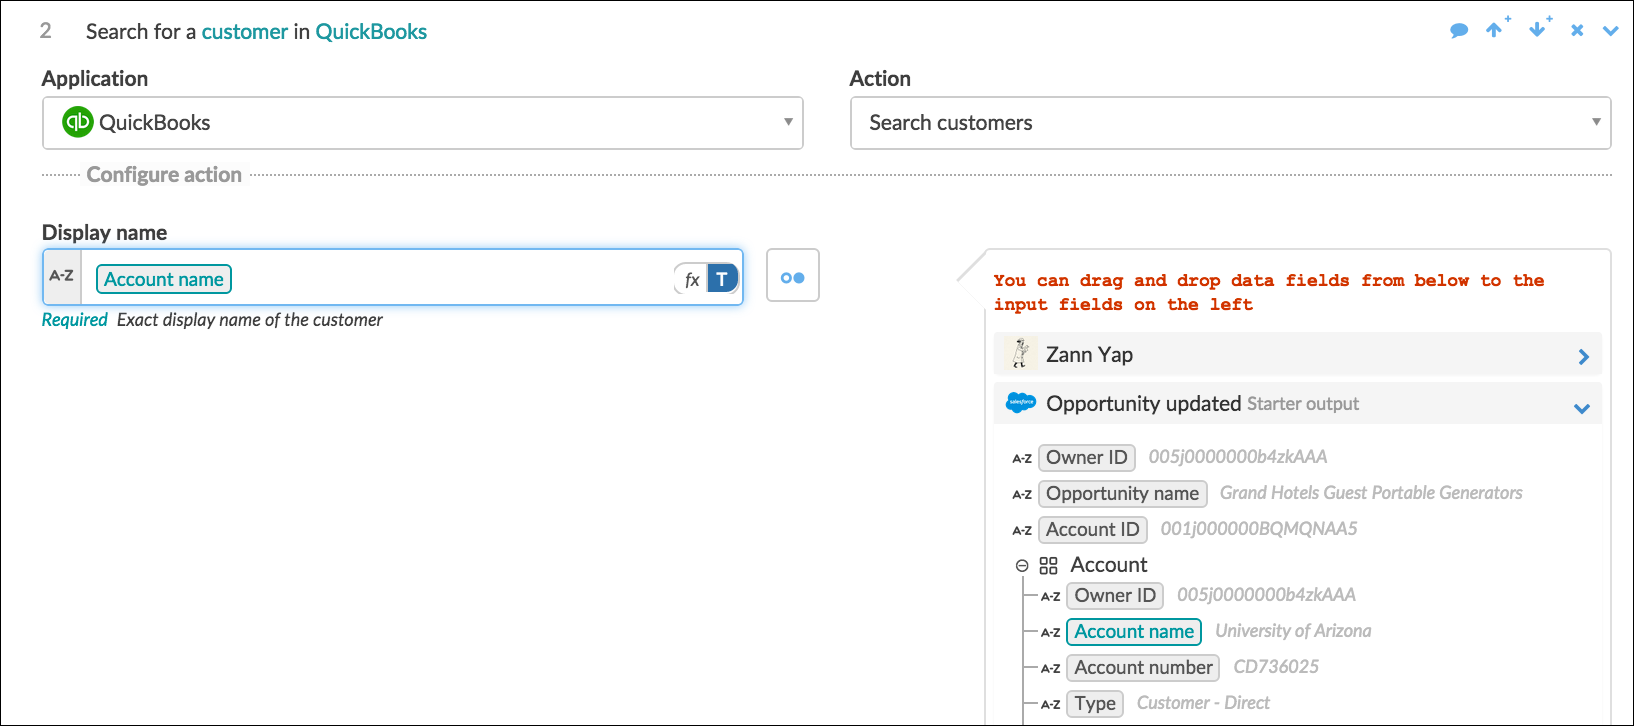
To fill up the ‘Display Name’ field, all we have to do is to click on the Account Name pill and it will be inserted into the field.
Conditional Action
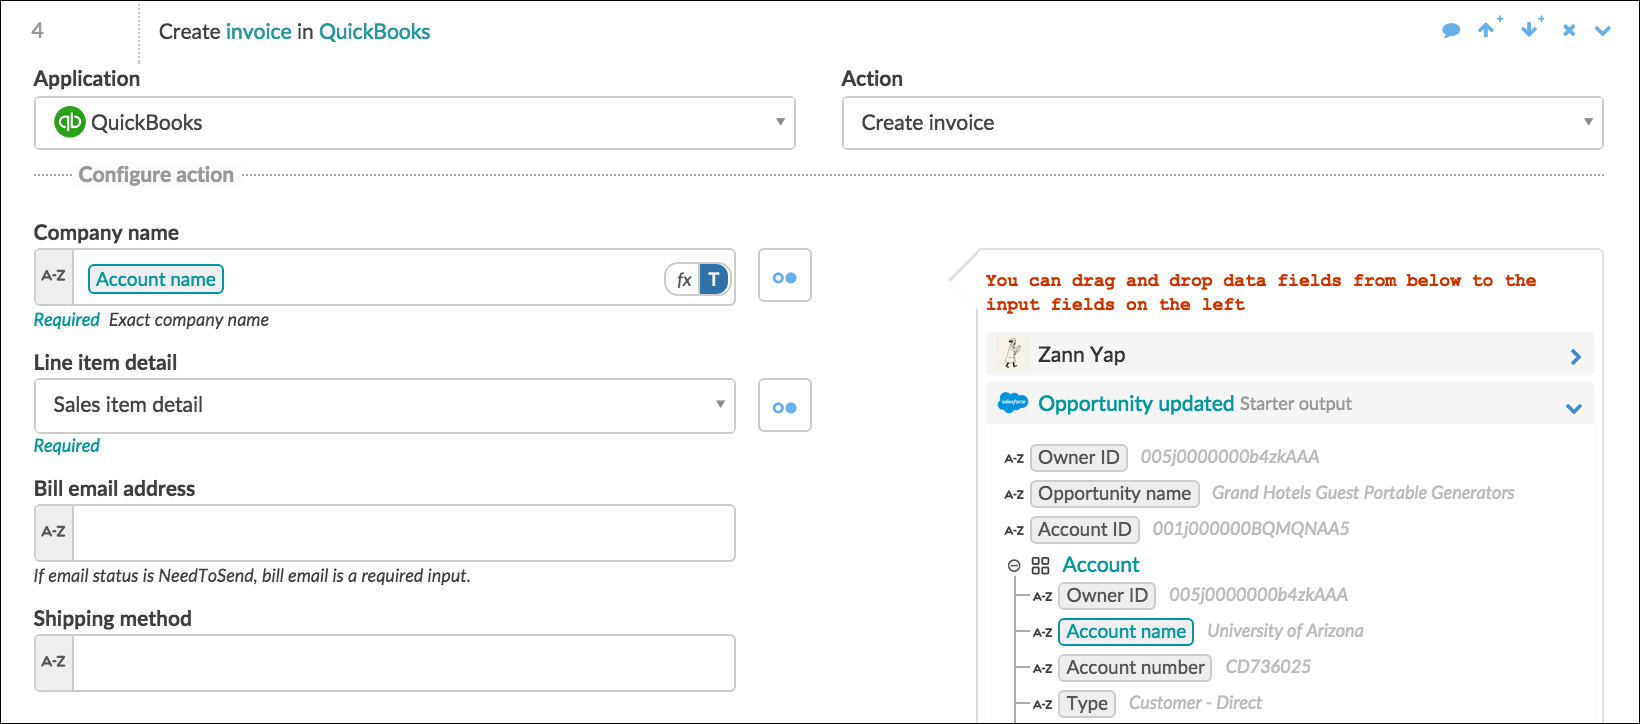
The next thing we want to do now is to have a conditional action. Note that this is not the conditional finish we used earlier. According to our plan, we will now create an action ‘If the Fully qualified name’ of the Customer is present’. After that, we will select the app again, (ie: QuickBooks), and then select ‘Create invoice’ in QuickBooks.


From here, it gives us all the fields that needs to be filled up, as well as the required fields. The little text below each field tells us whether the field is ‘required’. When we click on the ‘Company name’, it auto-populates some option on where we should fill in the data from. However, since we know the ‘Company name’ is going to come from the ‘Account name’ (and Opportunity updated) from Salesforce, we should select the fields from there, since that is the information source in this recipe.
You can map the rest of the input fields by clicking on the data fields from the right. For more information on mapping fields, watch this video.
Formula mode
Disclaimer: This is for more advanced users, especially when the data you have isn’t exactly what you want and you wish to tweak it.
In this particular example today, we’ll also make use of formula mode.
Let’s say that we’ll like the due date of this invoice to be 30 days after the ‘Close date’ of the ‘Closed Won’ opportunity. Here’s what you can do:
- Change the toggle from text mode (‘T’) to formula mode (‘fx’)
- Type “+30.days”. This means that we want the due date populated in QuickBooks to be 30 days after the ‘Close date’.

For more information on how you can make full use of this formula mode, visit this support article on formula mode to learn more.
Since this is a tutorial on how to build your first recipe, I won’t be following through to show you how to complete the remaining steps of this recipe. But the steps are roughly the same. (eg: using a conditional action and a basic action).
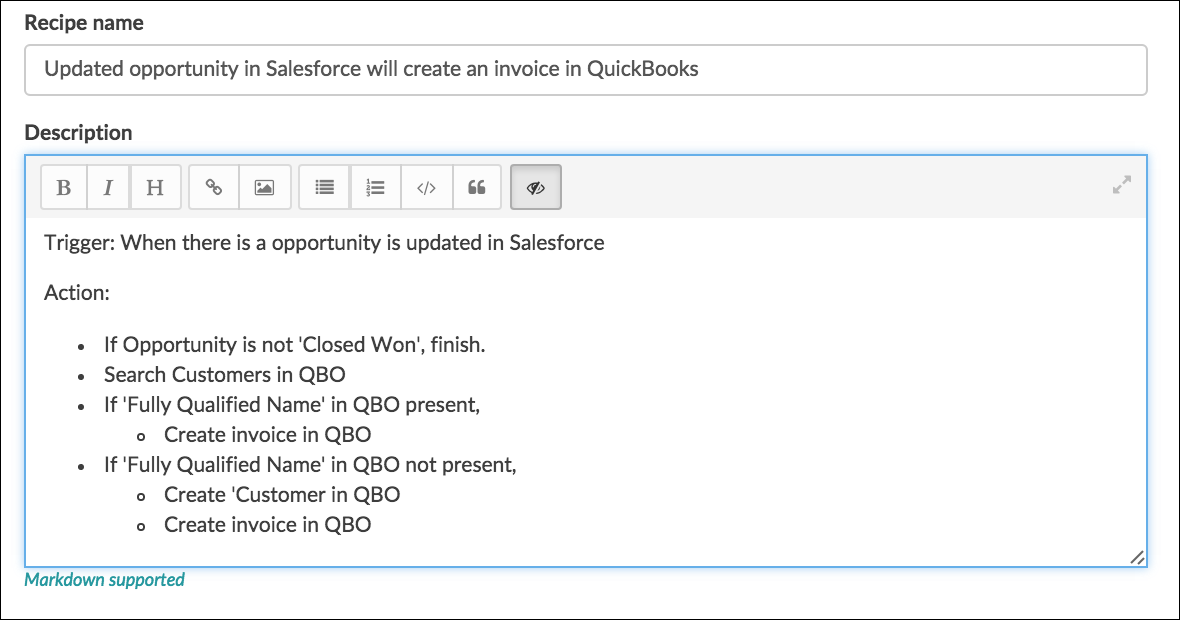
Filling in recipe name and description
After we’re done with that, we’ll go to the next tab and double check to see if the connections are good. The next thing we see is the form to fill in the recipe name as well as the description. It is sometimes auto-generated for you, but best practice is to change it to something you like. Plus, it is markdown supported, so feel free to get creative with that.
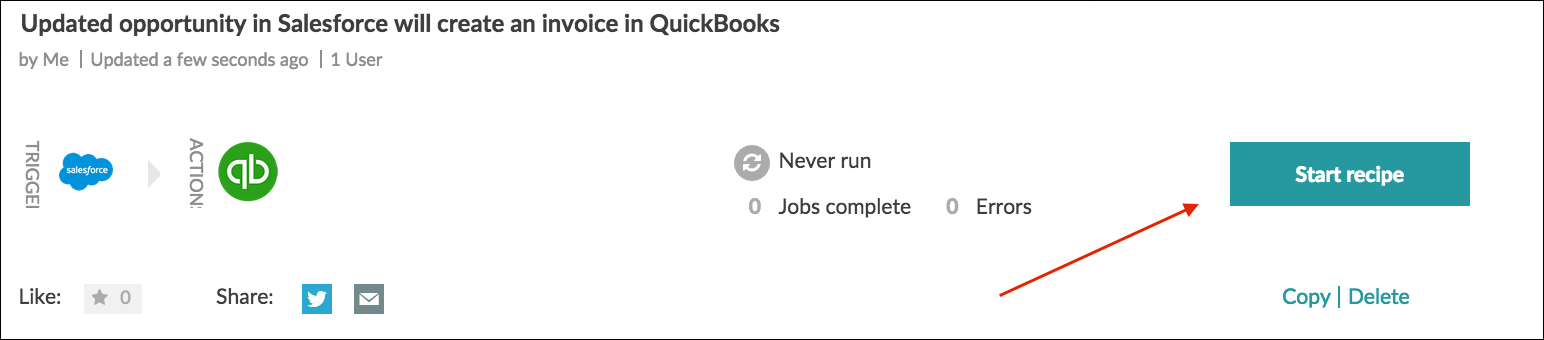
Step 4 – Start recipe!
Once you’re done, the recipe usually has an auto-save function, but just to be sure, you should save it before running it. [Quick tip: hit ‘r’ and then ‘s’ on your keyboard and the recipe will be saved.]
Click on start to run it. What the recipe should do now is to pick up a bunch of Opportunities we’ve created. [Another quick tip: hit ‘r’ and then ‘r’ on your keyboard to run your recipe.]
Step 5 – Check recipe jobs
The jobs will show up in a few seconds when the recipe has ran some successful jobs and you can go in and see what actually happened and which step(s) the recipe has done.
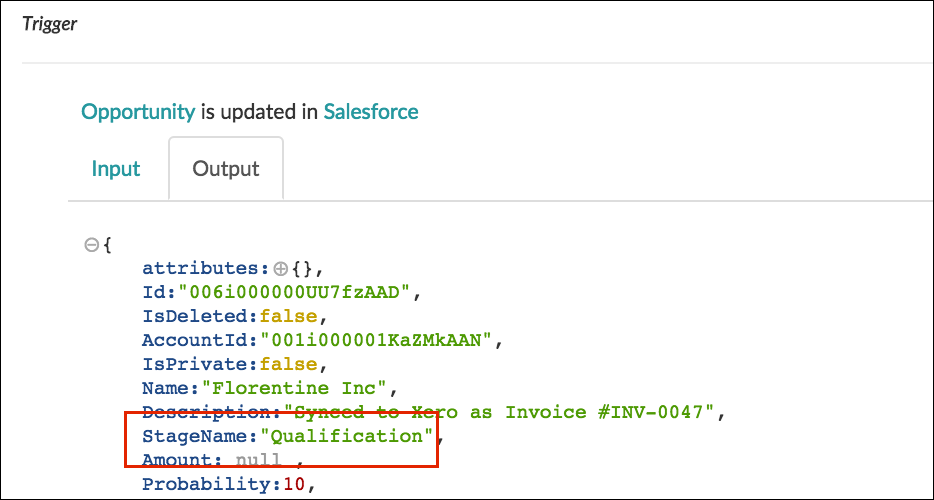
In the first job in our example, we can see that the recipe stopped at the trigger.

We can even click into the job history to dig in further to find out what happened. From here, we see that the Stage Name is ‘Qualification’ and the recipe indeed ended because the Opportunity is not ‘Closed Won’.
On the other hand, in the second job, we see that an invoice is successfully created in QuickBooks. You can even go into your QuickBooks account to double check if the data fields are properly transferred over.

And there you go! Congratulations – you’ve built your first recipe! If you need further help, let us know in the comments below, or email us at support@workato.com.