 Related: A guide to integrating REST APIs
Using Callable Recipes In Other Recipes
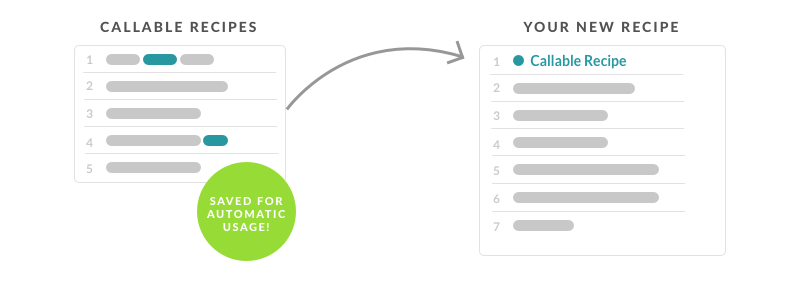
There are certain steps in a recipe that are often repeated in other recipes, such as the logic for error handling. Now, instead of building out the same 5 steps in each of your recipes, you can save time and make recipe creation easier with a Callable Recipe for Recipe Building. Think of callable recipes like a library of recipe sections that you can grab and insert into a recipe whenever you want to. Some common recipe sections that make useful Callable Recipes include expense approval, auto-provisioning accounts in your apps, the notification process when things are not working correctly, and error handling to name a few. Making these recipe sections pre-made and readily available to insert into recipes not only makes recipe building faster, but ensures consistency in your business processes while reducing complexity in your recipes. Let’s take a look at an example to see how this works. Say you want to automate the process of creating an invoice in Quickbooks Online (QBO) when an opportunity is closed-won in Salesforce. In order to create a QBO invoice, you’ll need to create a new customer if the customer does not already exist in QBO. Now, this snippet of logic: “creating a customer in QBO when they don’t already exist,” is a process that is necessary not only with your Salesforce to QBO integrations, but also when you have Point Of Sale (POS) transactions flowing into QBO, invoices you receive from your vendors and more. Instead of recreating the logic for “creating a customer in QBO when they don’t already exist,” you can make this snippet of logic into a Callable Recipe. Related: 5 examples of API integration Step 1: Create the Callable Recipe Create a recipe and set the trigger as “Receive request” from the “Callable Recipe” connector. *Originally the app was called “Workato Recipe” it is now called “Callable Recipe.” Setup the action to create the customer in QBO if it does not exist and to reply back with the Customer ID.
 Your Callable Recipe is now ready to go and looks like this:
 Step 2: Calling the Recipe Created in Step 1 into a New Recipe
Now that we have created a Callable Recipe, let’s see how this is used in a new recipe that will create an invoice in QBO when an opportunity is closed-won in Salesforce.
Step 2: Calling the Recipe Created in Step 1 into a New Recipe
Now that we have created a Callable Recipe, let’s see how this is used in a new recipe that will create an invoice in QBO when an opportunity is closed-won in Salesforce.
 You’ll notice that Step 1 in Actions is the callable recipe titled, “Call ‘Create QuickBooks Customer if customer does not exist‘ recipe.” These Callable Recipes make your recipe shorter and easier to read. If you want to make a change to the logic in one of these processes, you would only have to make the change in one place (to the callable recipe) and all of your recipes will automatically be updated, making you and your business more agile.
Calling Recipes from Other Apps with REST API
Enabling a REST endpoint for recipes makes it available to be called by any application, internal or external, as long as they have the API token to do so. The token ensures the security of your API. Choosing to build simple web and mobile apps using Workato and a REST Endpoint takes out a majority of the custom coding that would be involved and ensures a fast turnaround. There are two ways you can use a REST Endpoint:1. Bring Information Into An App
You can connect any app that has an API available with a REST Endpoint even if Workato doesn’t have a connector for that app. For example, if you want to bring in information from Zillow.com so you know how much a real estate property is worth, you can create a REST Endpoint that will populate your fields in QuickBase every time an employee run the recipe.You can also create a button that will start the REST Endpoint recipe. You can place the button wherever you would like, for example inside of Salesforce, so employees can tell the recipe to run without logging into Workato.
2. Send Information Out Of An App
Another scenario where this is useful is monitoring a supply chain – you could have a business partner call upon the REST endpoint you created to track shipping or generate a report via a link on your internal website. You can embed this anywhere you want. Let’s look at the same example we used previously. To enable REST endpoint for the recipe, all you need to do is set the REST endpoint as true and then provide the additional information as shown below. To manage the REST endpoints and the API tokens, go to “Service Catalog” under your username on the right hand corner of the screen. Here, you can easily test your REST endpoints and find the specific URL used to call the REST API. These screenshots will show you a more detailed view of REST API management:
That’s it!
As you can see from the above, creating Callable Recipes is a breeze. These will help you create sections of business logic that you can use with other recipes and applications, expand your automation capabilities, and increase your productivity!
To manage the REST endpoints and the API tokens, go to “Service Catalog” under your username on the right hand corner of the screen. Here, you can easily test your REST endpoints and find the specific URL used to call the REST API. These screenshots will show you a more detailed view of REST API management:
That’s it!
As you can see from the above, creating Callable Recipes is a breeze. These will help you create sections of business logic that you can use with other recipes and applications, expand your automation capabilities, and increase your productivity!