
What are trigger conditions?
Trigger conditions are further guidelines added to a specific trigger that filters what type of trigger events should be selected for processing.
Related: How to use IF and IF/ELSE conditions to control the flow of a recipe
In our previous Workato for beginners article, we covered how to build a recipe with triggers and actions. We built an automation for escalating support cases — regardless of priority — to engineering teams by connecting Salesforce and Jira.
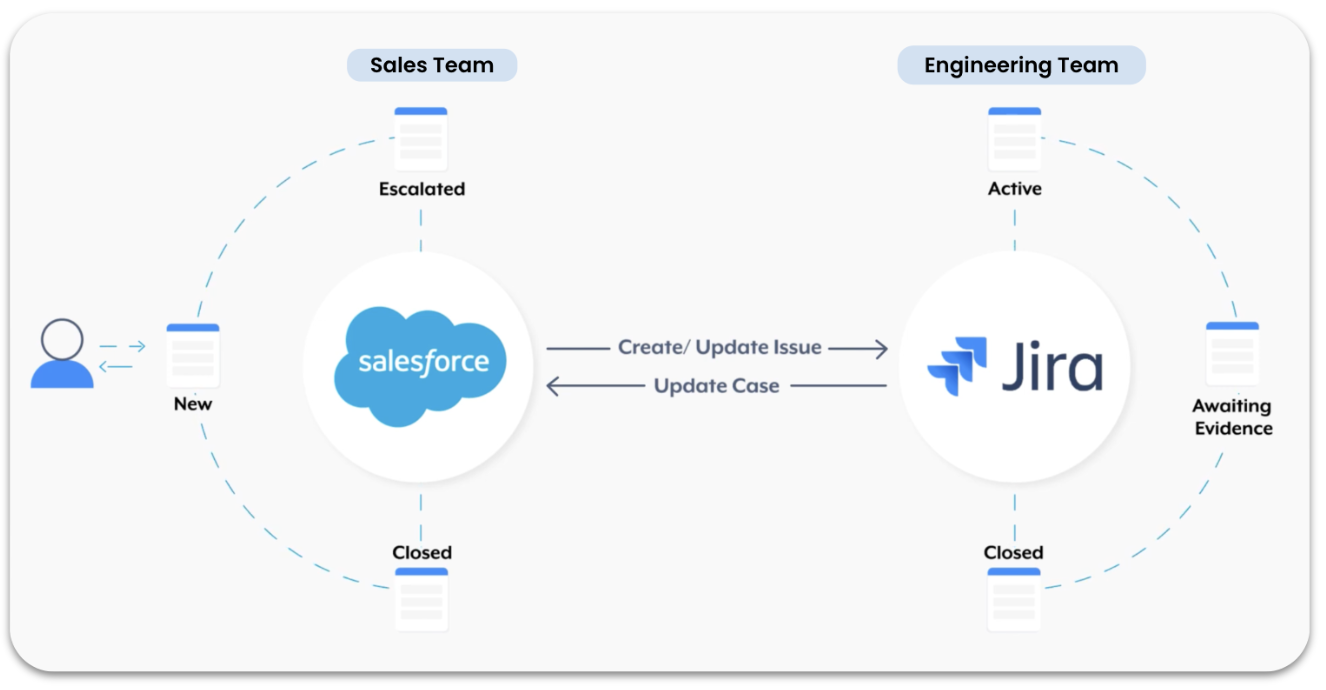
Recipe: Escalating cases from Salesforce to Jira
In this iteration, we want to create escalations for cases that truly need the engineering team’s immediate attention — aka, only cases that are of top priority. With the use of trigger conditions, we are able to filter trigger events and only create a Jira issue for cases that are:
- Case type:
Problem - Priority:
High
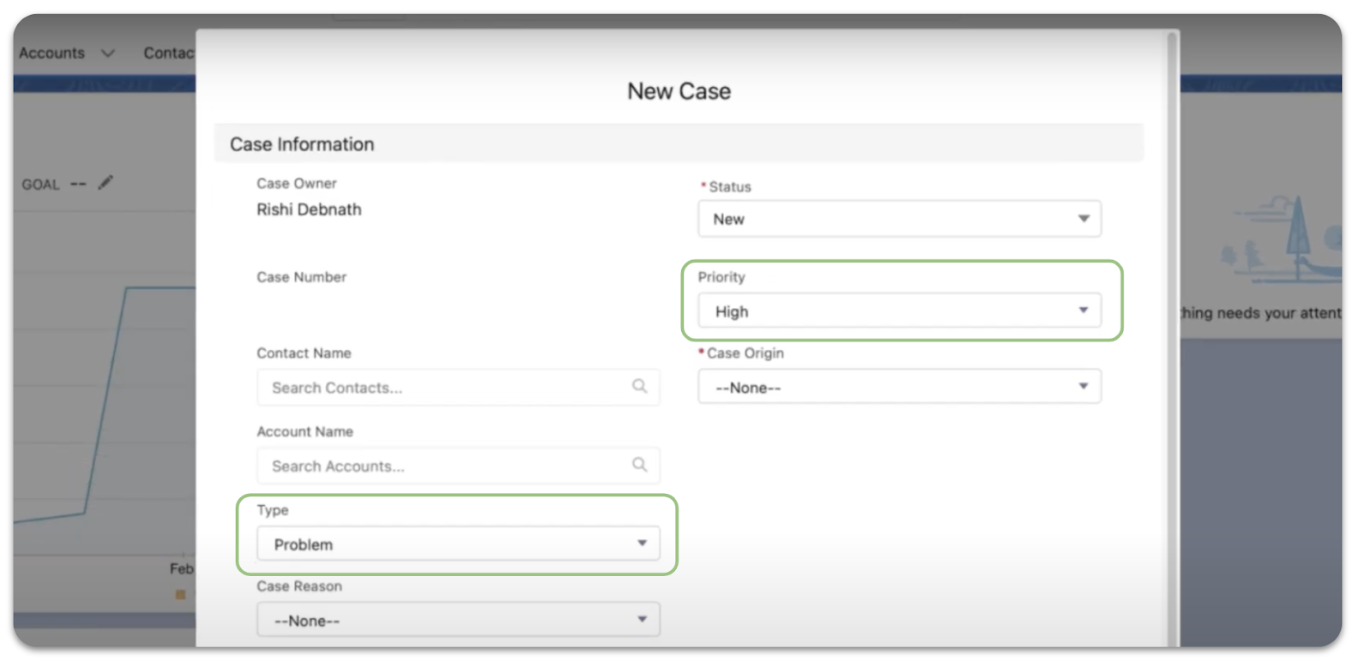
Cases that are — Type: Problem, Priority: High — in Salesforce
How to create a trigger condition
As mentioned above, I want to only process trigger events that have two trigger conditions:
- Case type:
Problem - Priority:
High
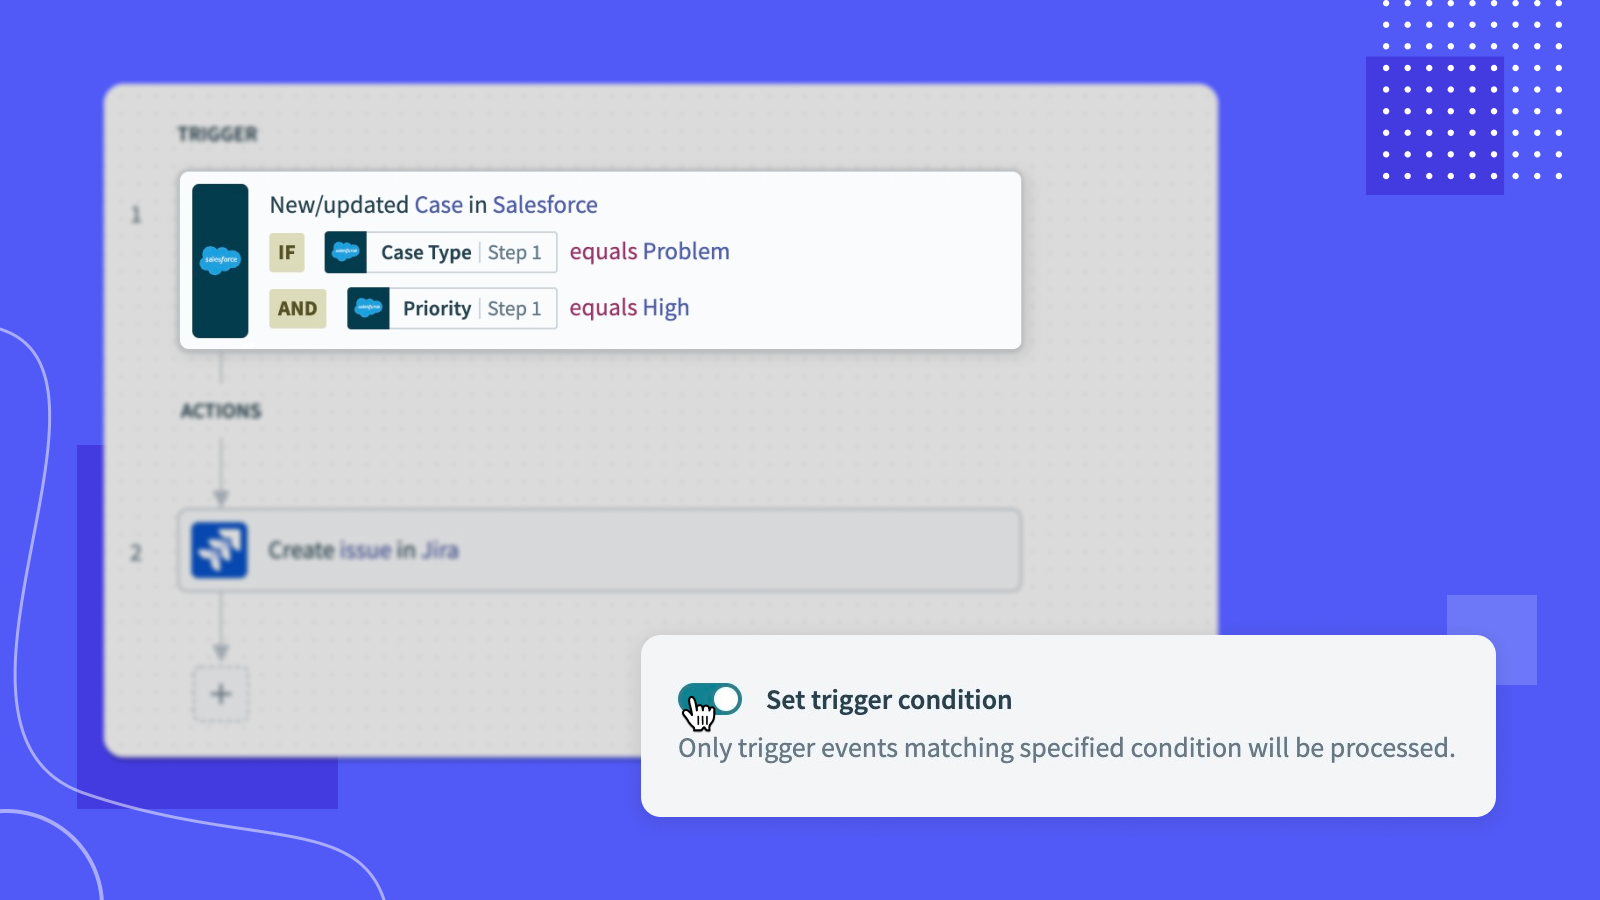
First, let’s navigate to the trigger section of the recipe and turn on the toggle that reads Set trigger condition.

Set trigger condition
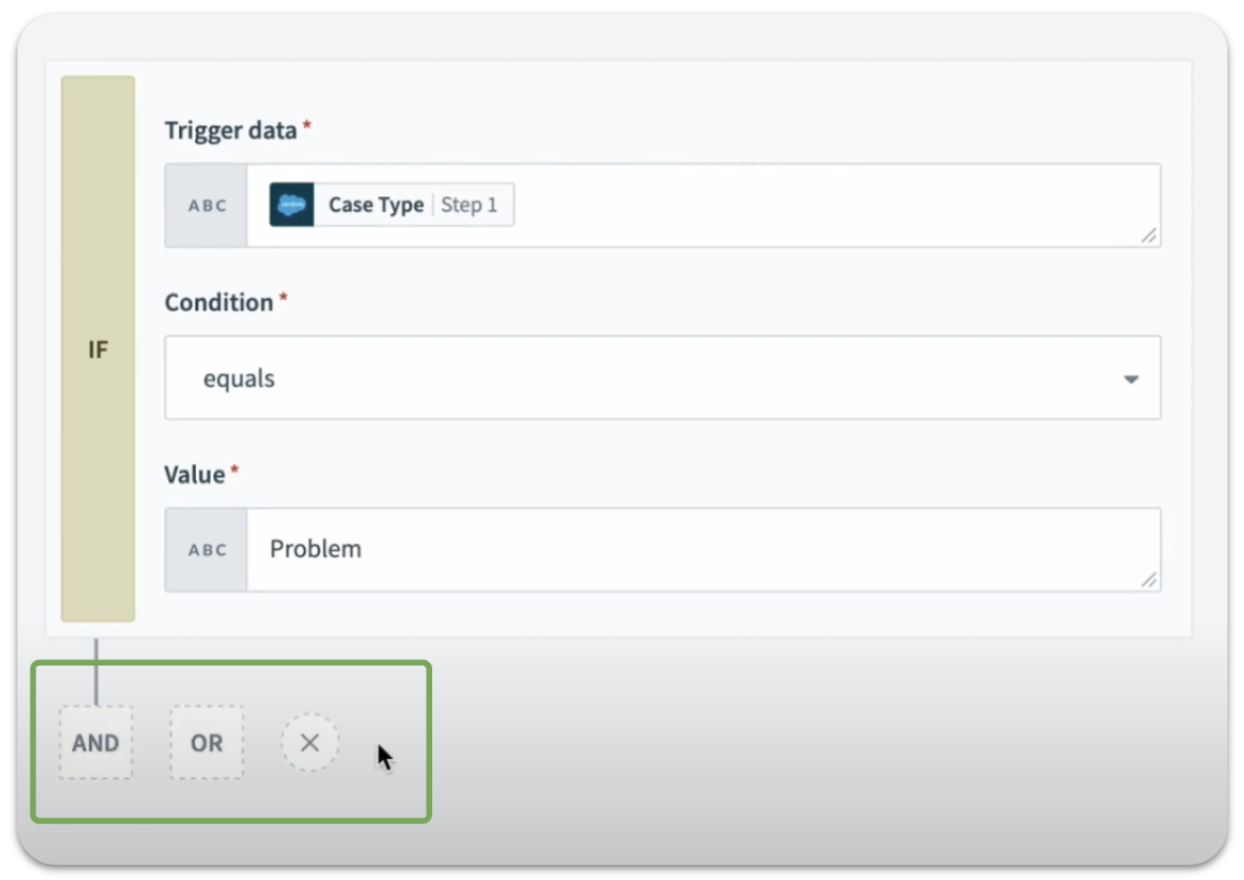
Step 1: Set up your trigger conditions
Trigger condition 1: Case Type = Problem
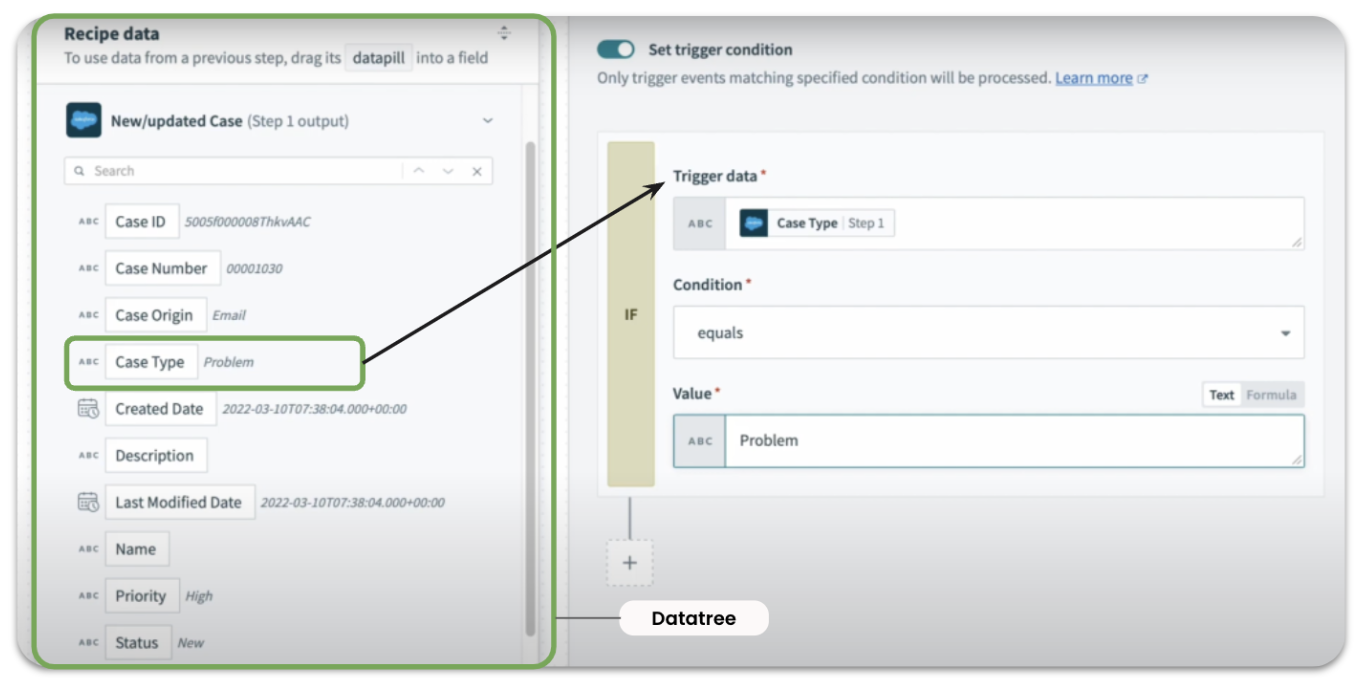
To set up your first trigger condition, select the relevant trigger data from the datatree that will appear when you click on the empty field. The datatree displays the different datapills that can be used to formulate your trigger condition.
In this case, I will select the data pill, Case Type as the trigger data.
As I want only events with Case Type = Problem to be selected for processing, I will define the condition as equals and the value as Problem.
To summarize the configuration:
- Trigger data: Case Type
- Condition: equals
- Value: Problem
Note that values are case sensitive and should be exact.
Configuring first trigger condition where Case Type = Problem
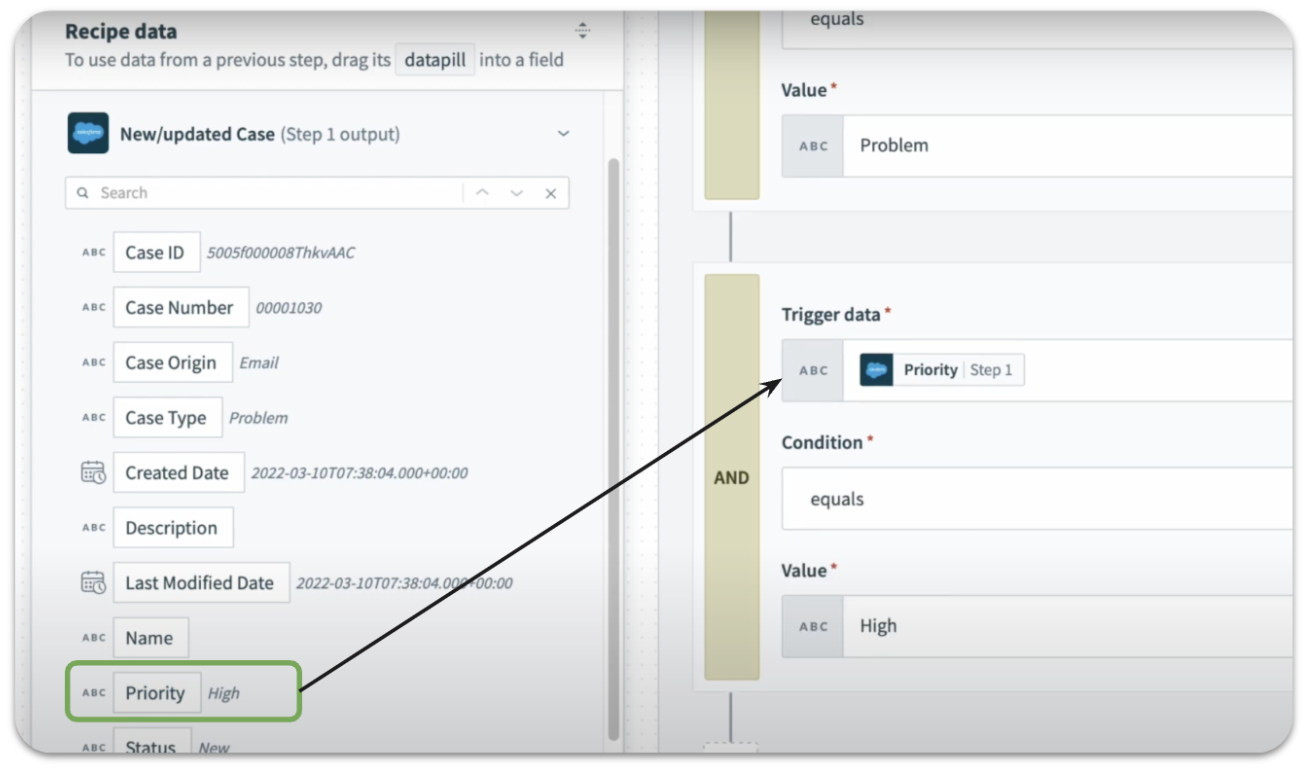
Trigger condition 2: Priority = High
Next, I will click the plus button below to add a trigger condition for Priority. I can select AND, which will require both conditions to be met, or I can select OR, to specify that only one condition needs to be met.
Since I want to check for both Case Type and Priority I will select AND.
Setting up the second trigger condition
Here, the trigger data will be Priority, our condition will be equal, and the value will be High, which is the value that will be tested.
To summarize the configuration:
- Trigger data: Priority
- Condition: equals
- Value: High
Configuring second trigger condition where Priority = High
Now that you have set up both conditions, the trigger condition here ensures that only cases of type Problem and that are High priority are escalated to the engineering team by creating an issue in Jira.
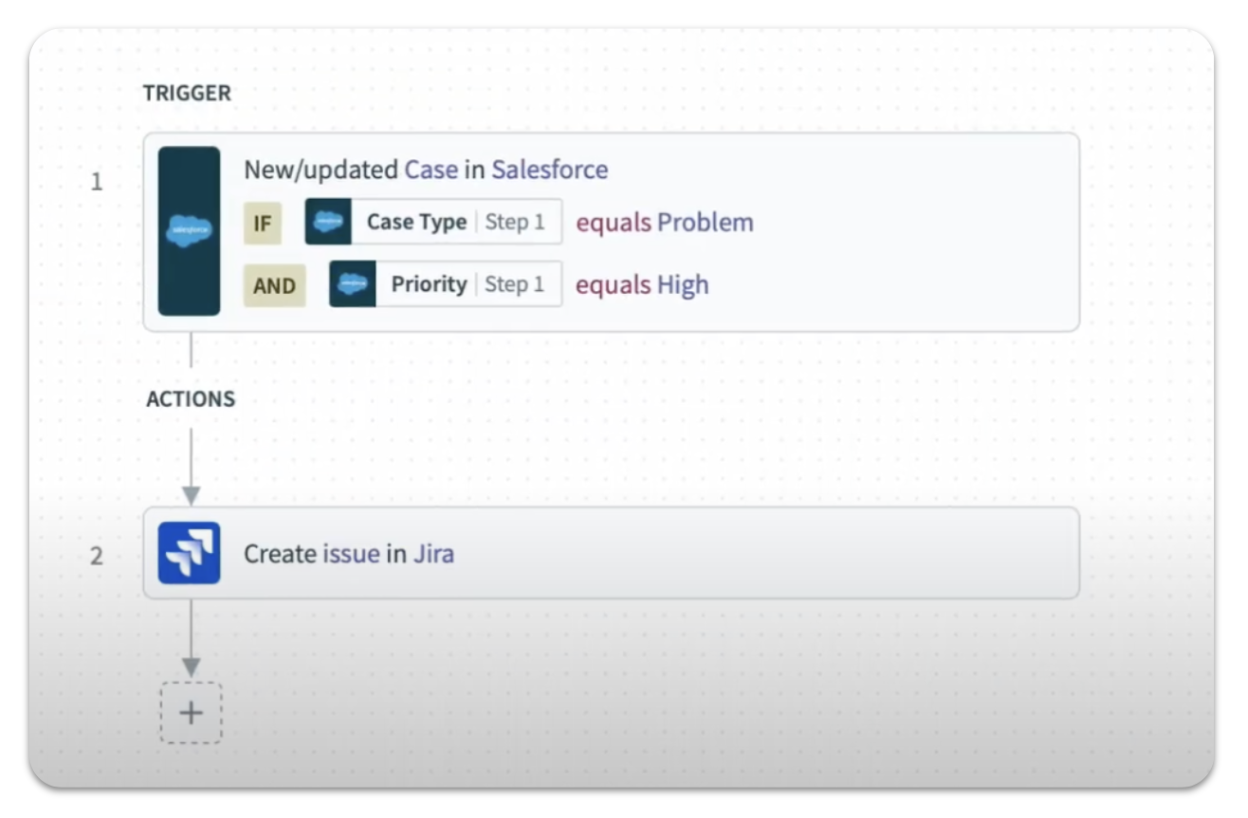
Trigger conditions summary
Step 2: Test your recipe
When trigger conditions are not met
To test if the trigger conditions are working, let’s see what happens when I create a new case in Salesforce of type Problem and Medium priority.
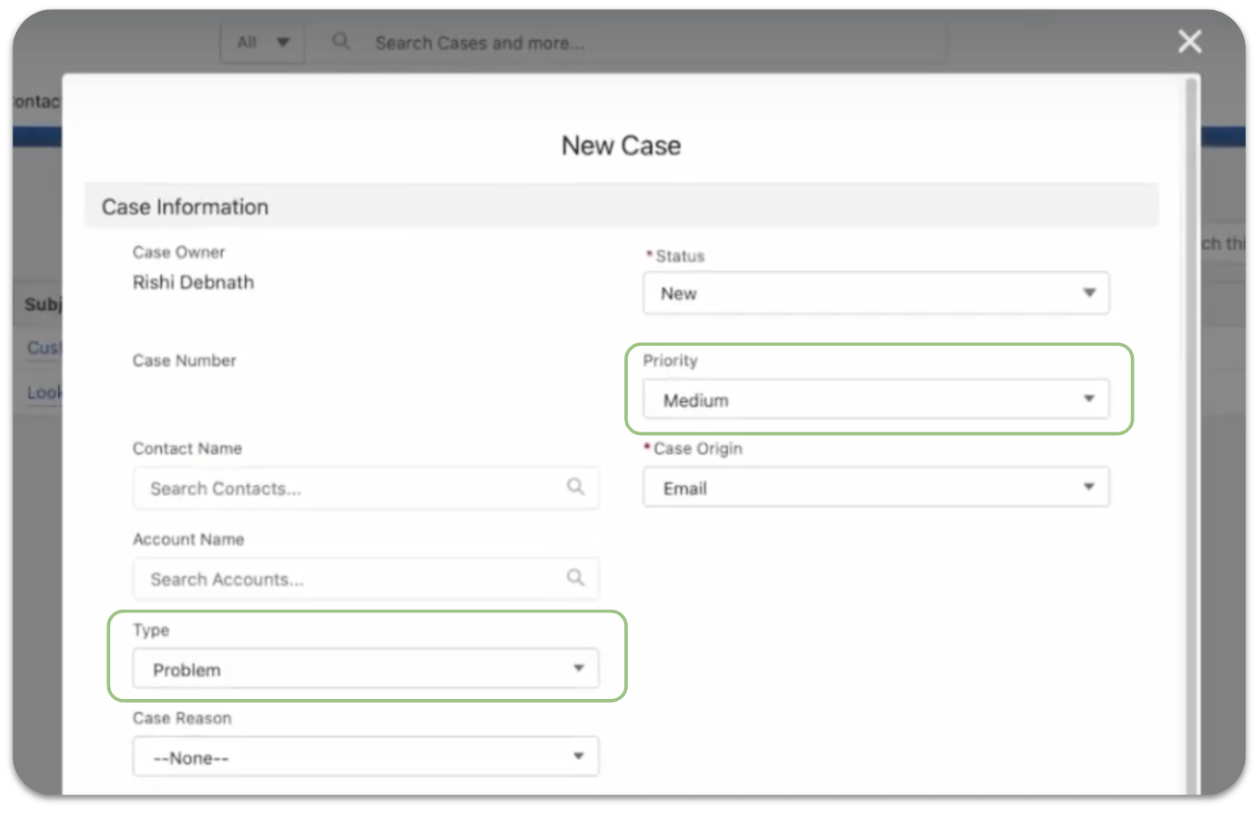
New Salesforce case: Type = Problem, Priority = Medium
After creating the new case, let’s now go back to the recipe. To test the recipe, click Test at the top to see if the trigger catches any activity to trigger the recipe.
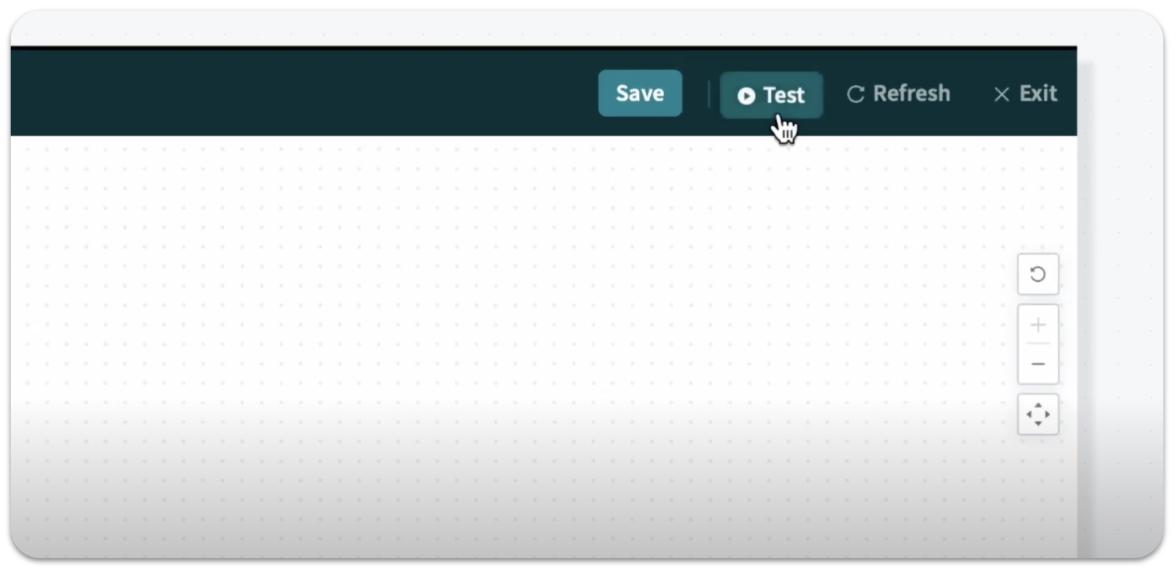
Test recipe button
As the priority of the new case we created in Salesforce is Medium, we should see that the recipe has not found a trigger event since it does not match our trigger conditions — High priority and case type of problem.
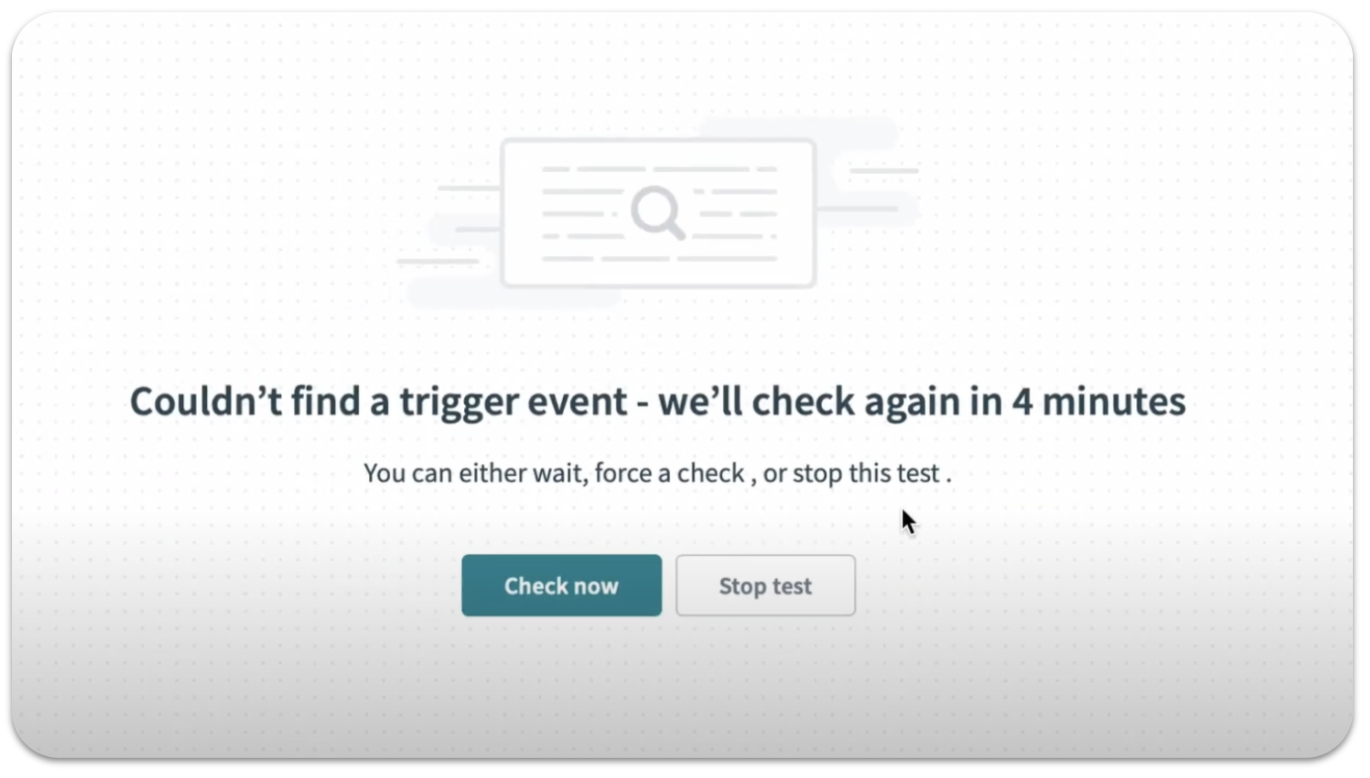
Trigger condition not met, trigger event not found
When trigger conditions are met
Let’s say the case priority has changed to High because issues weren’t resolved. We’ll go back to Salesforce and update the case to be marked as high priority in order to kick off the automation.

Salesforce case priority changed to High
To test the recipe again, go back to the recipe test and click “check now” to look out for any new trigger events.
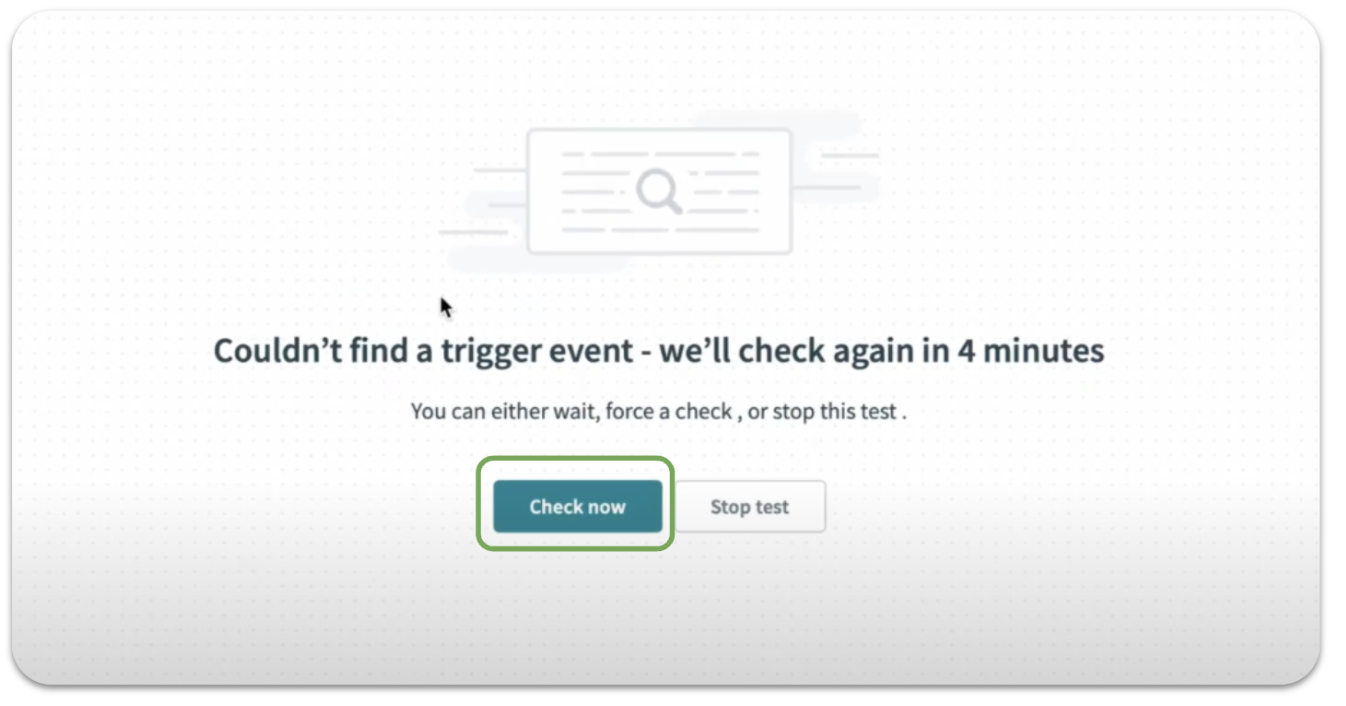
Click “Check now” button to test recipe again
As the trigger conditions are met, you should see that the trigger was processed and the recipe was successful. The recipe picked up the edited Salesforce case with the Case ID: 5005F000008U2e5AAC
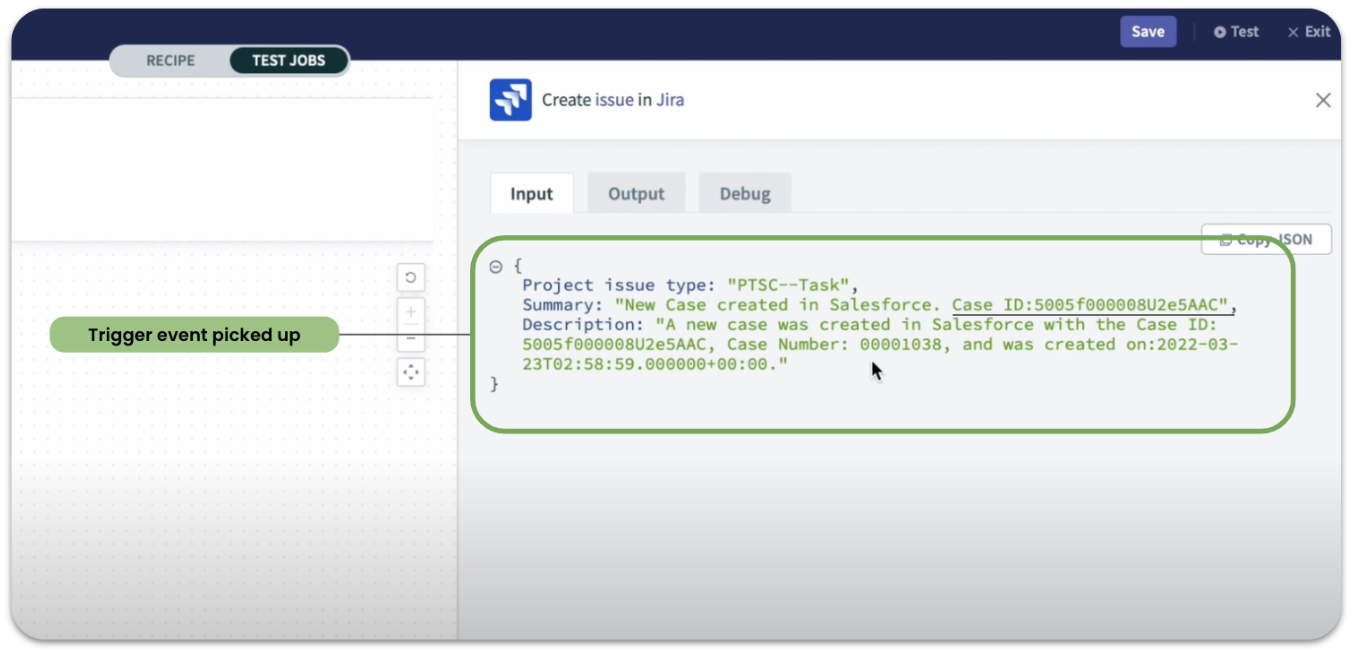
Trigger event picked up
To double-check, we can go to Jira to validate, and we can see that a new issue in Jira with the same Case ID was created since it met our trigger conditions.

New issue created in Jira
Learn more about Trigger Conditions
You can easily use any combination of trigger conditions to define your business rules when processing events. To learn more, read the full documentation on trigger conditions.
Other methods to control the flow of your recipe
Besides trigger conditions, conditional actions also allow you to add more logic to your recipe flow to create more precise automations. Adding IF and IF/ELSE conditions to your recipe allows you to build decision points into an automation.
Read up on all the different types of conditions you can create in Workato.
Browse other Workato for Beginners resources:
- Getting started with your workspace
- Setting up your first project
- Create a new app connection
- How to build your first recipe
- How to create a Bi-directional Sync