
If you’ve ever wished that your AI assistant could connect to your tools — and not just answer questions — this tutorial is your starting point.
In this post, you’ll learn exactly how to configure an MCP server in VS Code so your AI assistants can securely work with real data from your business systems.
What is an MCP Server?
A Model Context Protocol (MCP) server is a program that bridges AI assistants like Claude and ChatGPT with your business tools, such as GitHub, Salesforce, internal databases, or other operational systems. The MCP site describes it as a “USB-C port for AI,” offering a standardized way for AI to safely access external systems.
MCP Architecture
MCP uses a client-server model where your AI application (the MCP host) coordinates and manages one or multiple MCP clients that connect one-to-one with MCP servers, like dedicated phone lines for each tool.
Two layers power this:
- The data layer uses a JSON-RPC 2.0-based exchange protocol that defines the message structure and semantics to handle what gets exchanged: connection initialization, connection termination between clients and servers, capability negotiation, and the actual functionality.
- The transport layer manages how information travels, either with stdio for local processes or HTTP for remote servers, handling security, authentication, and message delivery.
Core Components of MCP servers
MCP servers expose three key primitives that make AI actionable:
- Tools are executable actions, such as querying databases, creating calendar events.
- Resources provide context, like file content, database schemas, or API responses.
- Prompts are reusable templates that structure AI interactions.
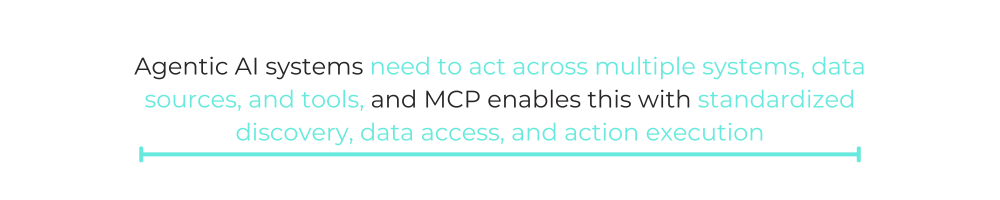
Why MCP Servers Matter for Agentic AI
Agentic AI systems need to act across multiple systems, data sources, and tools, and MCP enables this with standardized discovery, data access, and action execution. It also keeps humans in control through sampling (i.e., servers can request AI completions) and elicitation (i.e., servers can ask for user input or confirmation).
Since you now know what an MCP server does and also why it matters for today’s Agentic AI systems, let’s explore how you can configure and use one yourself.
How to set up an MCP Server
In this section, we’ll walk through setting up a GitHub MCP server in VS Code so AI assistants like GitHub Copilot agent can have direct access to your GitHub account.
Why GitHub? It’s one of the most popular MCP servers and demonstrates the core concepts of the tech beautifully. Plus, the setup process is straightforward and mirrors how you’d configure other MCP servers.
Once you understand how to set up the GitHub MCP server, you’ll have the foundation to connect AI to virtually any tool in your tech stack.
Ready? Let’s get started!
Prerequisite
First off, make sure that you’ve got:
- Visual Studio Code (version 1.101+) installed on your machine (tested with version 1.106.1).
- A GitHub account. If you don’t have an account, create one here.
Now that we’ve got those out of the way, let’s begin.
Step 1: Create the MCP configuration structure
First, you need to create a special folder and file that VS Code will use to manage your MCP servers:
- Launch VS Code and then choose a project folder where you want to use the GitHub MCP server.
- In your project’s root directory, create a new folder called .vscode (yes, with the dot at the beginning).
- Inside the .vscode folder, create a file named mcp.json
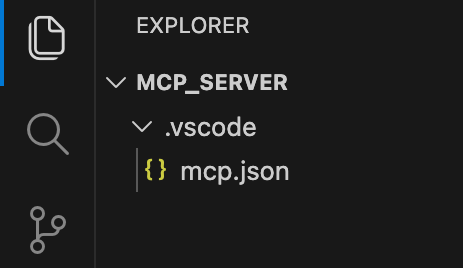
Your folder structure should now look like the image above.
Step 2: Add the GitHub MCP Server.
Now comes the fun part! VS Code has a nice built-in way to add MCP servers:
- Look for and click the “Add server” button in VS Code (this should appear when you’re on the mcp.json file).
- When prompted, select “NPM Package” from the dropdown options.
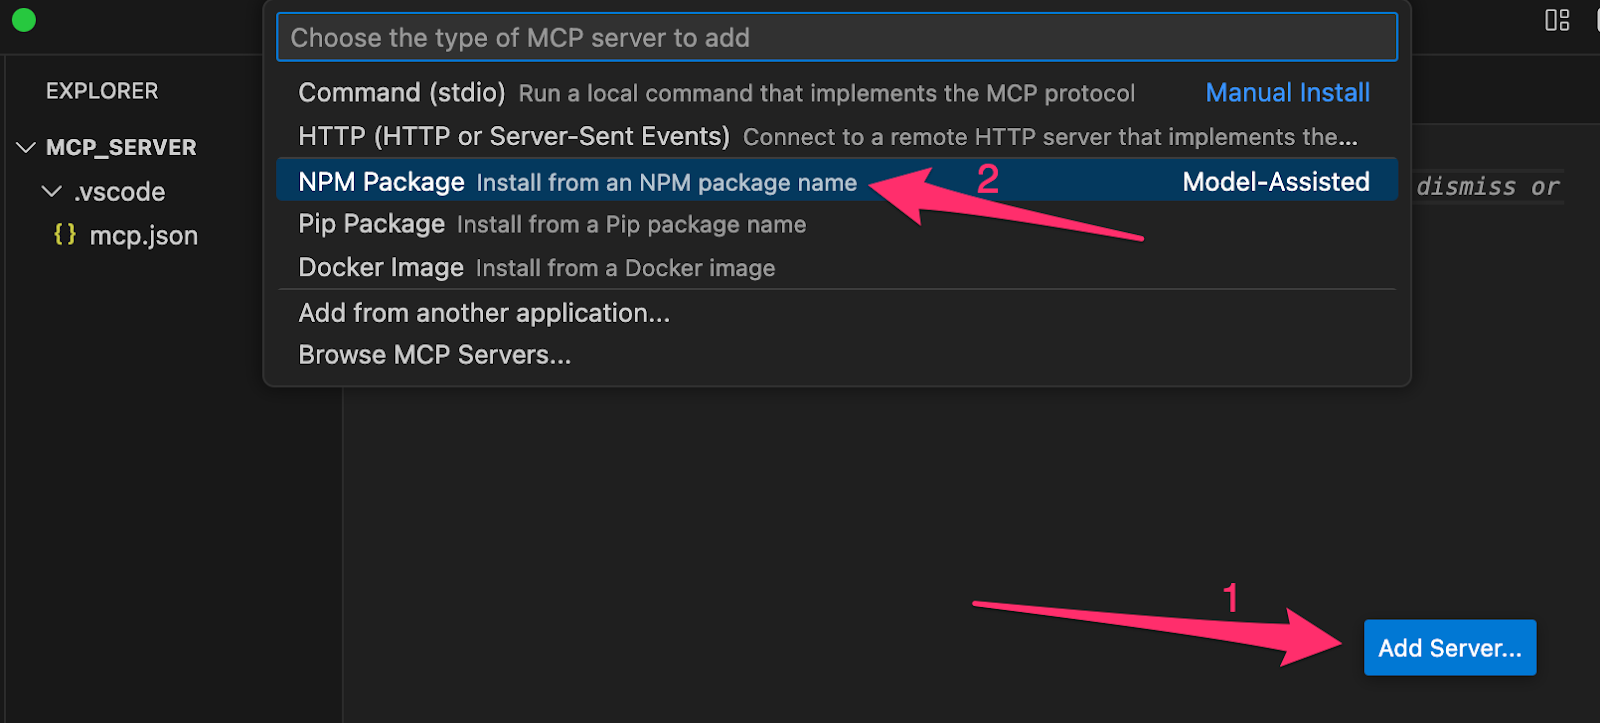
- A text field will appear asking for the package name. Type in exactly: @modelcontextprotocol/server-github and press Enter
- When the confirmation prompt appears, click “Allow” to proceed.
- Next, you will be prompted for your GitHub Access Token. Press “Escape” to cancel. We’ll configure this manually in the next step.
After this, VS Code will automatically configure the basic setup for you and populate your mcp.json file with the necessary configuration.
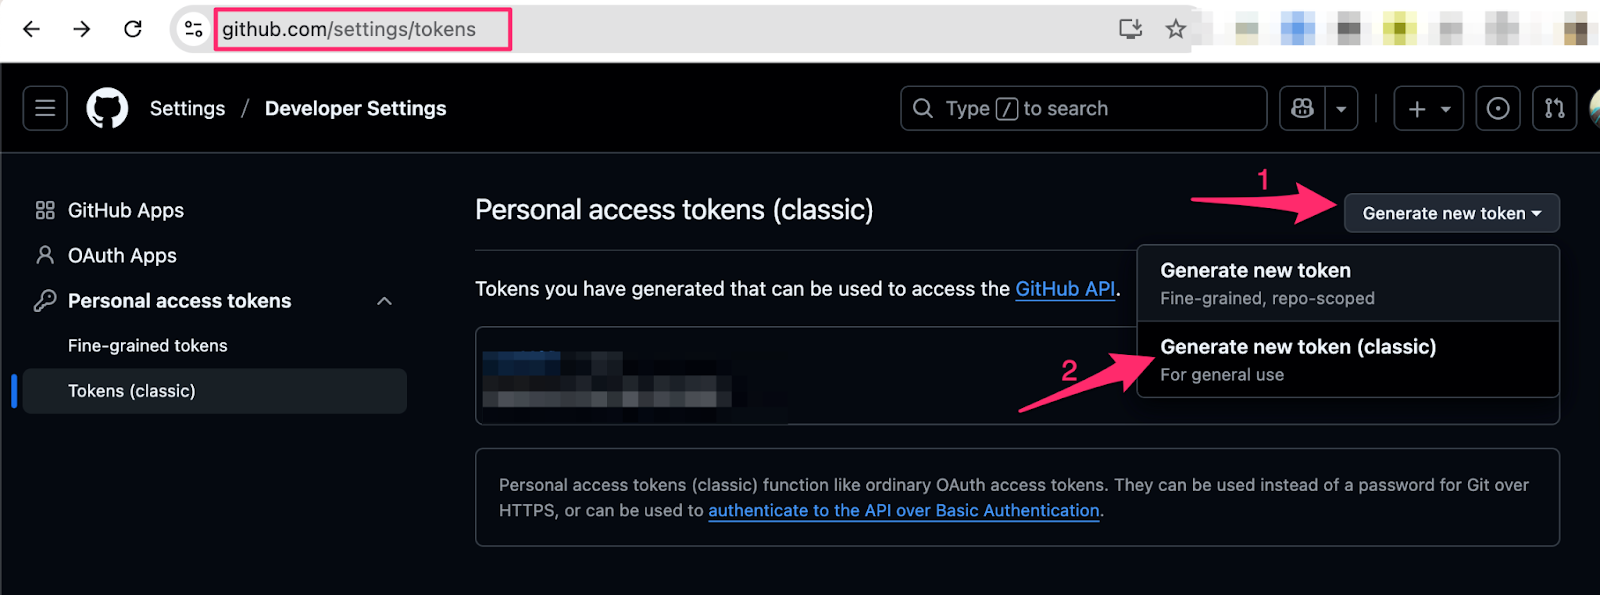
Step 3: Create your GitHub personal access token
To allow the MCP server access to your GitHub data, you need to grant it permission. Here’s how to do that:
- Log in to your GitHub account and go to the token creation page.
- Click the “Generate new token” button (preferably, choose “Generate new token (classic)”).
- Give your token a descriptive name like “VS Code MCP Server” or any text that describes your aim. I use “testMCP” for mine.
- Select the scopes/permissions your server needs. For most use cases, you’ll want:
- Repo (full control of private repositories)
- Read:org (if you work with organization repos)
- user (read user profile data)

- Scroll down and click “Generate token”
- Important: Once the token is generated, copy it immediately! GitHub only shows it once, and you’ll need it in the next step.
Step 4: Add your token to the configuration
We’re almost there! Now, it’s time to connect everything:
- Go back to VS Code and open your mcp.json file
- You should see a placeholder that looks like “<YOUR_TOKEN>” or similar.
- Replace the entire placeholder (including the angle brackets) with your actual GitHub token from step 3.
Your configuration should look something like this:
“`json
{
“servers”: {
“github”: {
“command”: “npx”,
“args”: [
“-y”,
“@modelcontextprotocol/server-github”
],
“env”: {
“GITHUB_PERSONAL_ACCESS_TOKEN”: “<YOUR_TOKEN>”
},
“type”: “stdio”
}
},
“inputs”: []
}
“`
For security reasons, never commit this file with your real token to version control, and ensure to add .vscode/mcp.json to your .gitignore file.
Step 5: Test your connection
You’re all set! Now, let’s make sure everything works:
- Restart VS Code to ensure the MCP server initializes properly.
- Open GitHub Copilot or your AI assistant in agent mode.
- Try a prompt that requires GitHub access, like:
- “Show me my recent pull requests.”
- “Summarize the latest commits.”
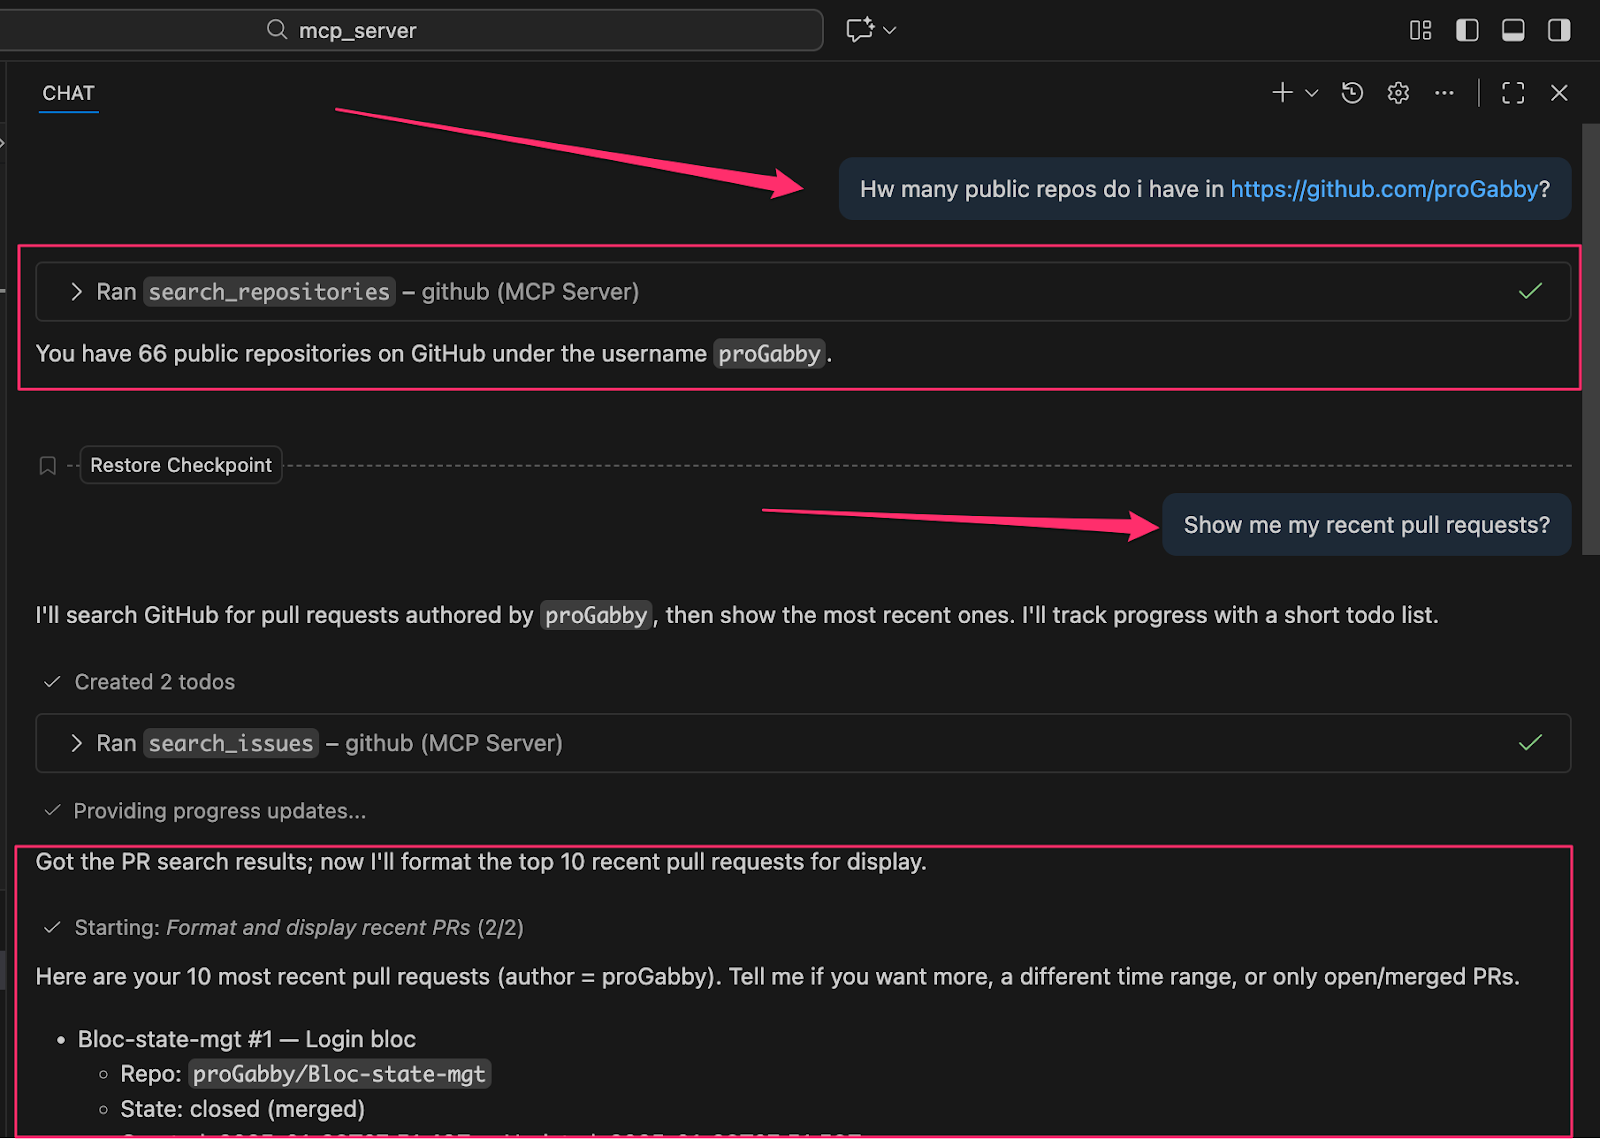
If everything is configured correctly, the AI assistant should be able to fetch and display information from your GitHub account like in the screenshot above.
Common issues and troubleshooting tips
Here are some common hurdles you might run into during this process and how to fix them:
1. Authentication failures
If this occurs, your token likely has spaces or is incomplete. Classic tokens start with gph_, so check and copy it fresh from GitHub without any extra characters.
2. Access denied errors
If you see this, you didn’t grant enough permissions. Go back to GitHub token settings and enable at least the repo scope for repository access.
3. Server won’t start
Server not starting? Check that your file is named exactly mcp.json (not mcp.json.txt) and it is directly inside .vscode. Also, scan for JSON syntax errors; missing commas and brackets are common culprits.
Scaling AI across the organization with Workato Enterprise MCP
The GitHub MCP server works great for developers. But what if you want to connect AI across your entire business?
Workato Enterprise MCP extends MCP beyond single tools, letting AI assistants like Claude securely access multiple systems with enterprise-grade security, governance, and human oversight.
Real-world use cases
Here are some real examples of how Workato Enterprise MCP helps teams work faster with AI:
- Workato Enterprise MCP helps sales teams create better outreach faster. With it, AI pulls insights from emails, summarizes Gong calls, and researches customer sites, thereby turning hours of work into seconds, with reps approving every action before it’s carried out.
- With Workato MCP, AI assistants can deliver daily briefings to leaders that unify KPIs from sales, finance, HR, and ops with market news for real-time governed insights.
- Product teams can also ship faster, since it enables AI assistants to check GitHub commits, Jira, and other tools simultaneously and point out risks while still allowing oversight from the team.
- Marketers often can’t link campaign spending to revenue. Workator Enterprise MCP lets AI combine CRM, automation, and ad data to connect campaigns to the pipeline, summarize results, and suggest smarter budgets to boost ROI.
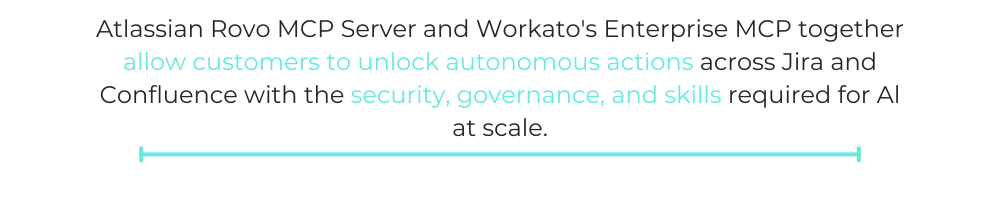
As Alan Braun (VP Product Ecosystem, Atlassian) notes: “Atlassian Rovo MCP Server and Workato’s Enterprise MCP together allow customers to unlock autonomous actions across Jira and Confluence with the security, governance, and skills required for Al at scale.”
Explore hundreds of pre-built, secure enterprise MCP servers at Workato and see how easily you can create your own to power AI across your business.
Here’s to unlocking the full promise of agentic AI!
This post was written by Inimfon Willie. Inimfon is a computer scientist with skills in Javascript, NodeJs, Dart, flutter and Go Language. He is very interested in writing technical documents, especially those centered on general computer science concepts, flutter, and backend technologies.