

If there’s one central truth in data processing, it’s “garbage in, garbage out”. Poor quality input leads to poor outcomes, so cleansing and validation are vital in any data pipeline. This is even more true when you need to bring together data from multiple sources.
Take the example of marketing leads. If our leads are all coming from a single source, like Hubspot, we can apply some in-platform validation rules. For example, Hubspot will check that an email address is valid before allowing a form to be submitted. However, as we expand our marketing efforts, we’ll need to handle leads from a variety of sources, including gated content, event registrations, and in-person conferences. Each source may apply different validation rules, or none at all. To maintain quality, and prioritize the best leads from every source, we need to centralize cleansing and validation into a unified pipeline, bringing all of our leads into a standard format, subject to the same validation rules.
A great way to do this is by creating an API that can handle leads from any source, and apply a standard set of cleansing and validation rules. By creating a dedicated service for validation, we gain some major advantages:
- Validation rules can be developed once, and applied to data from all sources. Lead sources can be added or removed at any time without additional development.
- If we do want to change or improve how we validate leads, we have a single place to manage those changes. This makes it easy to put basic validation rules in place quickly, and then improve the process over time.
To show you how to do this, we’re going to build a basic lead validation API, using Workato’s API platform to host the service, and data transformation formulas to perform cleansing and validation.
How to do it
Assets
For this project, we’ll need to create the following assets:
- A master API recipe to handle the validation flow
- Three callable recipes:
- Email cleansing & validation
- Name cleansing & validation
- Date standardization & validation
- A connection to a Snowflake database (or any other DB)
Main validation recipe
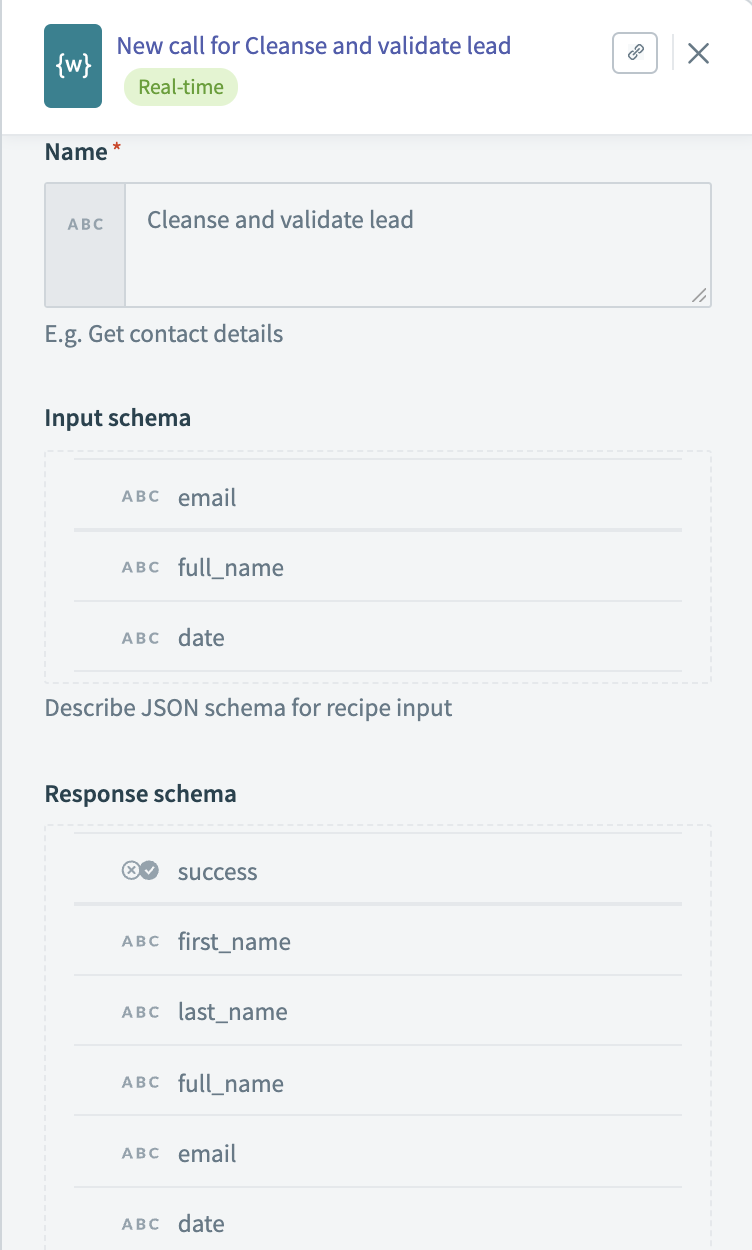
Our main recipe will handle incoming requests to the validation API and return a response. A key task here is to carefully define our input and output schema, as these will define how every other service will interact with our validation API.
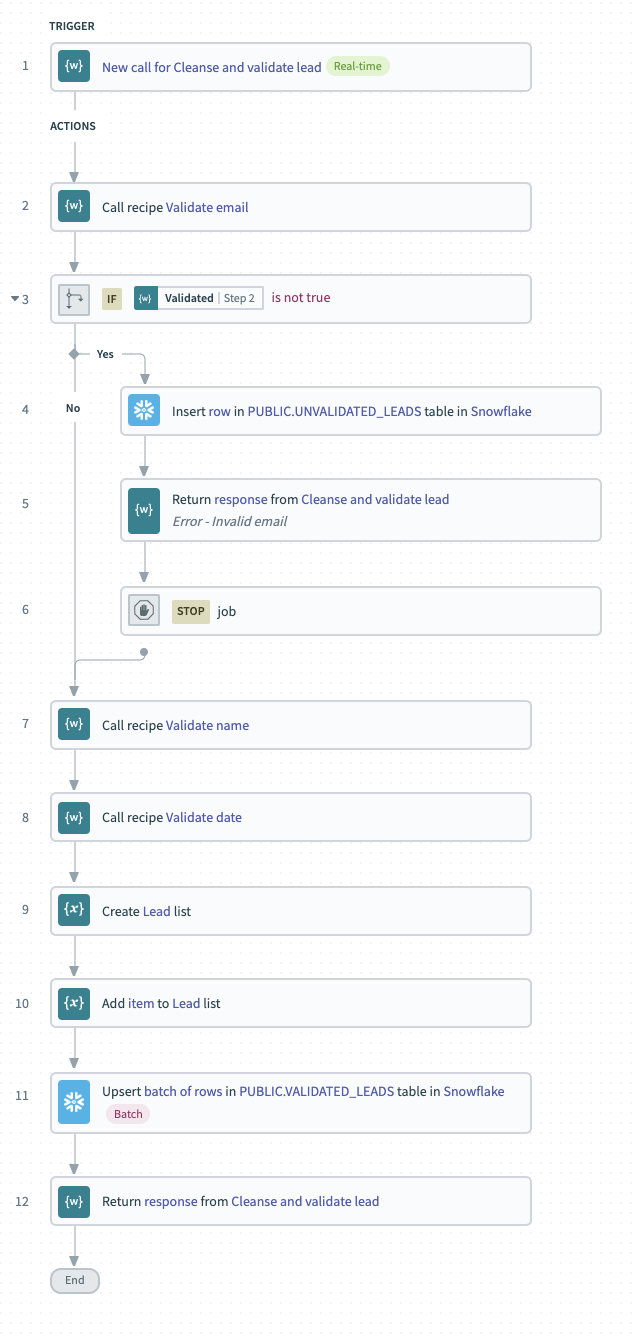
The main recipe will call each of our three validation recipes in turn. If the lead fails validation, we’ll add it to a table of unvalidated leads in Snowflake. If validation succeeds, we’ll add it to a master table of validated leads.
Validate an email
Without a valid email address, our lead has little value, since we won’t have any way to contact the lead, or to get further information from enrichment sources. To make sure we capture as many valid leads as possible, we’ll approach email validation in two stages:
- Cleansing stage – fix any obvious errors or typos in the email address, like whitespace characters
- Validation stage – check that the cleansed email address is valid
Cleanse input
For our cleansing stage, we’ll use formulas to make three changes to the input email:

- Using the
gsubformula, strip out any whitespace
- Using
gsub, correct for the common@@typo by replacing@@with@ - Convert all alpha characters to lowercase with the
downcaseformula. Email is not case sensitive and this standardization will make our validation step simpler.
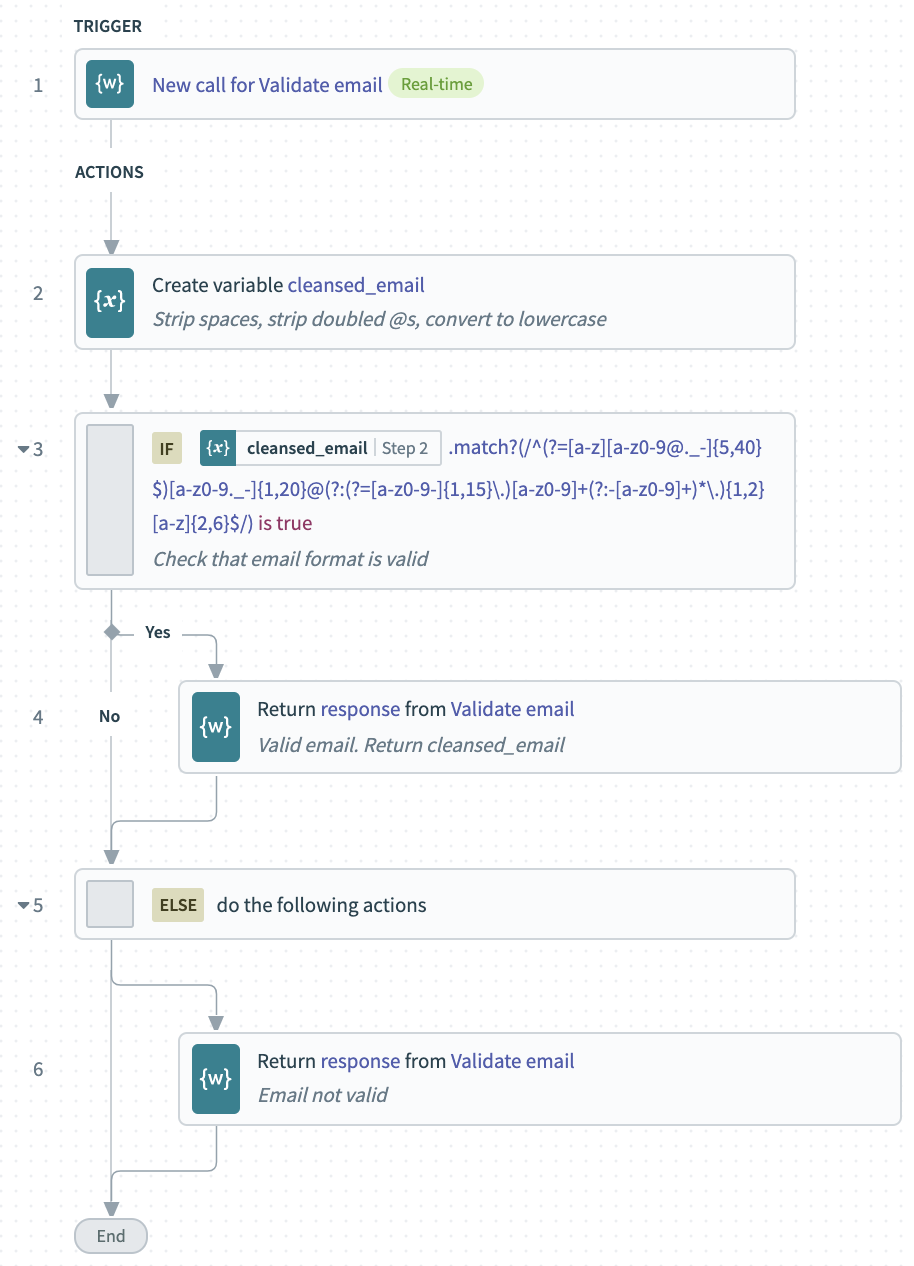
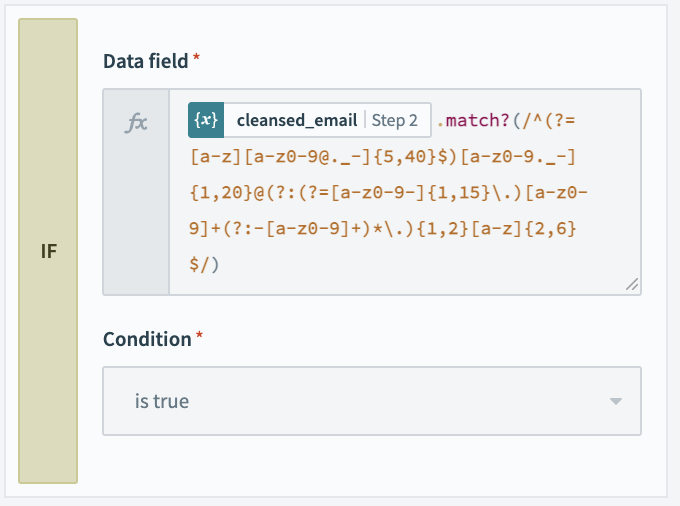
Validate input
In the validation stage, we’ll take our cleansed email address, stripped of obvious errors and typos, and see if it matches the requirements of a valid email. The simplest way to do this is by using the match formula. The match formula can compare any string to a regular expression to see if it matches a given pattern.
Regular expressions can be a little tricky to write, but fortunately there are public resources available, and browser-based tools for testing them. If you’re not comfortable writing regular expressions, just search for one that looks like it matches your needs and make sure to try it out with a few test values.
Validate a name
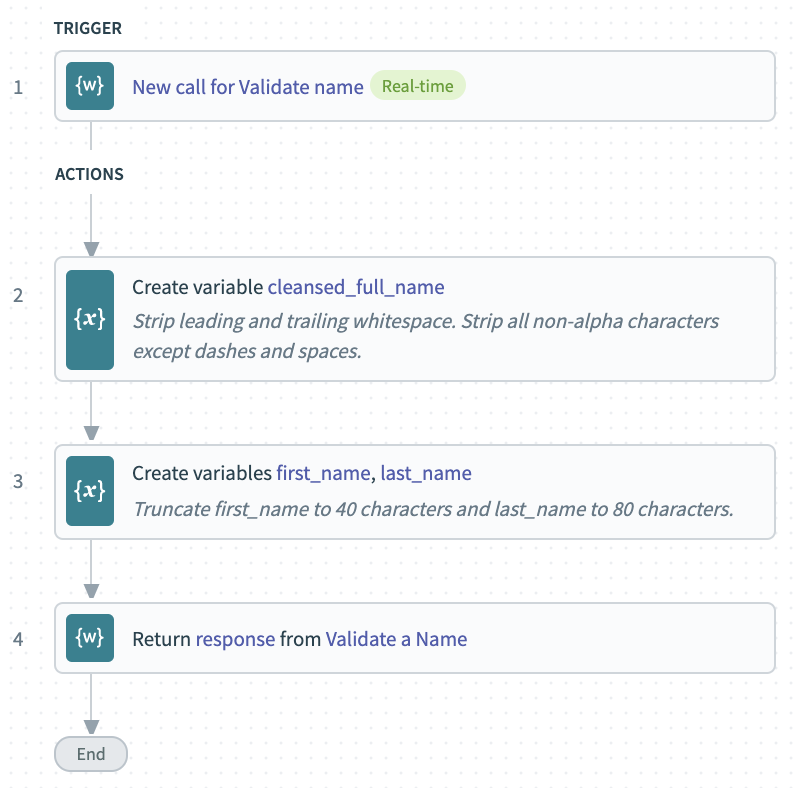 Our lead pipeline captures a full name as a single field. The goal of our name validation recipe is to clean up any disallowed characters in the provided name, and to create separate first and last names to help us match the schema of apps like Salesforce.
Cleanse input
To cleanse our raw full name, we’ll use three formulas:

lstripremoves any leading whitespace. For example" John Jarndyce"becomes"John Jarndyce"rstripremoves trailing whitespace. For example:"John Jarndyce "becomes"John Jarndyce"gsubuses a regular expression to match and remove any non-alpha characters except for spaces and dashes. For example"D1avid John Rhys-Jones"becomes"David John Rhys-Jones"
Extract first and last names
Some places we’ll need to send our leads require not a full name, but separate first and last names. To meet this requirement, we need to break down our full name for parts. We may also need to adjust for length. For example, Salesforce allows a maximum of 40 characters for Lead Last Name and 80 characters for Lead Last Name. Here, we’ll use three formulas:
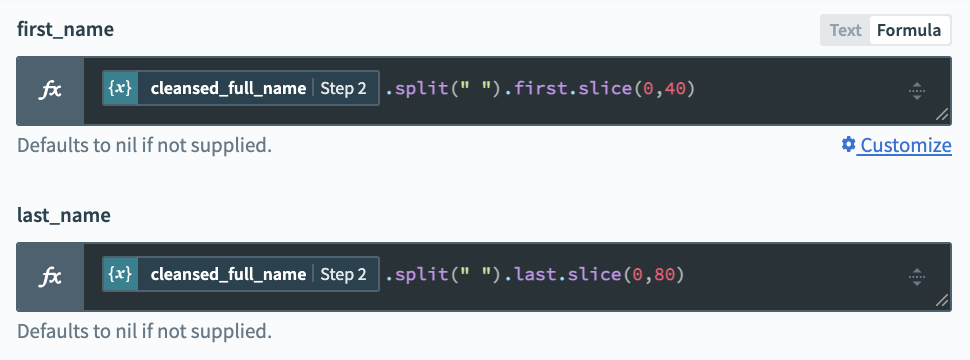
split– turns the input string into an array, with a new entry for each space character. So"John Paul Jones"becomes["John", "Paul", "Jones"]firstorlastextract the first or last entry in an array.slicelets us isolate part of an input string. For example:slice(0,40)captures the first 40 characters in the string.
Validate a date
Finally, we need the date when we captured our lead. Since we’re processing leads from multiple sources, dates could be written in different formats, and some sources may send leads in batches covering several days. We need to convert those dates into a single standard format. We also need to check that each date makes sense. For example, it shouldn’t be in the future. Since we don’t want to drop an otherwise good lead just because of a poorly formatted date, we’ll use the date of processing as a fallback, if validation fails.
Standardize input
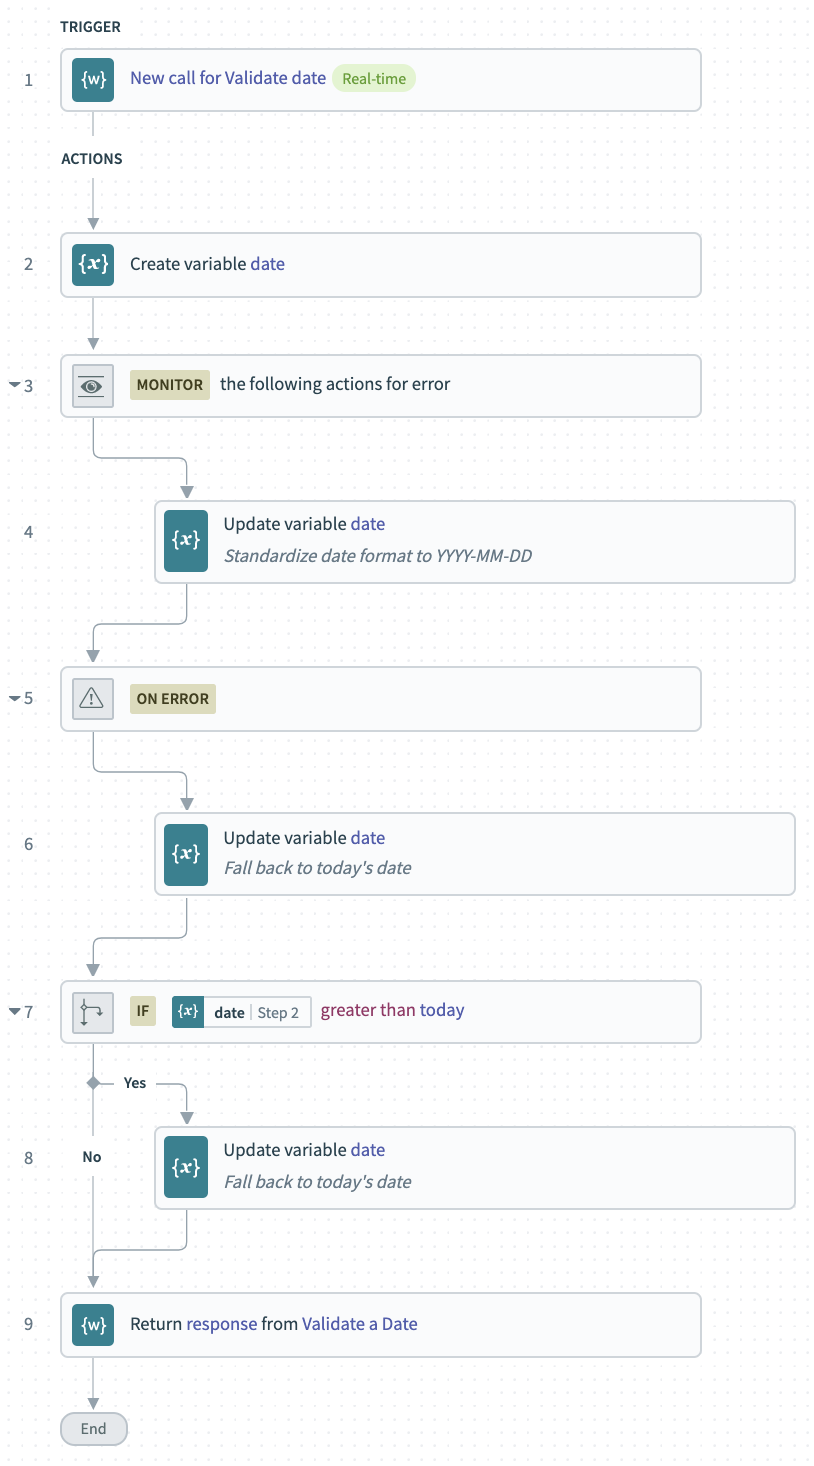
To standardize our input to a YYYY-MM-DD format, we’ll use the to_date() formula. If we know exactly how our input will be formatted, we can pass that information to the formula. That would look like: to_date("MM-DD-YYYY"). But since we want to process dates in multiple formats, we can just let Workato attempt to figure out the formatting for us, automatically.

If Workato can’t make a valid date from the input, an error will be created, so we need to nest this step in an error-handling block.
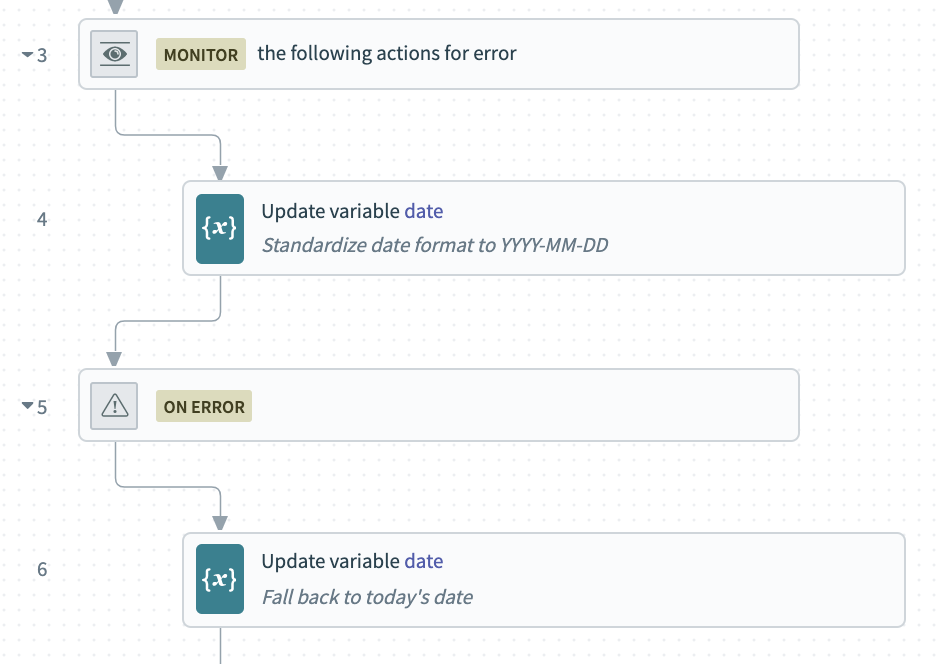
In the event of an error, we can set the value of our date variable to the current date, using the today formula.

Check for future dates
Now that we have a date in a standardized format, we can check if it’s a future date. To do this, we simply use an if condition to see if our date is greater than today.
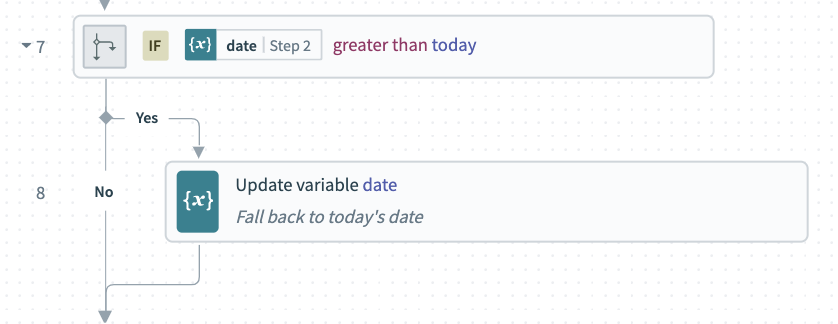
If the date is a future date, we can again fall back to our default value of the current date.
Create the API Endpoint
From here, Workato’s API platform can turn our master recipe into an API endpoint, automatically determining the required input parameters.
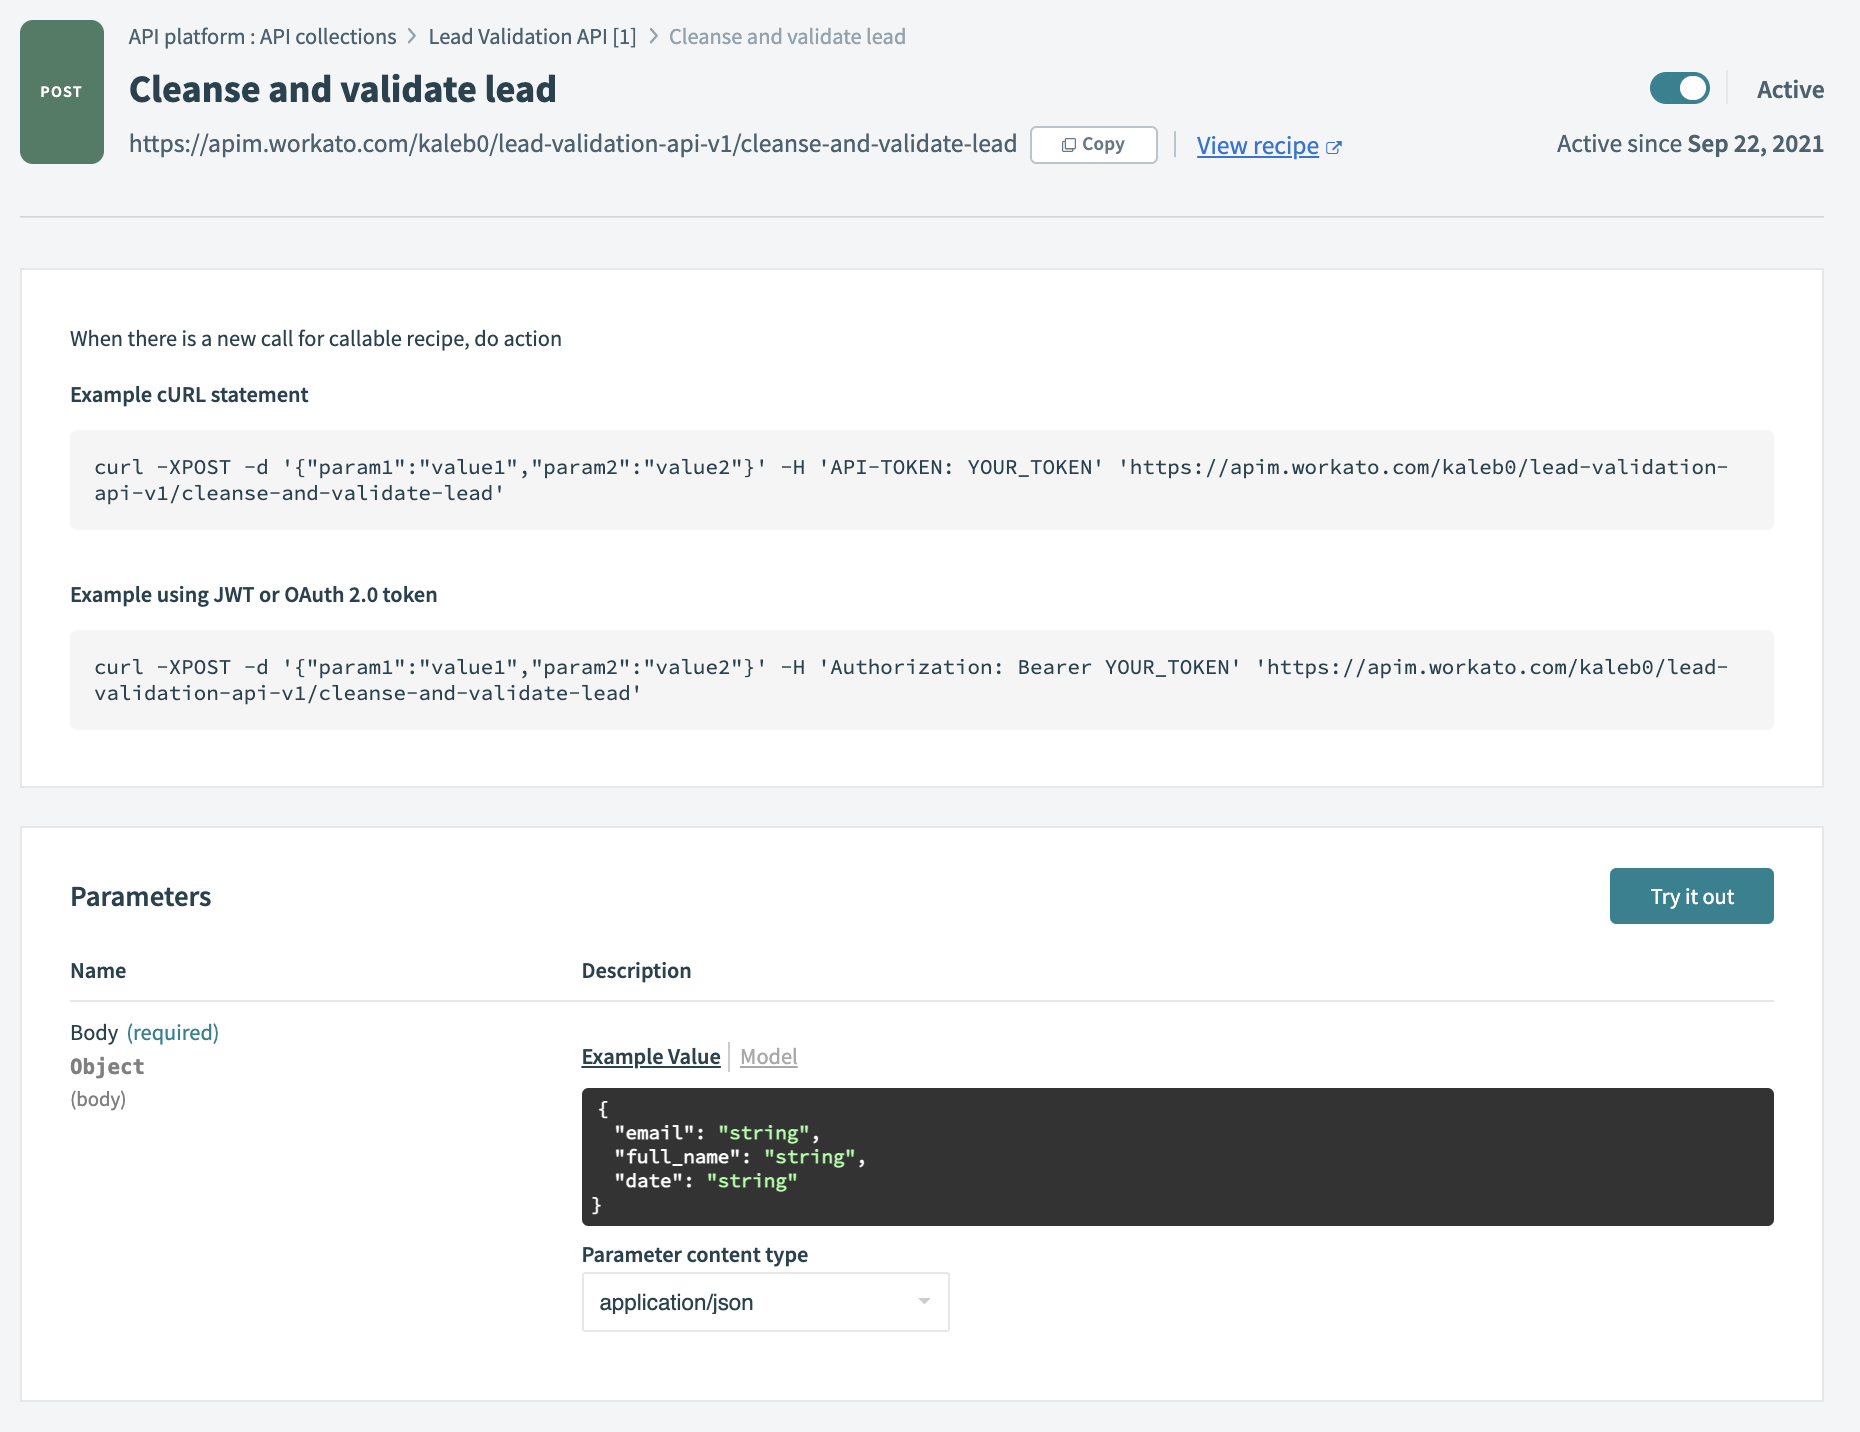
We can create access credentials for any service to forward leads to our new API, or call it from any Workato recipe.
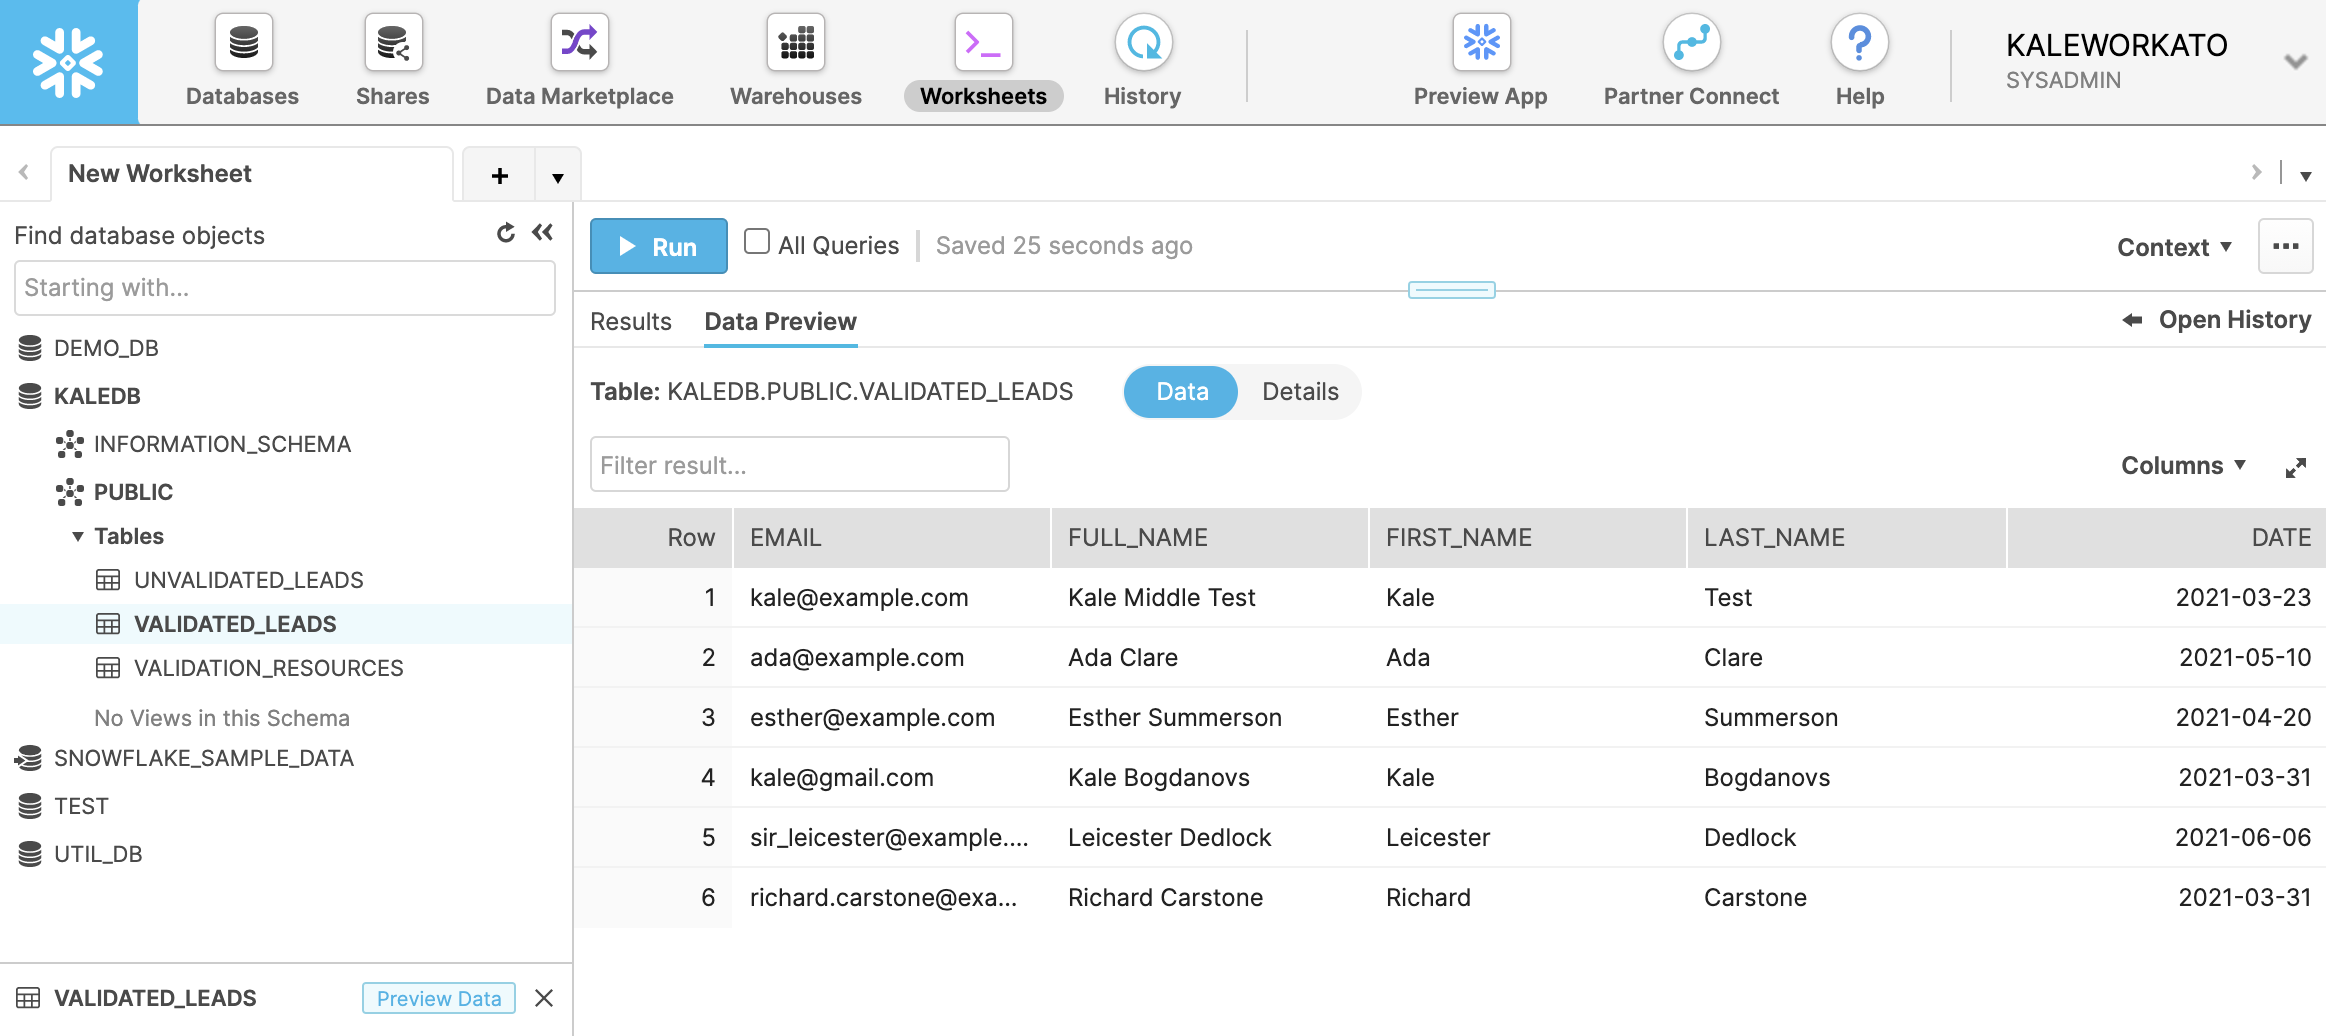
Result
After running some test data into the API, we begin to see validated leads in Snowflake.
What next?
Refine the process
We now have a single API that can perform basic validation on an incoming lead. From here, we can think about adding additional validations, or handling other edge cases. For example:
- Treat non-business emails as invalid
- Handle a full-name input with no spaces
- Set a maximum age to accept a lead
One huge advantage of abstracting our validation process into its own API is that we can make changes to how we validate without having to update every service that uses the API. For example, there are paid services, like Abstract API’s email validation service, dedicated to validating business emails. We could completely rewrite our email validation recipe to use one of those APIs, instead of writing our own rules, without making any other changes to our lead processing pipeline. Designing this way makes it easy to start with the basics and improve your processes over time.
Enrichment
Now that we have a unified pipeline for high-quality basic lead data, we have a great opportunity to add enrichment:
- Use a revenue intelligence service like ZoomInfo to add information about the company and contact.
- If the lead is a current customer, check your database to enrich customer information like app activity, recent purchases, or subscription status.
Some marketing platforms will do some of these enrichment tasks for you, but by making them part of your unified lead processing pipeline, you make sure the same high-quality information is added to all your leads, no matter where they come from, or where you act on them.
Speed-to-lead
With a single standardized pipeline of validated and enriched leads, we’re in a great position to get a head start on making leads actionable:
- Classify them by geography, business size or vertical.
- Notify the appropriate team members so they can get moving on big opportunities as quickly as possible.
For some more ideas on increasing speed-to-lead, check out our Product Hour on accelerating GTM velocity.