
Creating an XML document is tricky. The default to_xml formula in Workato is great when we are dealing with simple XMLs but does not satisfy more complex XML requirements. Thankfully, you can build XML with Message Templates in Workato. This tool let’s you create any kind of document (including XML) in your recipe.
Message Templates
Workato Message templates use Mustache as the templating language. Message templates can be used to generate HTML/JSON/XML/text documents. They also allow you to separate the composition logic (what the message should look like) from the generation logic (actual data to include in your document). You can create and complex XML documents through simple visual templates.
Learn more in the Message templates documentation.
The Problem
Many business workflows involve creating and uploading XML documents to a file hosting site. This is usually to support legacy applications that require a very rigid data structure. It can be frustrating to create these documents dynamically especially when you have to construct highly complex XML structures with attributes and deep hierarchies. Let’s take a look at a sample workflow and see how Message templates can simplify this process.
In this example workflow, I need to sync all service requests between ServiceNow and a legacy on-premise application. Due to the nature of this legacy app, the only available interface is through structured XML documents to a FTP server.
Creating the Message Templates
Template Body
I have a sample XML which looks like this. This XML contains request information (number, stage, priority etc.) as well as the request item(s) associated with it. The on-premise application requires all XML files to obey this structure.
<?xml version="1.0" encoding="UTF-8"?>
<soapenv:Envelope xmlns:soapenv="http://schemas.xmlsoap.org/soap/envelope/">
 <soapenv:Body>
   <ext:Request SysId="c422fb540a0a0b1200b05d16361b2b62">
     <Number>REQ0000002</Number>
     <Stage>requested</Stage>
     <Opened_At>2015-12-08T19:15:43.000000+00:00</Opened_At>
     <Priority>4</Priority>
     <Requester>fred.luddy</Requester>
     <Request_Items>
         <Request_Item Index=0 SysId="c422fbd80a0a0b1200a293da219a72df">
           <Number>RITM0000002</Number>
           <Price>0</Price>
           <Quantity>1</Quantity>
           <Short_Description>A Blackberry Wireless Device</Short_Description>
           <Approval>approved</Approval>
           <Billable>false</Billable>
         </Request_Item>
     </Request_Items>
   </ext:Request>
 </soapenv:Body>
</soapenv:Envelope>
The quickest way to create a template XML is to copy and paste this sample into the Template body. Navigate to the message templates feature under tools and create a new template.
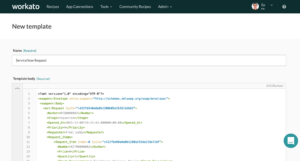
New Message Template with sample XML
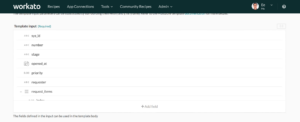
At this point, I need to replace all sample data with variables. The XML template should look like this after this step.
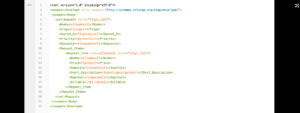
Message template with variables
These variables act like placeholders for actual data that will be used to construct the final document. For a better experience, enter zen-mode by clicking on the Fullscreen icon at the top right corner of the Template body.
Notice that dynamic XML attributes were added to the template simply by including a variable it in the appropriate tags.
In my specific scenario, there is an added complexity – a request may contain multiple request items. To handle this, I can use sections to repeat selected blocks in my template. I will need to add section tags around the <Request_Item> tag to ensure that every associated request item is included.
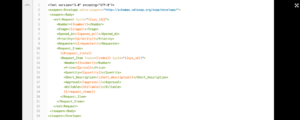
XML template with sections
Template Input
The template body is now complete. Next, I will need to define the input data for this template. This input determines what data will be presented as input fields when using the Message Template in a recipe. I will map data to these input to create the final XML document. Based on the variables and sections in the template body, the input in a JSON form should look like this.
{
"sys_id": "c422fb540a0a0b1200b05d16361b2b62",
"number": "REQ0000002",
"stage": "requested",
"opened_at": "2015-12-08T19:15:43.000000+00:00",
"priority": 4,
"requester": "eeshan.sim",
"request_items": [
{
"index": 0,
"sys_id": "c422fbd80a0a0b1200a293da219a72df",
"number": "RITM0000002",
"price": 0,
"quantity": 1,
"description": "A Blackberry Wireless Device",
"approval": "approved",
"billable": false
}
]
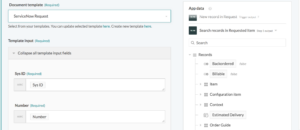
}I can use this JSON sample to generate the Template input schema.
Input fields describing data to pass to the template
My template is now complete and ready for use in a recipe.
Using Message Templates in a Recipe
Once the message template is ready, I can start building the recipe to automate syncing of requests between the applications. To create the XML document, select Message Template by Workato as the App. When I select the newly created template, I will see the input fields that needs to be mapped with data from ServiceNow.
Mapping datapills to template
Next, I need to test the recipe to ensure that the XML document created has the intended structure and data. I do this by running a simple recipe that uploads a sample request from ServiceNow.
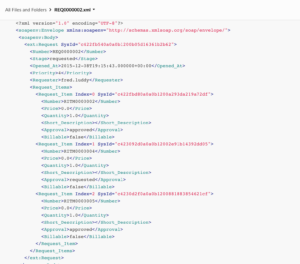
XML document uploaded
This XML document that was uploaded looks exactly like what I need – excellent! You may refer to this sample recipe to build your own XML document sync.