
Use the new Deployment permission for smarter project management
We’re excited to announce a significant update to Workato’s platform – the Deployment permission. The Deployment permission determines access to project deployments across environments.
What’s Changing?
Previously, deploying projects required Recipe lifecycle management permission in the Development (DEV) environment and any access in the target environment. Now, you will need the Deployment permission enabled in both DEV and the target environment to successfully deploy projects.
Why Does It Matter?
This update enhances security by segregating deployment permissions from recipe lifecycle management. Now, you have precise control over who can deploy projects to production or test environments, minimizing risks.
Who Gets It?
The Deployment permission is enabled for system roles and custom roles as follows:
- Admin: Enabled
- Analyst: Enabled
- Operator: Disabled
- Custom: Disabled until an admin manually enables it
Note that by default the Deployment permission is not enabled for custom roles.
Admins can restore access for these collaborators by updating the custom role(s) to enable the Deployment permission in the appropriate environments.
If you do not have access to the Deployments tab for a project, ask your admin to update your permissions!
Adding Deployment Permission for Custom Roles: A Quick Guide for Administrators
Fret not if your users deployment tab has disappeared! Adding the Deployment permission takes is only a few quick steps:
- Go to Workspace admin > Collaborators, then select Collaborator roles.
- Choose the custom role you want to update.
- Navigate to the Recipe development tab.
- In the Deployment section, tick the Deployment checkbox.

- Click Save changes.

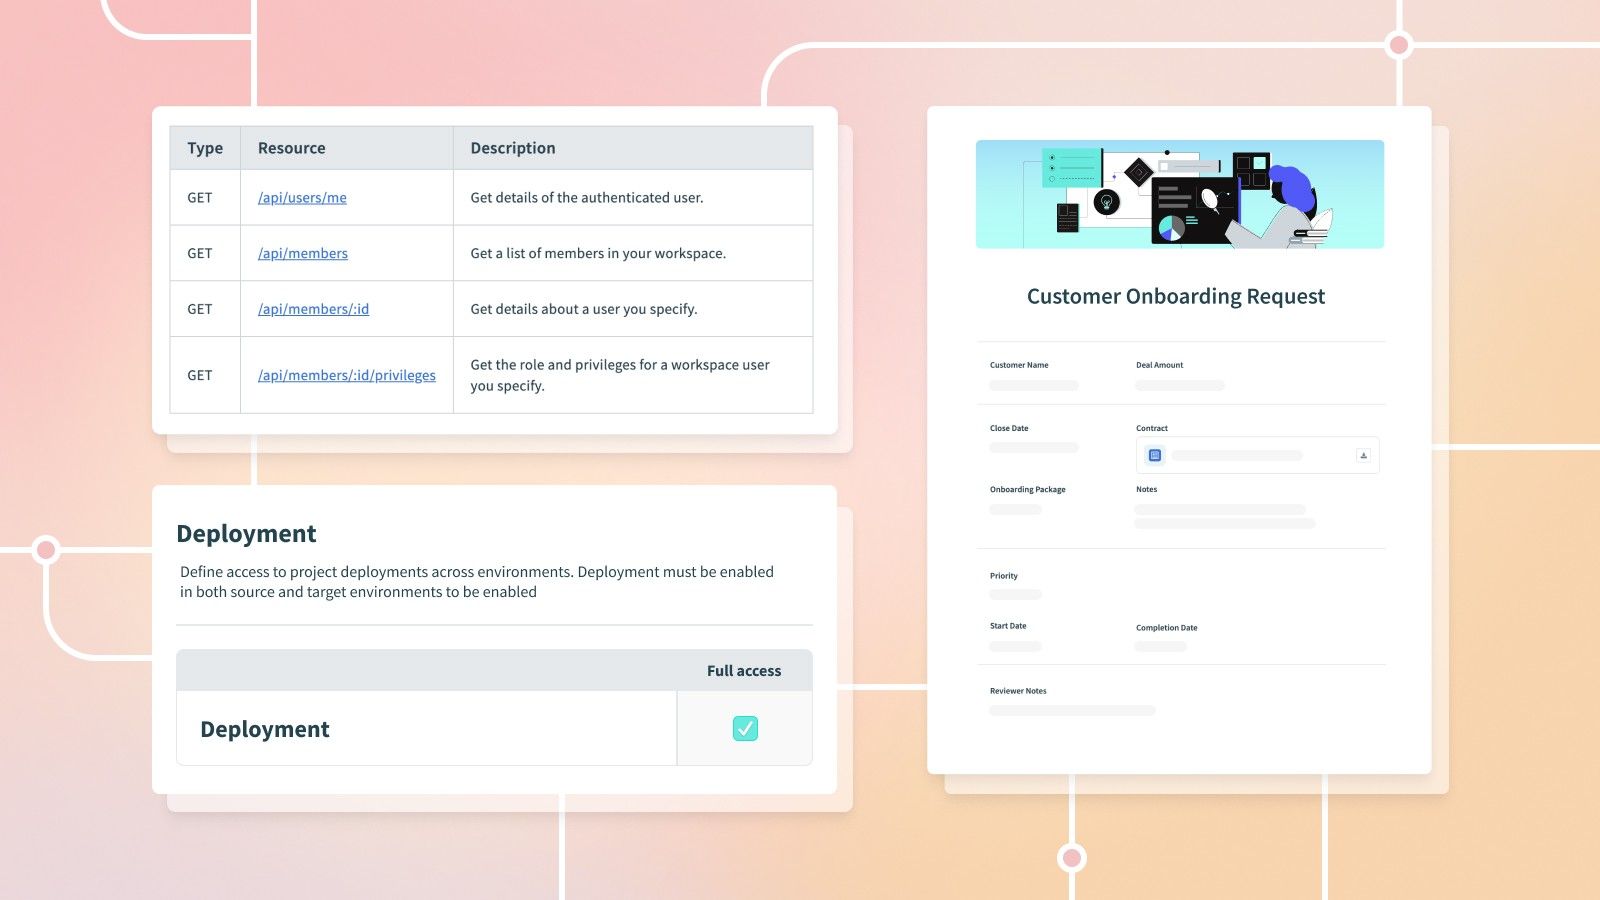
Manage workspace users with the new User Audit API
The developer API just got more powerful with the addition of the user resource. This new set of endpoints gives you insights into who holds the keys to your workspace and precisely what permissions they wield. This new set of endpoints allows you to perform the following actions:
| Type | Resource | Description |
GET
|
/api/users/me
|
Get details of the authenticated user. |
GET
|
/api/members
|
Get a list of members in your workspace. |
GET
|
/api/members/:id
|
Get details about a user you specify. |
GET
|
/api/members/:id/privileges
|
Get the role and privileges for a workspace user you specify. |
The User Audit API empowers you to automate regular audits, ensuring a secure and well-managed workspace for your team. For all the details, be sure to check out our full documentation.
Quickly search and filter by linked columns in Table Storage
You need to be able to navigate your business data efficiently when building automations. That’s why we’ve added the ability to search and filter by linked columns in your Table Storage data tables.
Many business processes involve linking multiple tables together. Take the example of an order to cash process where you need to store purchase order (PO) information. Each purchase order consists of multiple line items, so you may store this data in two linked tables: one table with all line items and one table all POs that are linked together by the PO number.

With this release, you can now easily navigate interconnected data tables using linked columns! Of course, you can also perform these same actions using the Table Storage connector.

View Workflow Apps pages at any stage
Workflow Apps makes it easy for users to input or review automation data with our drag-and-drop page builder. In minutes you can outline the stages of your workflow, create pages for users to input or review data, and tie it all together with business logic in the form of recipes.
But what about stages of your workflow where there is no task for a user? They might not have data to input or review, but it’s still useful to have a concise summary somewhere of what’s going on with their request. That’s why we’ve added the ability to associate a page with any stage of your workflow.
Take the example of a customer onboarding workflow.
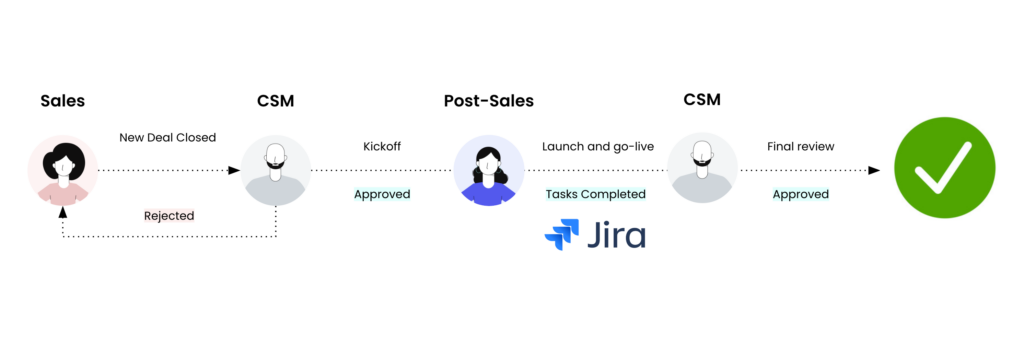
First, a seller closes a deal in Salesforce with the relevant deal information. In response, the CSM reviews that information in their customer onboarding Workflow App and either approves or rejects the request.
Next, post-sales takes over and starts working on the tasks created for them in Jira by their Workflow App. At this point, there is nothing assigned to the CSM for review, but they still might want to go back and check on their request.
Now, you can do just that by associating a page with any stage of a workflow application.
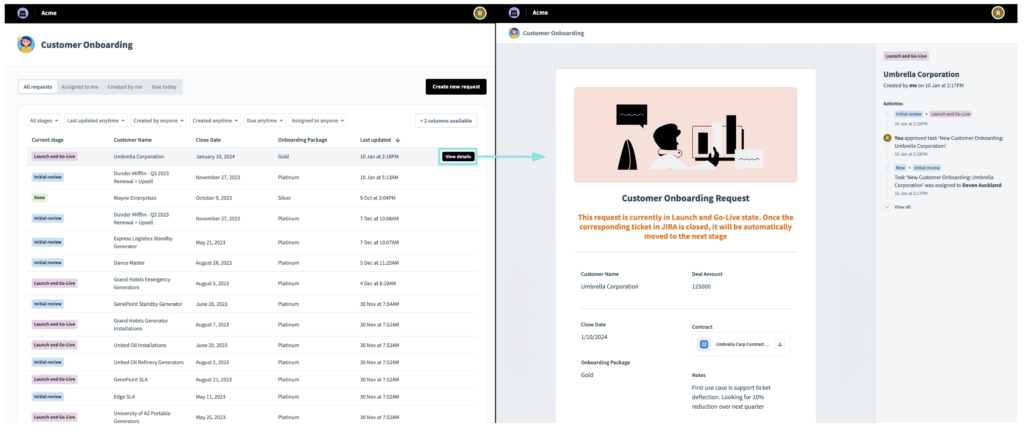
By clicking the View details button from your list of requests, you can be taken to a custom summary page with the most up to date information on your request. This seemingly minor change helps business users stay updated without the hassle of jumping between apps. Gone is the need to bounce between business applications to track a workflow!