
What is a bi-directional data sync?
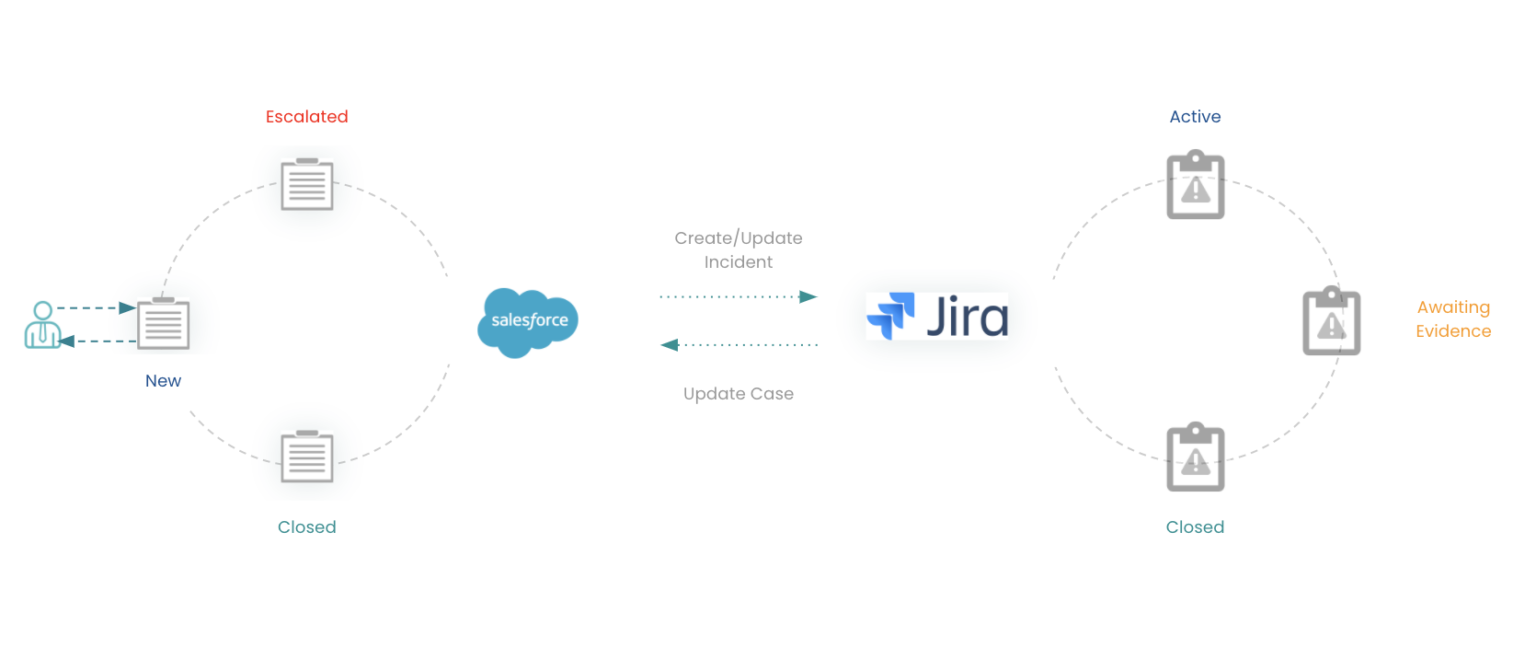
One of the most common automation use cases is a bi-directional data sync. This kind of automation is useful when different teams use different apps to work on the same business object. For example, customer success managers (CSMs) might work on a support case in Salesforce or Zendesk, while technical support engineers (TSEs) work on the same case from Jira.
This means that there will be a record of the customer’s support request in Salesforce, and a second record in Jira. The case details recorded by the CSMs in Salesforce need to be synced to Jira so that the TSEs can prioritize and schedule the work. Additionally, notes and status updates recorded by the TSEs need to be synced back to Salesforce so that the CSMs can communicate with the customer.
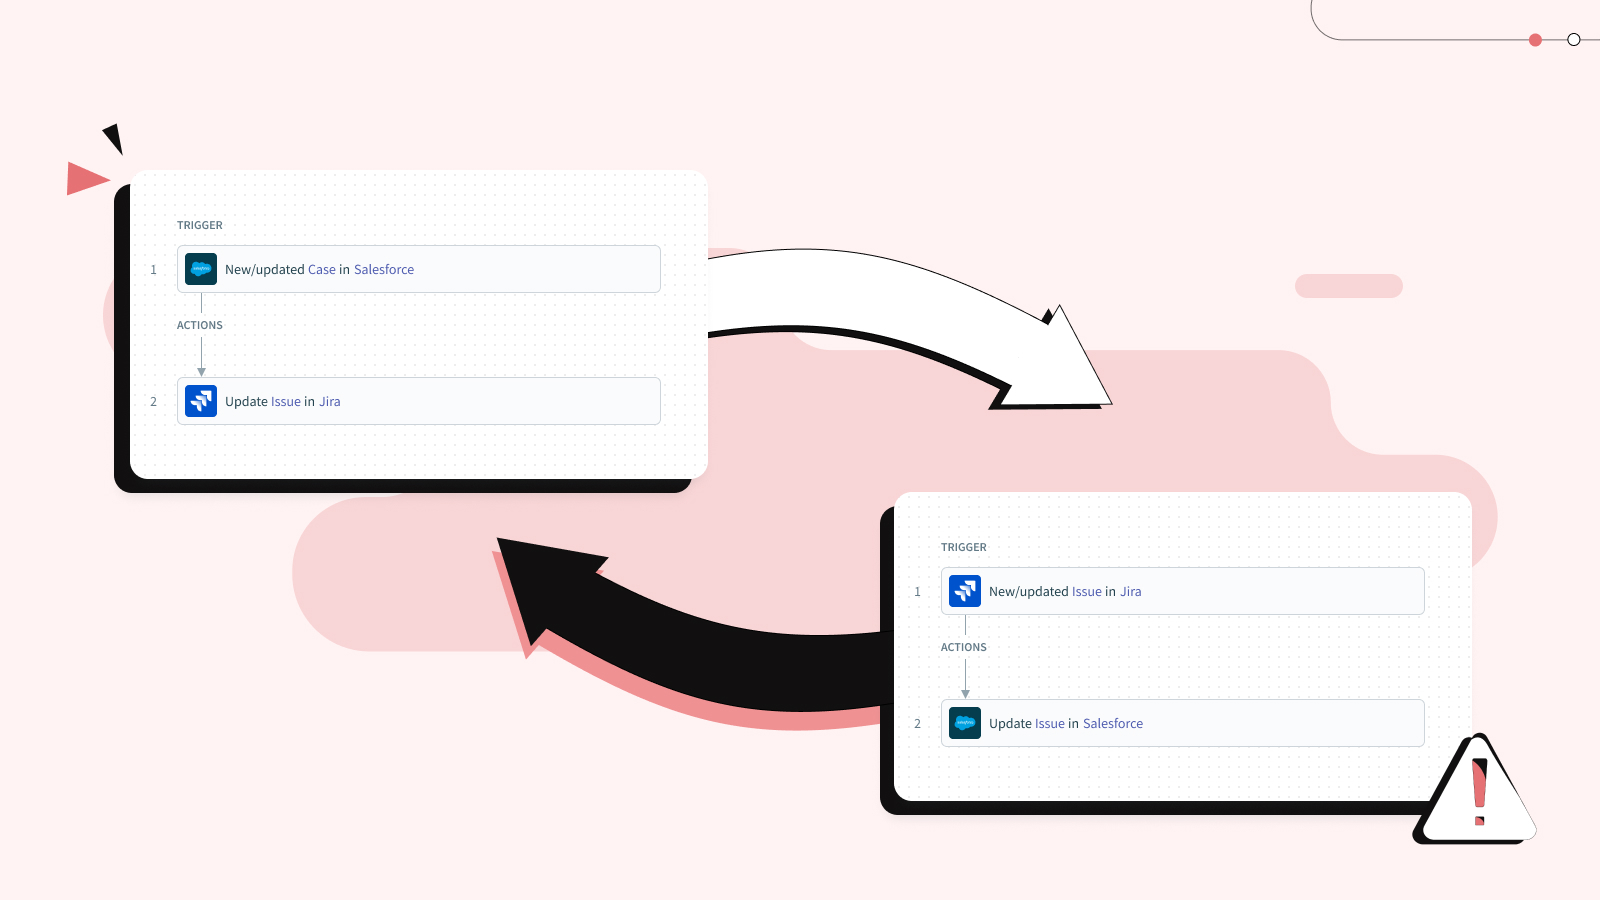
A bi-directional data sync requires two recipes in Workato. For example, in the scenario described above:
- Recipe 1 is triggered by new or updated customer support cases in Salesforce and creates or updates issues in Jira.
- Recipe 2 is triggered by new or updated issues in Jira and updates cases in Salesforce.
What are infinite loops?
Perhaps you can already see an issue here. If every updated case in Salesforce triggers an update in Jira, and every update in Jira triggers an update in Salesforce, then the two recipes will keep on triggering each other, indefinitely! You really don’t want this. Fortunately, it’s easy to avoid with a little planning.
How to prevent infinite loops
The exact steps you need to take to prevent infinite loops in your bi-directional syncs will vary slightly depending on which apps you’re using. However, there are two basic steps you’ll need to complete.
- Create a dedicated integration user for each app involved in the sync.
- Identify and exclude records modified by the integration user.
Create dedicated integration users
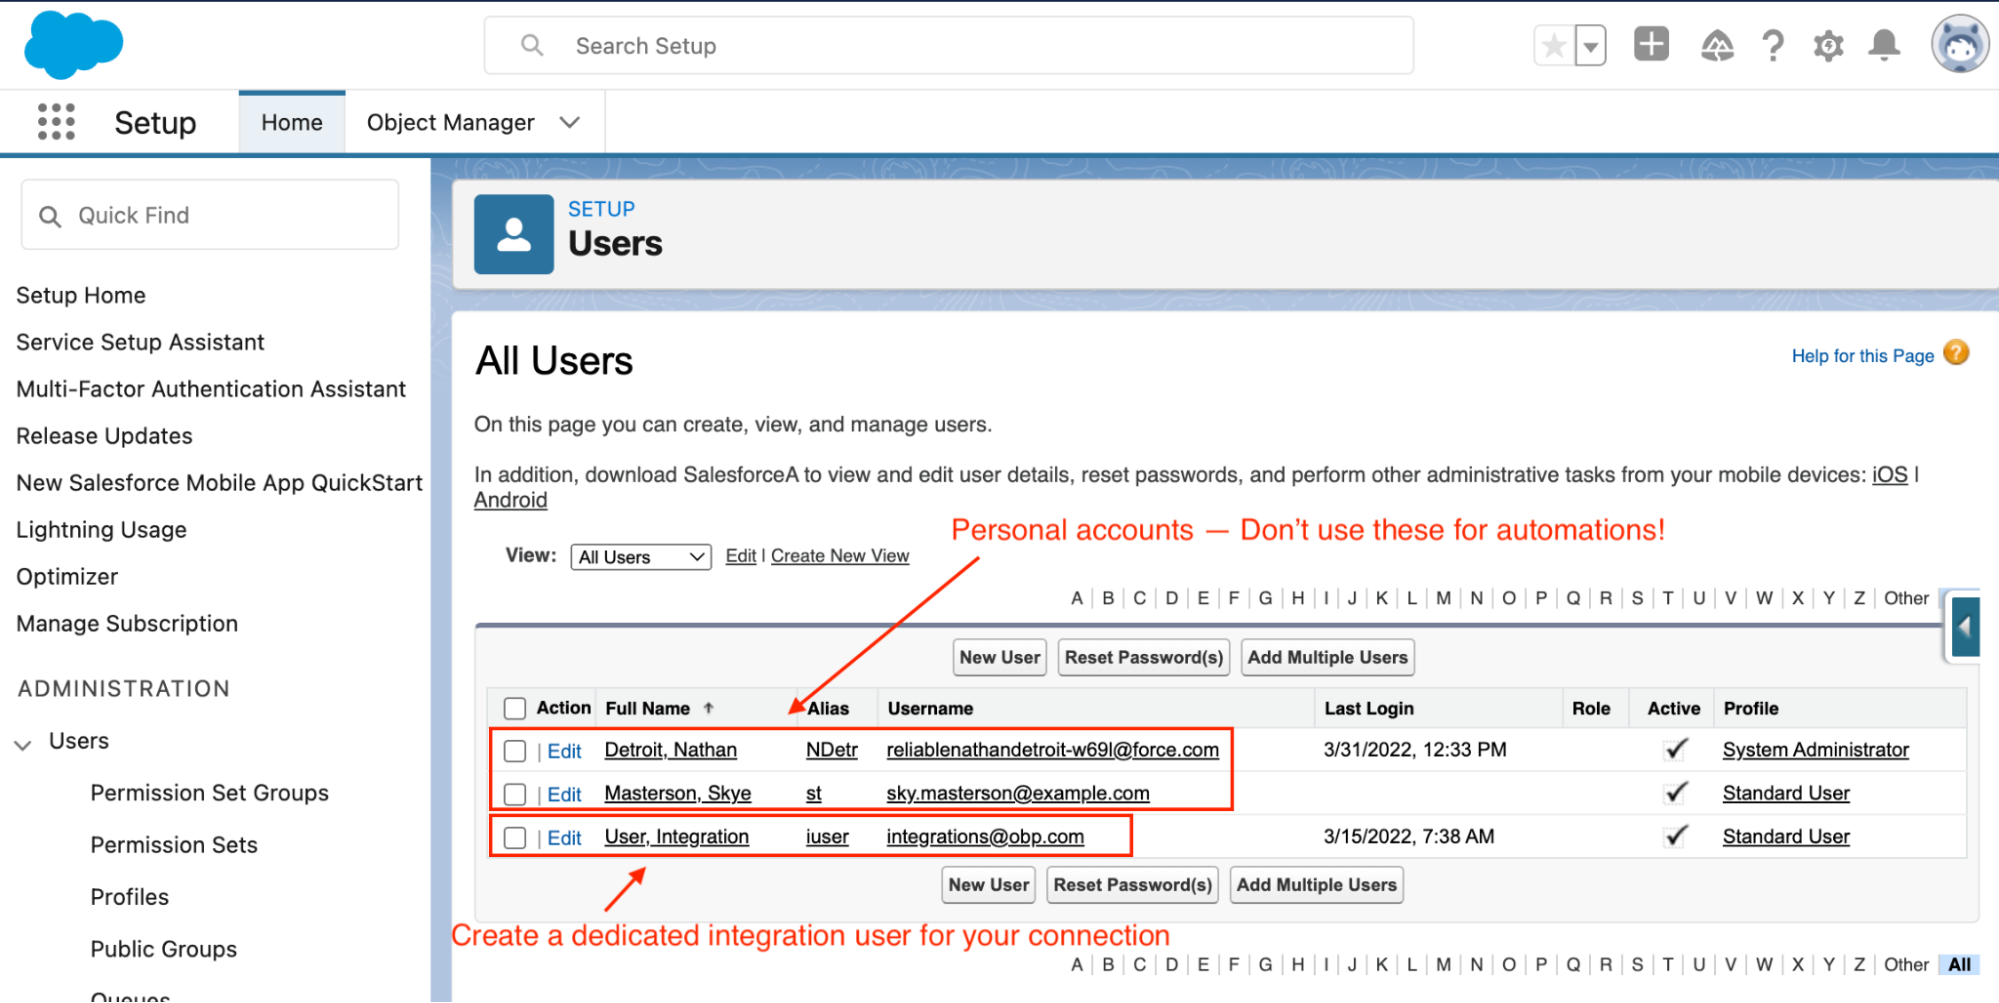
To avoid infinite loops we need to be able to distinguish between records updated by people–which we want to trigger our recipe–and updates created by the recipes themselves–which we want to ignore.
To do this, we need to create a dedicated integration user for our connections in Workato to use. Don’t use personal credentials that could also be used by a human. For example, here’s a dedicated integration user in Salesforce.
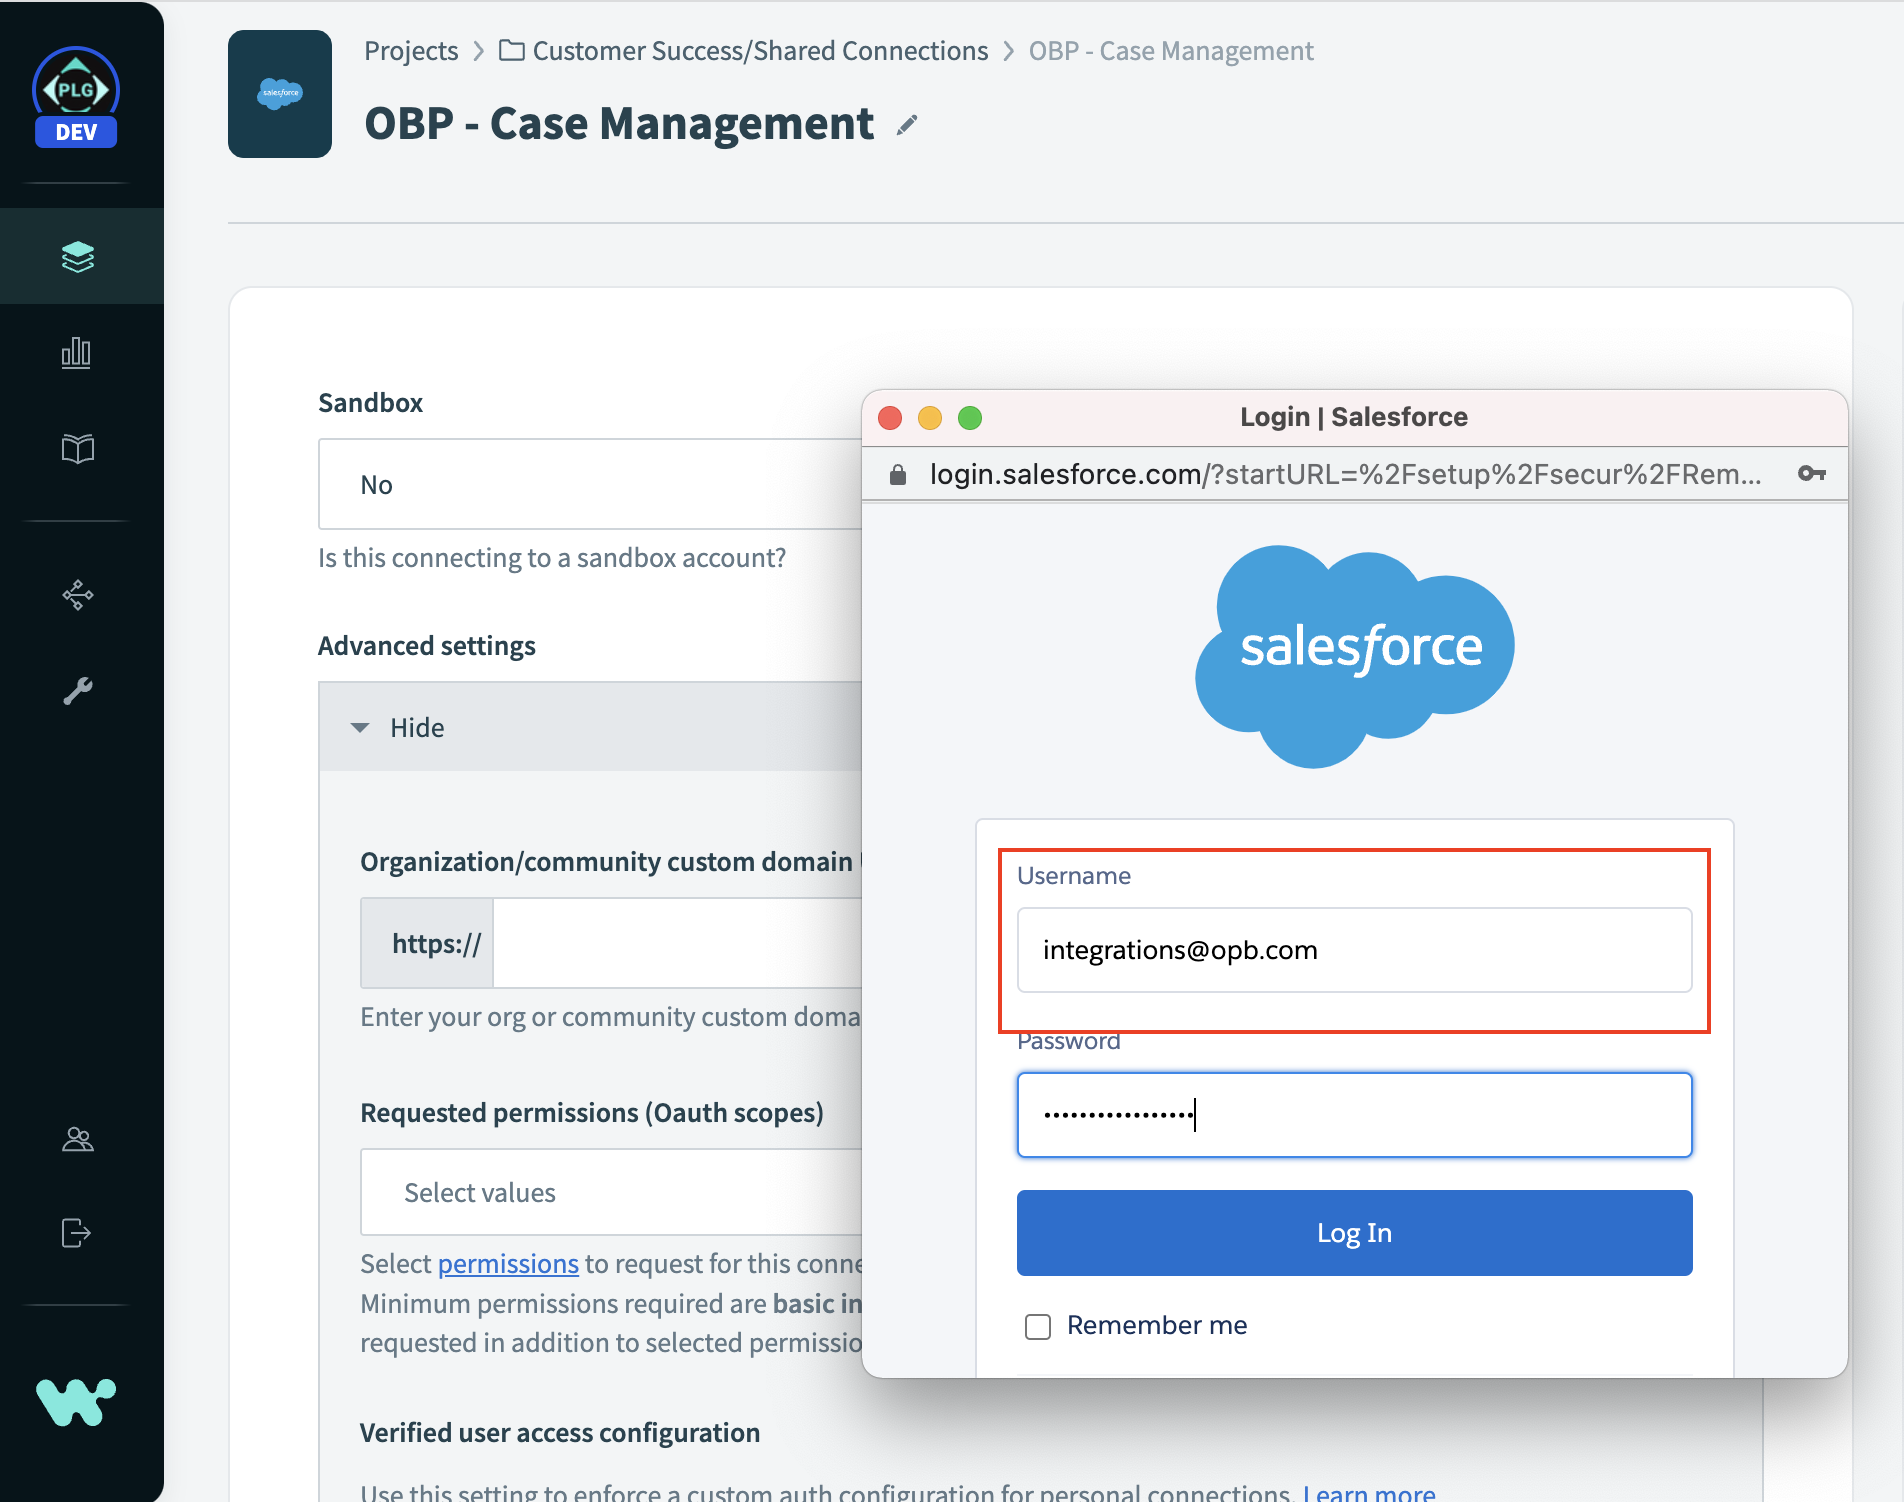
When you set up your connections in Workato, use the credentials for your dedicated integration user:
Identify and exclude records last modified by the integration user
Now that we’ve created dedicated integration users for our bi-directional sync, we need to be able to identify which records were last modified by the integration user, and stop our recipes from processing them.
This is the tricky part. Under the hood, most connectors in Workato interact with an app’s API. The information provided by each app’s API is a little different, so you’ll need to figure out the most appropriate way to identify records that were last modified by the integration user. There are four different approaches you can use.
- Add conditional filters to your trigger
- Create a custom query in your trigger settings
- Create additional steps in your recipe
- Use a custom field
Let’s explore each method, with examples.
Add conditional filters to your trigger
In many cases, your trigger will automatically include information about who last updated the record. The field is usually named something like “Last updated by” or “Last modified by”. The data might be in the form of a user ID or email, or it might be a unique ID generated by the app.
If a “Last updated by” or similar field is available, you can add a condition to your trigger to filter out any records that were created by your dedicated integration user.
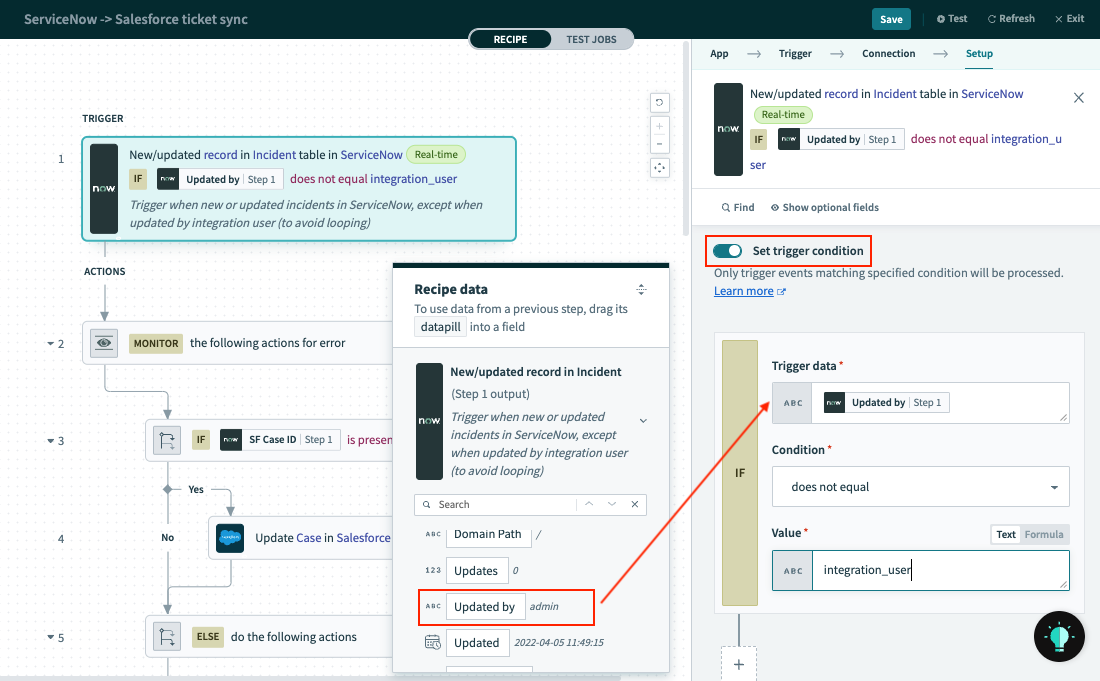
Example: ServiceNow
ServiceNow includes an “Updated by” field in the New/updated record trigger. To filter out records updated by the integration user, just turn Set trigger condition to on. Set the filter to only pick up records where “Updated by” does not equal the username of your integration user.
When to use this
Using an easily accessible “Last updated” field to power a trigger filter is the simplest way to prevent infinite loops. Records excluded by the trigger filter won’t create a job record or use any tasks in Workato. However, not every app provides the information you need to use the trigger filter. In those cases, you’ll need to explore some of the other options below.
Create a custom query in your trigger settings
Many large cloud apps, including Salesforce, Jira, ServiceNow, and NetSuite, have a dedicated language for querying records. For example, Salesforce has Saleforce Object Query Language, or SOQL. You can use these query languages to fine tune which records will trigger your recipe. If you’re a power user, you may already be familiar with the app’s query language. If not, check the app’s docs for a full reference, or a cheatsheet.
Example: Saleforce
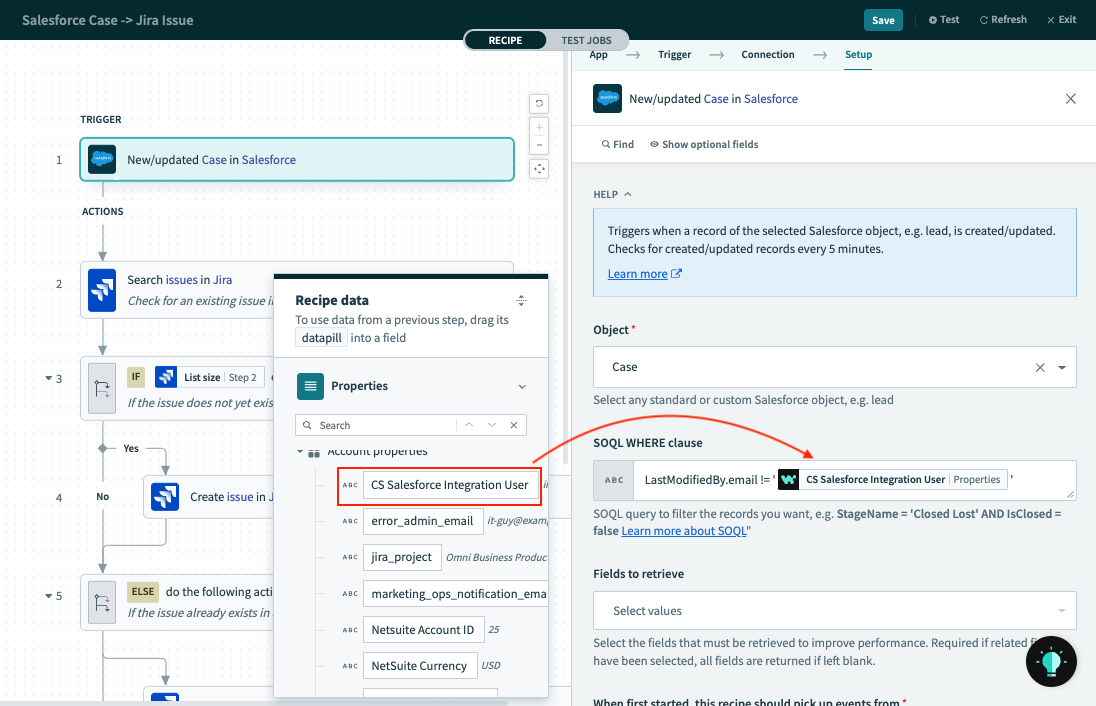
When setting up any new/updated object trigger for Salesforce, you can include a `WHERE` clause written in SOQL. You can use this field to exclude records last modified by a particular email address. Plug in the email of your integration user. For example, you might set the clause to LastModifiedBy.email != ‘integration_user@example.com’.
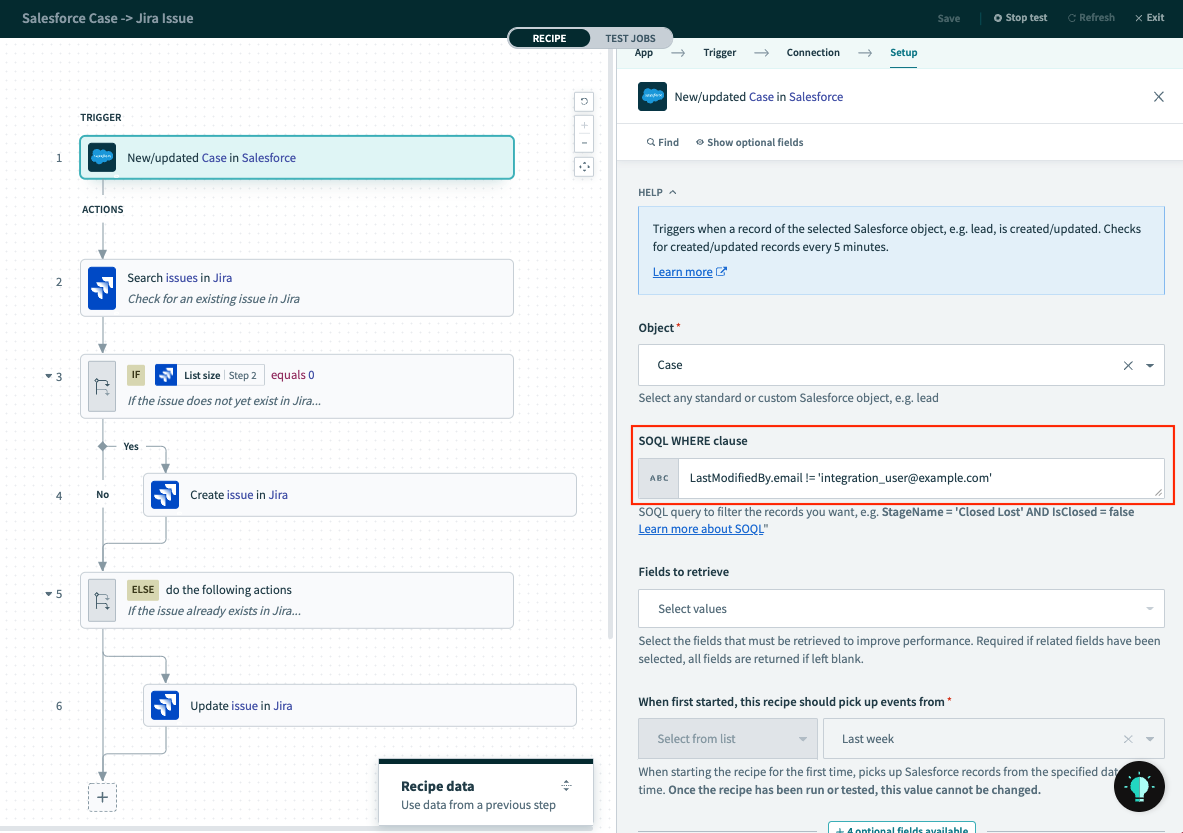
Now, updates made by Workato won’t retrigger the recipe, and you’ll avoid infinite loops.
When to use this
If you’re familiar with the syntax, using a dedicated query language will usually be the most efficient way to exclude records created by the integration user. You can often search based on fields that won’t be included in the trigger record, so it’s also useful in cases where an app doesn’t provide an obvious `last_modified_by` field.
Create additional steps in your recipe
Occasionally, a trigger won’t provide any way to identify the last user to update a record. For these cases, it may be possible to get the information by adding extra steps to the recipe.
Example: Jira
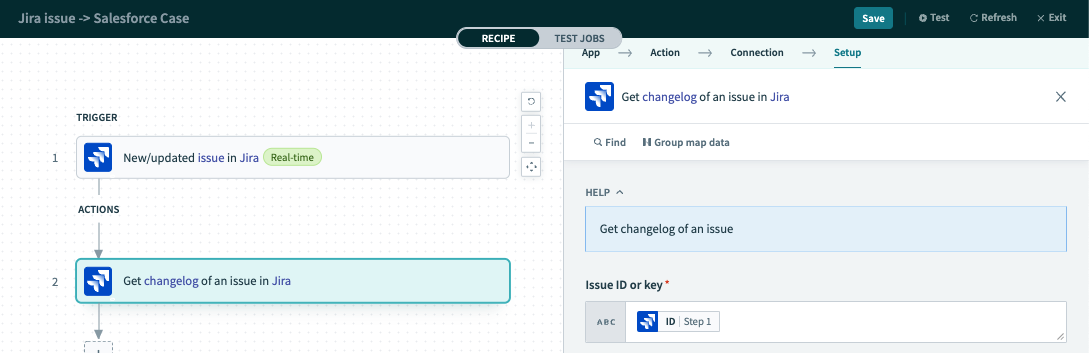
The New/updated issue in Jira trigger does not include a “last modified by” field. You can use the dedicated Jira Query Language (JQL), but it doesn’t quite offer the options we need. It’s possible to exclude any issue that’s been updated by the integration user within the last day. However, this would also exclude any issues that were updated by a human user within a day of the last automated update.
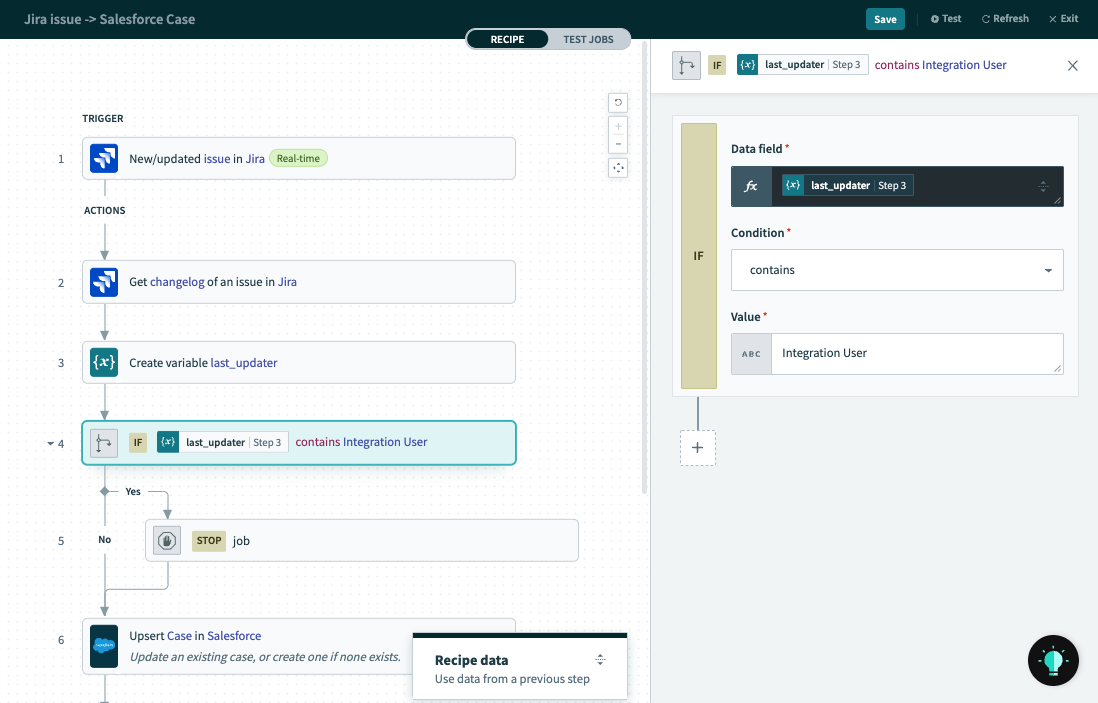
We can use a separate action to get the changelog for an issue.
This action will give us the Display Name of the author of the most recent change to the issue. However, the list of changes is in chronological order, so we need to make sure we only read the last entry. We can do this by creating a variable to hold the data, and using a the last formula to pick out the last changelog entry.
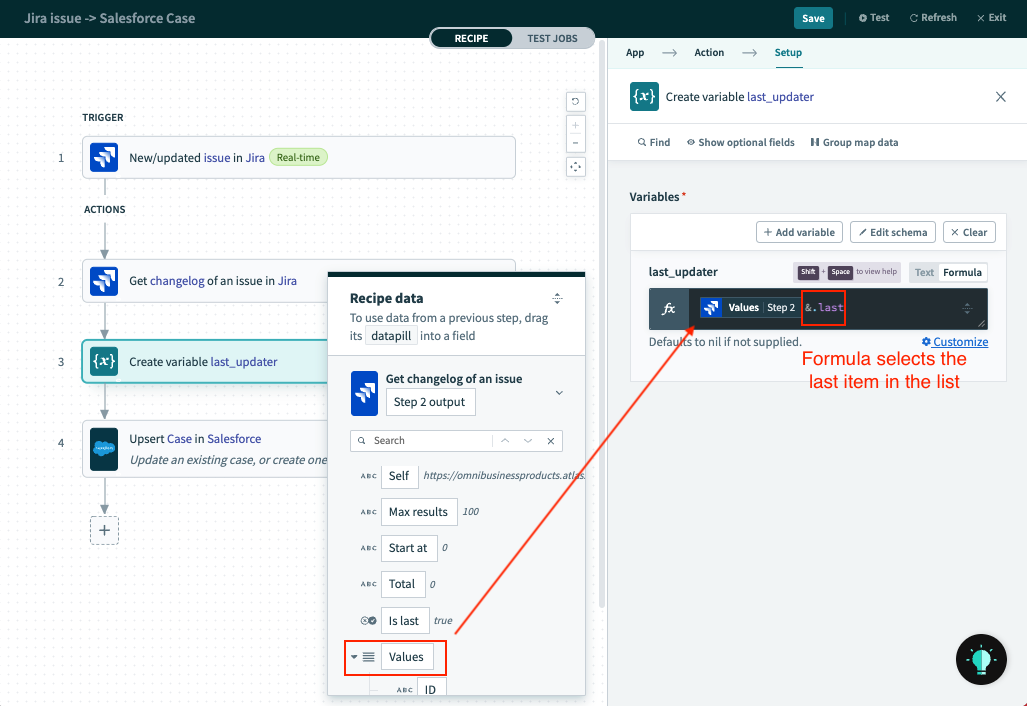
Now we can check to see if the changlog entry includes the username of the integration user. If it does, we can stop the job, preventing an infinite loop.
When to use this
This scenario is uncommon. You should explore it only for apps that don’t offer any other way to identify and exclude the integration user.
Create a custom field
The final method is to create a custom field on your records that you can use to distinguish between records updated by humans and records updated by Workato. In order for this to work, you need to be able to create a custom field in your app.
Example: Jira
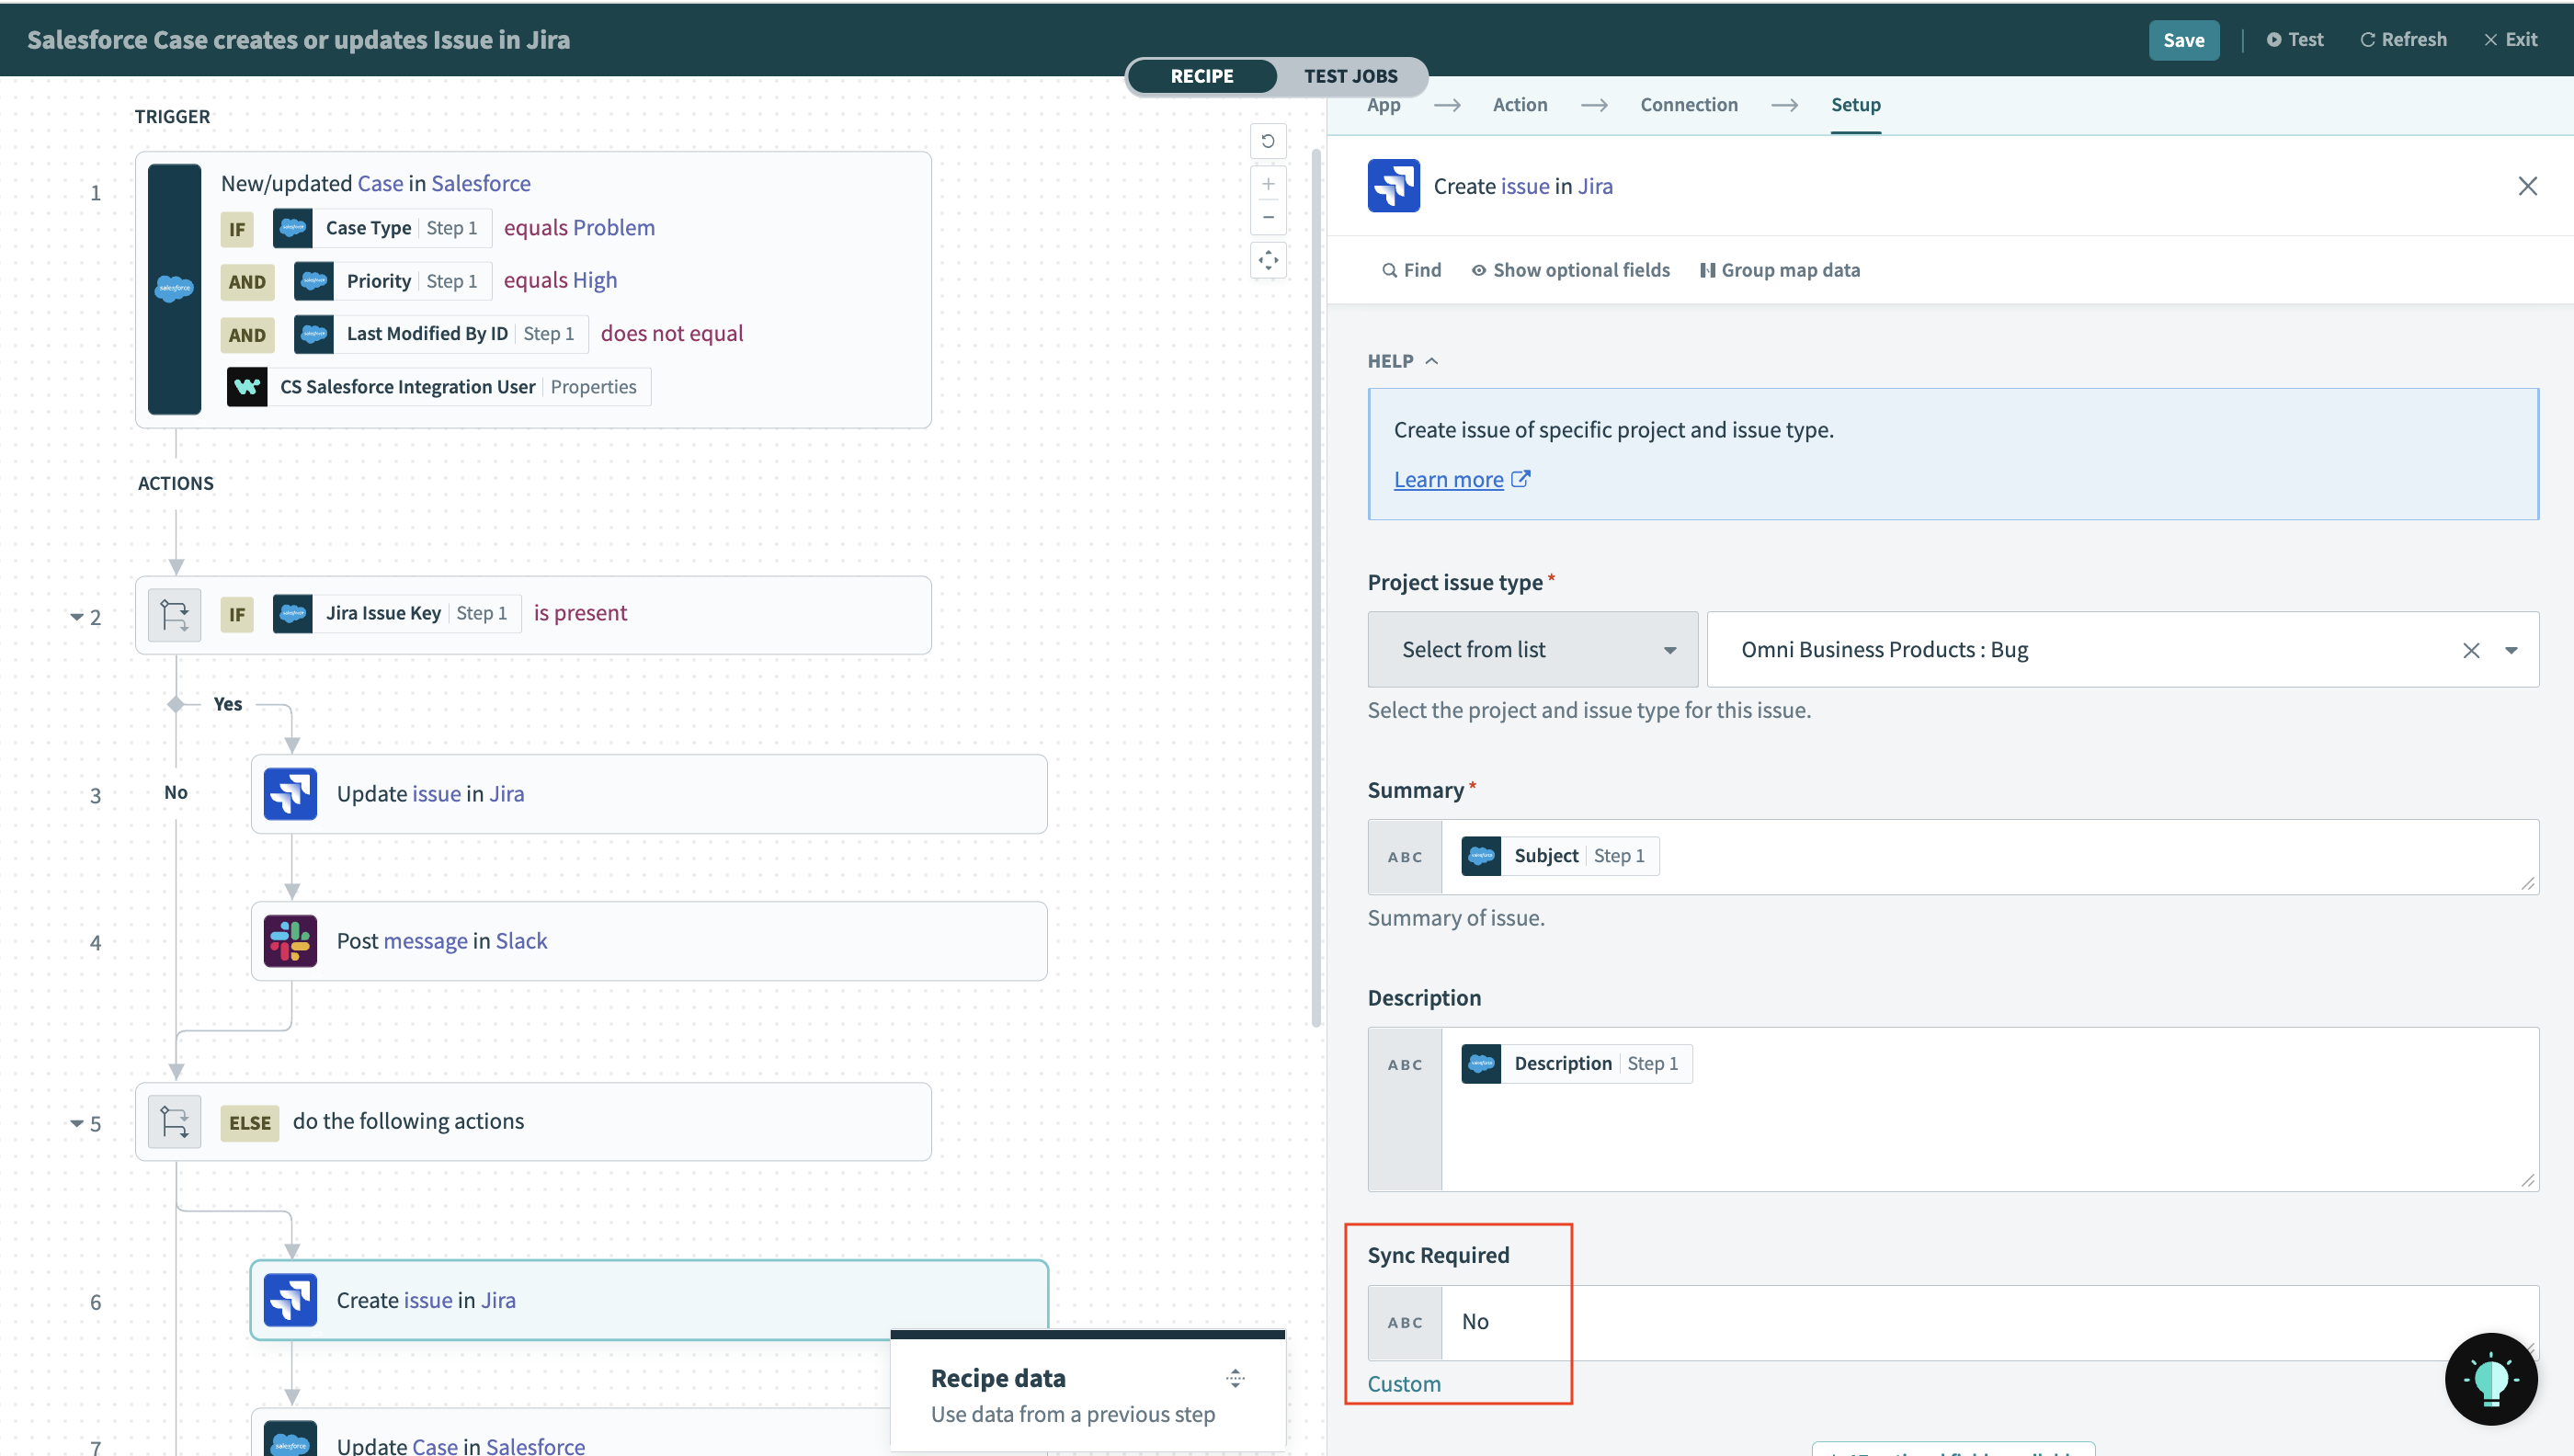
When syncing customer support cases to Jira issues, you can create a custom field called “Sync Required”. Whenever a CS representative manually updates an issue, they should set the value to “Yes”.

Whenever you update the issue in Workato, set the value to “No”.
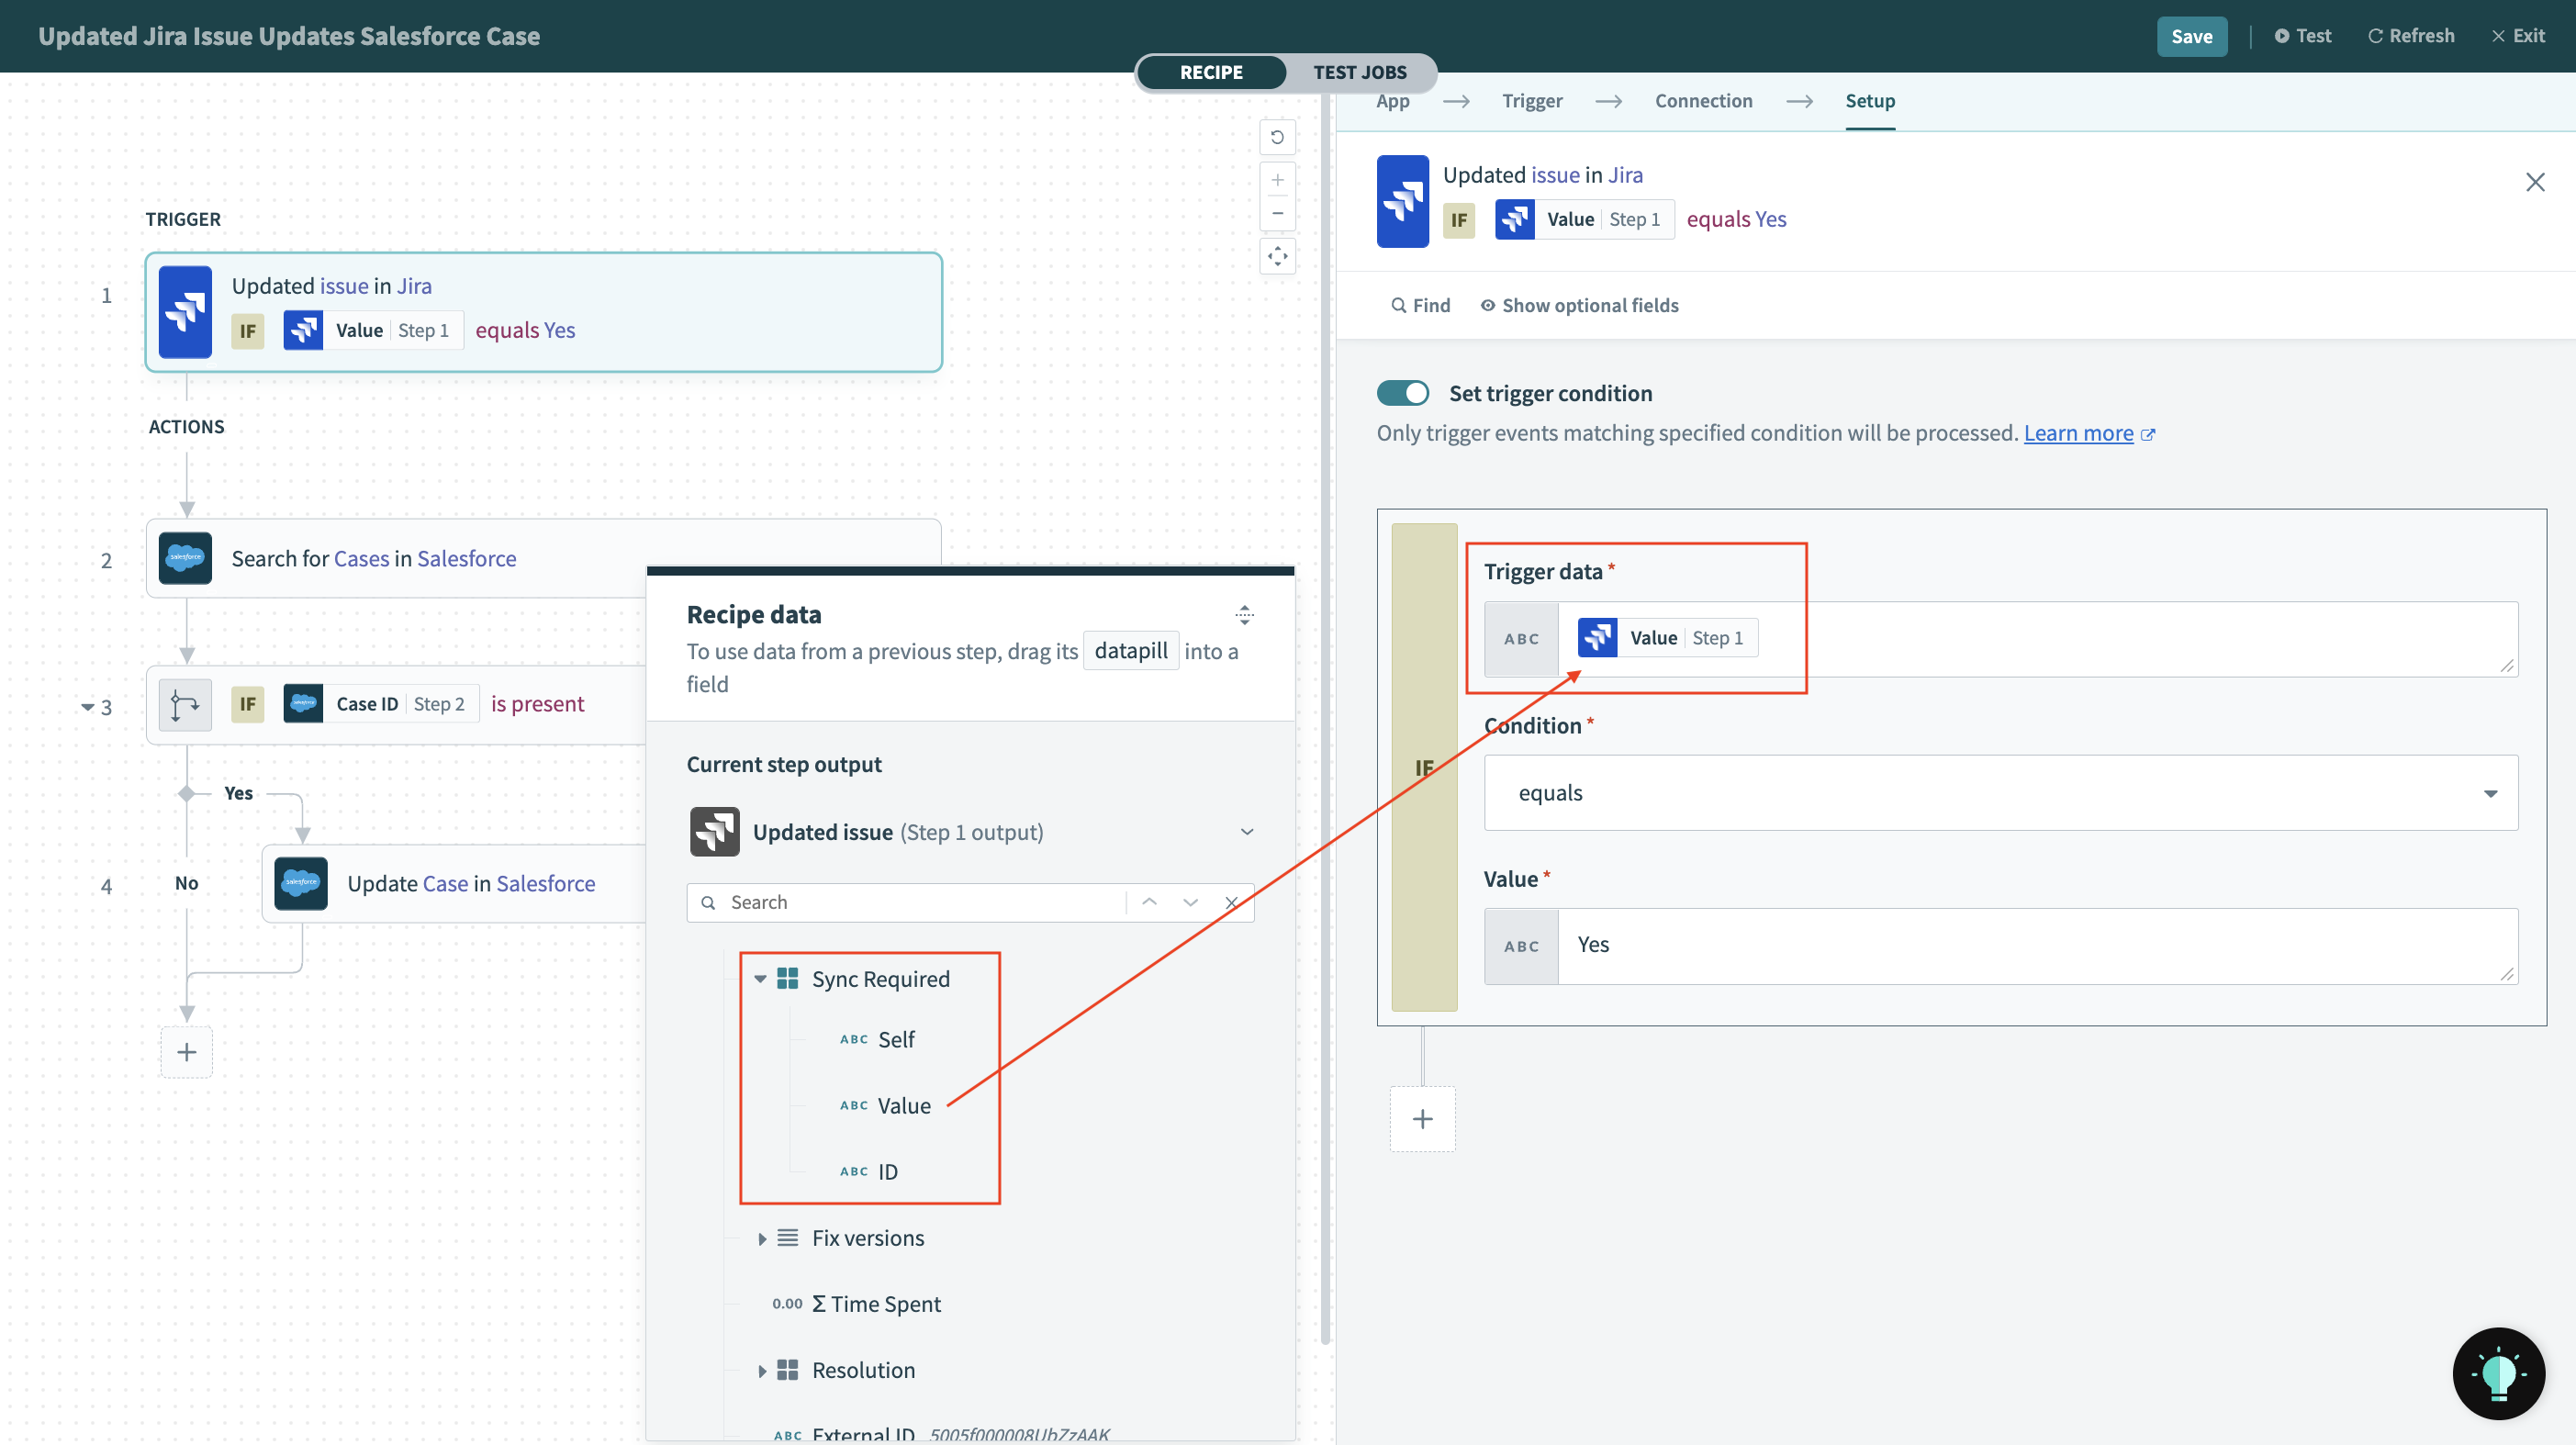
Finally, for any recipe triggered by a new or updated issue, create a trigger condition to only capture records where “Sync Required” has a value of “Yes”.
When to use this
This strategy can be used with any app that allows the creation of custom fields, so it can be used even for apps that don’t surface any “Last updated by” information. However, it does require human users to configure the field correctly any time they make a change. If you use this strategy, be sure to train your teams on how to correctly use the custom field.
Pro tip – use account properties to store the integration user
One last tip. The credentials you use for your automations can change over time. If you have to update your integration user, you don’t want to have to hunt through all of your recipes to find and update references to the old user. To avoid this, you can use an account property to store the ID for your integration user. Go to Tools > Properties to create an account property.
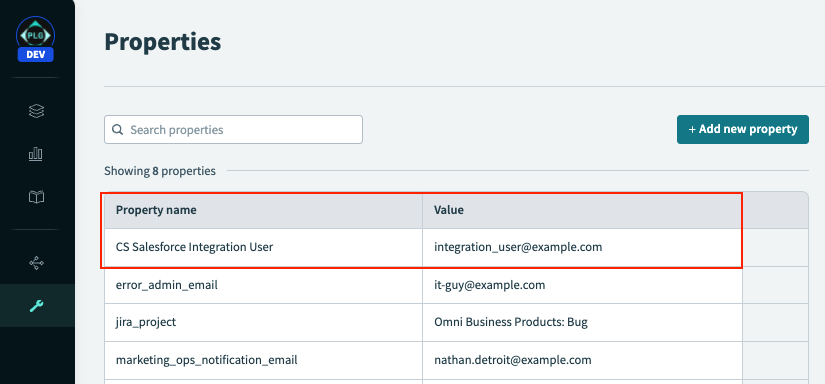
Now, instead of directly providing the integration user’s info in your recipes, you can just refer to your account property. It’s available in the recipe data widget and you can use it like any other datapill.
Using account properties means that:
- If you need to change your integration user, you can update just the value of the account property. The change will take effect across all recipes that use it.
- If you need to use different integration user accounts and different app instances in your development and test environments, you can set the correct account property value for each environment without needing to edit your recipes.