
What are Environments in Workato?
Environments are a low-code/no-code approach to simplify change management for your automations. Below, we will look at the importance of having a robust change management system, and everything you need to know about Environments.
The automation movement
The automation movement is gathering momentum across the enterprise. For one thing, more business processes, across more departments, are being automated. More than 60% of automations in Workato now cover non-IT use cases.
Read more: Workato’s Workato Automation Index 2021
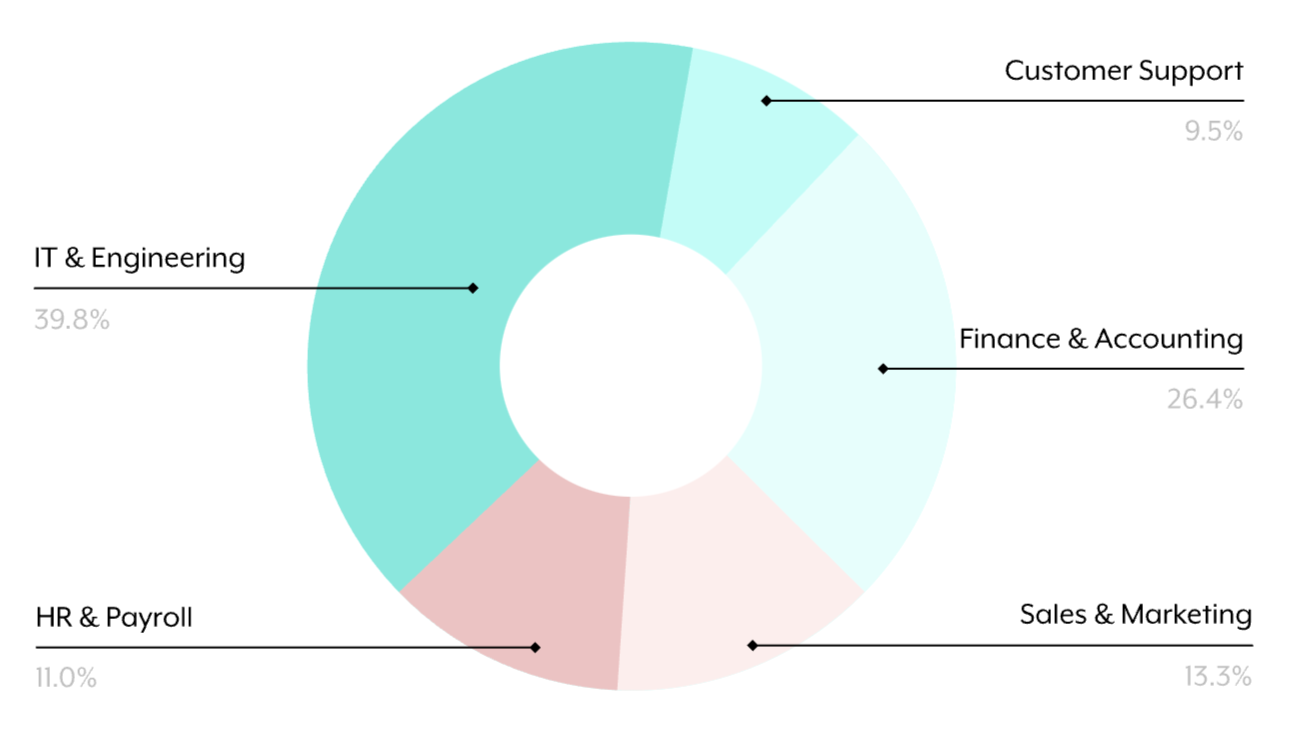
Departments with the most automation
In addition, the process of building automations is being democratized, as both tech-savvy and business-savvy teams are embracing the automation wave. Almost half of our builders in Workato now work outside of IT.
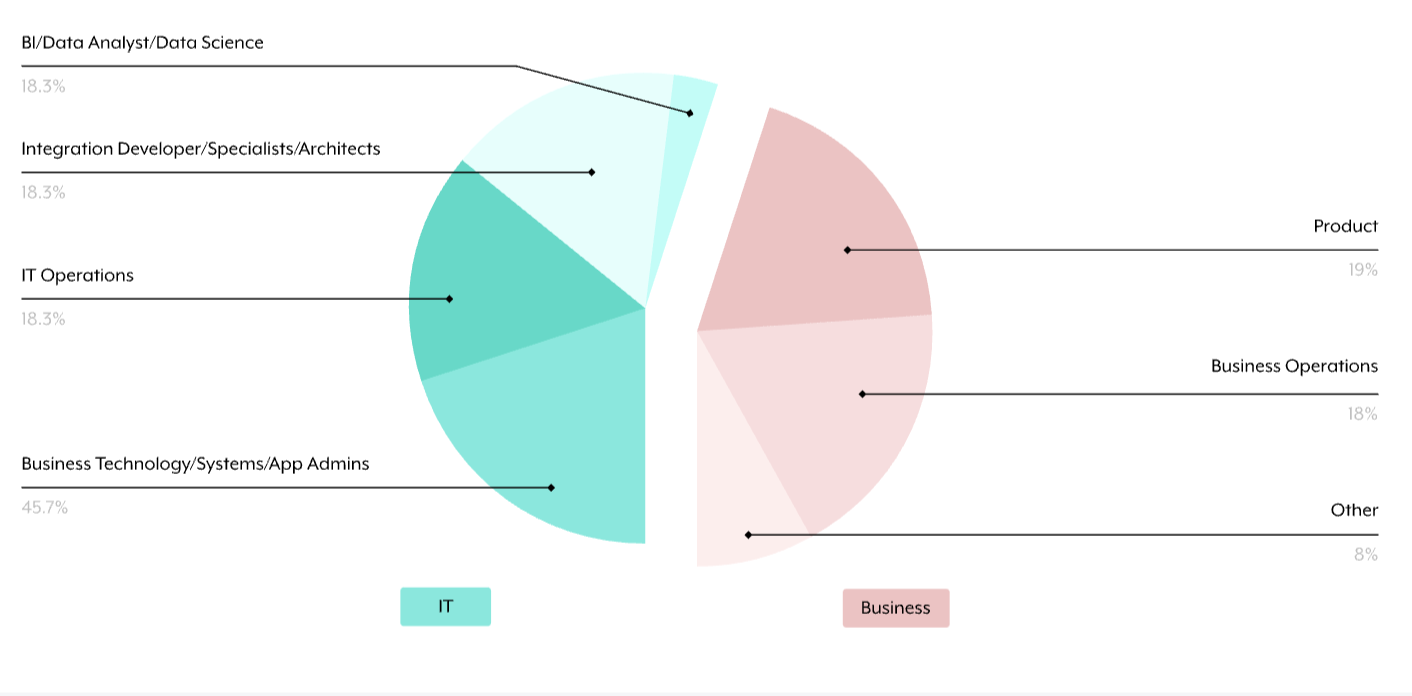
Who builds automation?
The importance of change management in automation
However, automating critical business processes isn’t a one-and-done thing. Your automation projects need to continue to evolve and grow with your needs.
For example, a case management project might begin with a simple recipe to create engineering issues in Jira from tickets in your support platform. But over time, you might add additional rules to determine when to escalate issues, or ChatOps capabilities to triage and resolve issues via Slack.
You might switch to a new customer support platform, or change where you manage bugs. While all this change happens, your case management automations need to remain functional and stable. To make this work, you need real, robust change management.
The limitations of conventional change management methods
But conventional methods for change management come with their own challenges. You need dedicated, third-party tools for version control, code repositories, and code deployment. You also need specialized skills to manage pull requests, peer reviews, approvals, deployments and rollbacks.
Low-code/no-code change management
To truly fulfill the promise of democratizing automations, we need to democratize change management as well as building, but there’s never been a low-code/no-code tool for enterprise-grade change management that can match the rigor of code-based tools.
To automate critical business processes at scale, both technical and non-technical users need to be able to:
- Build, test, and experiment without impacting production data.
- Deploy a project into production when ready.
- Develop, test and deploy changes to active projects with zero downtime.
- Protect critical automations by controlling who can build, test and deploy
- Audit the history of how projects have changed over time.
- Roll back to a previous version of a project if something goes wrong
In other words, we need a low-code/no-code approach to change management, that’s easy for business experts to adopt and apply, but flexible enough to fit in with the existing CI/CD processes required by technical users.
This approach will unlock the ability to add more builders, without compromising quality, stability, and scale.
Introducing Environments: the low-code/no-code way to change management
Environments are the new low-code/no-code way to manage change in Workato. Each workspace includes three environments:

Development– a space to experiment, build, test and debug. Connections inDevelopmentshould authenticate to sandbox versions of your apps.Test– while you’ll certainly test and debug recipes as you build in theDevelopmentenvironment, you’ll probably also want to do quality assurance and user acceptance testing on your project as a unit. TheTestenvironment is the place for thisProduction– when your project is tested and ready to roll, deploy it seamlessly to yourProductionenvironment. Connections inProductionshould authenticate to production versions of your apps.
Environments and change management best practices
Protect your production automations with role-based access control
As a best practice for change management, you should limit the ability to make changes in your Production environment to those who are responsible for it.
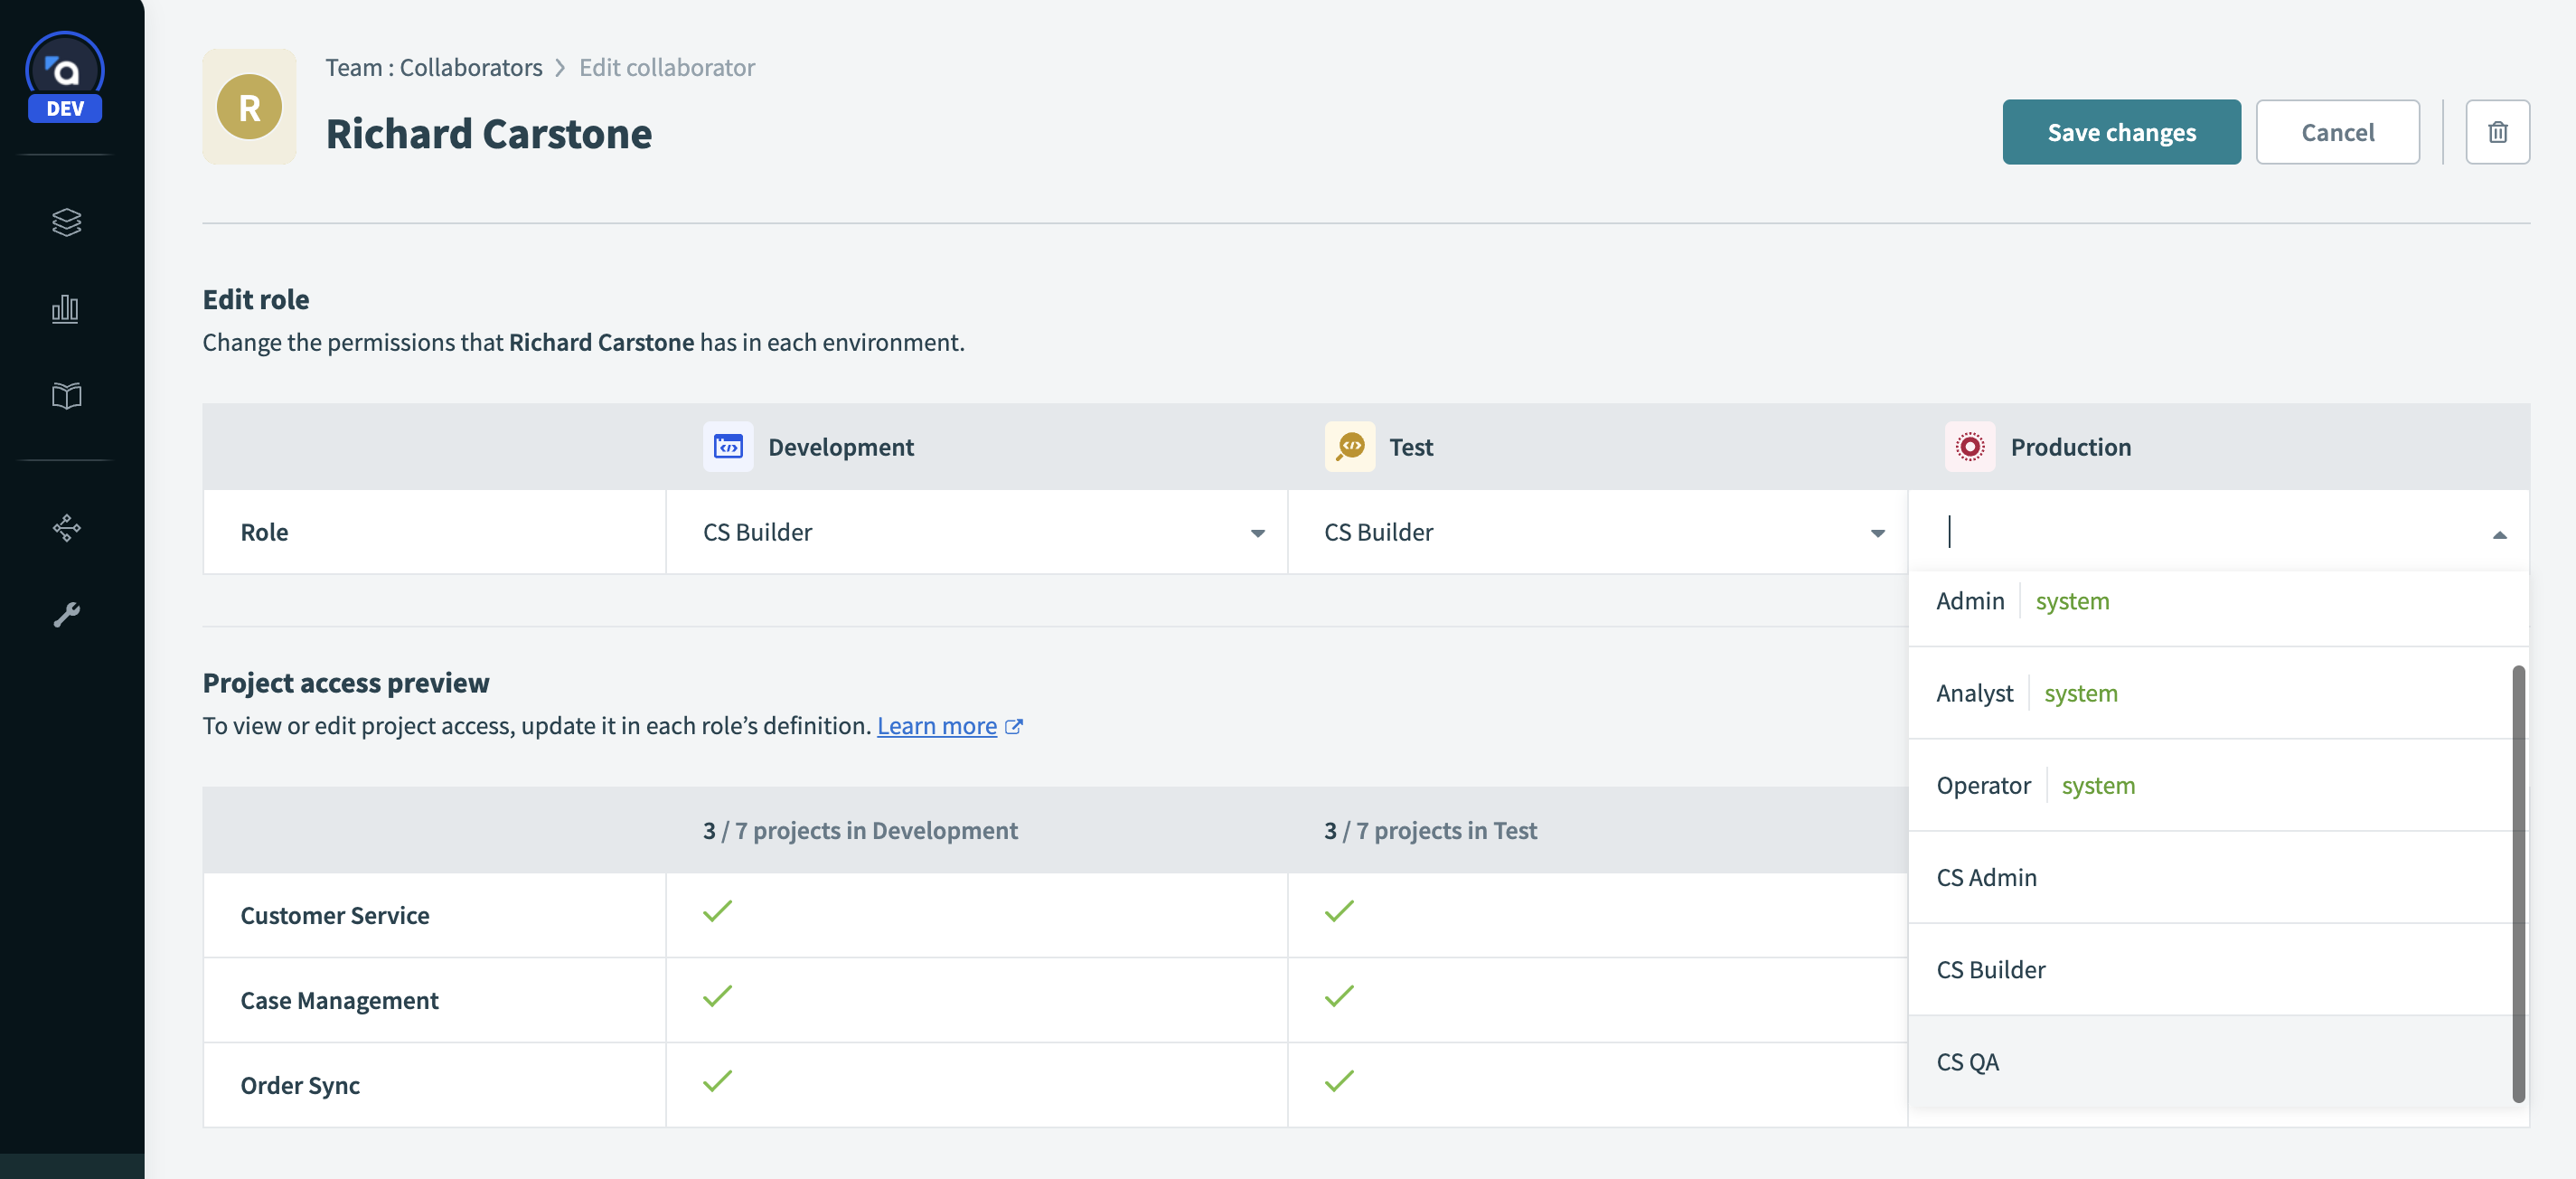
Workato’s role-based access control feature allows you to control access to each project, and to each environment. For example, an integration builder might have full access in the Development environment, but only read access in Production to enable troubleshooting.
Example:
Here’s an example of how you might set up a small team to manage a particular project:
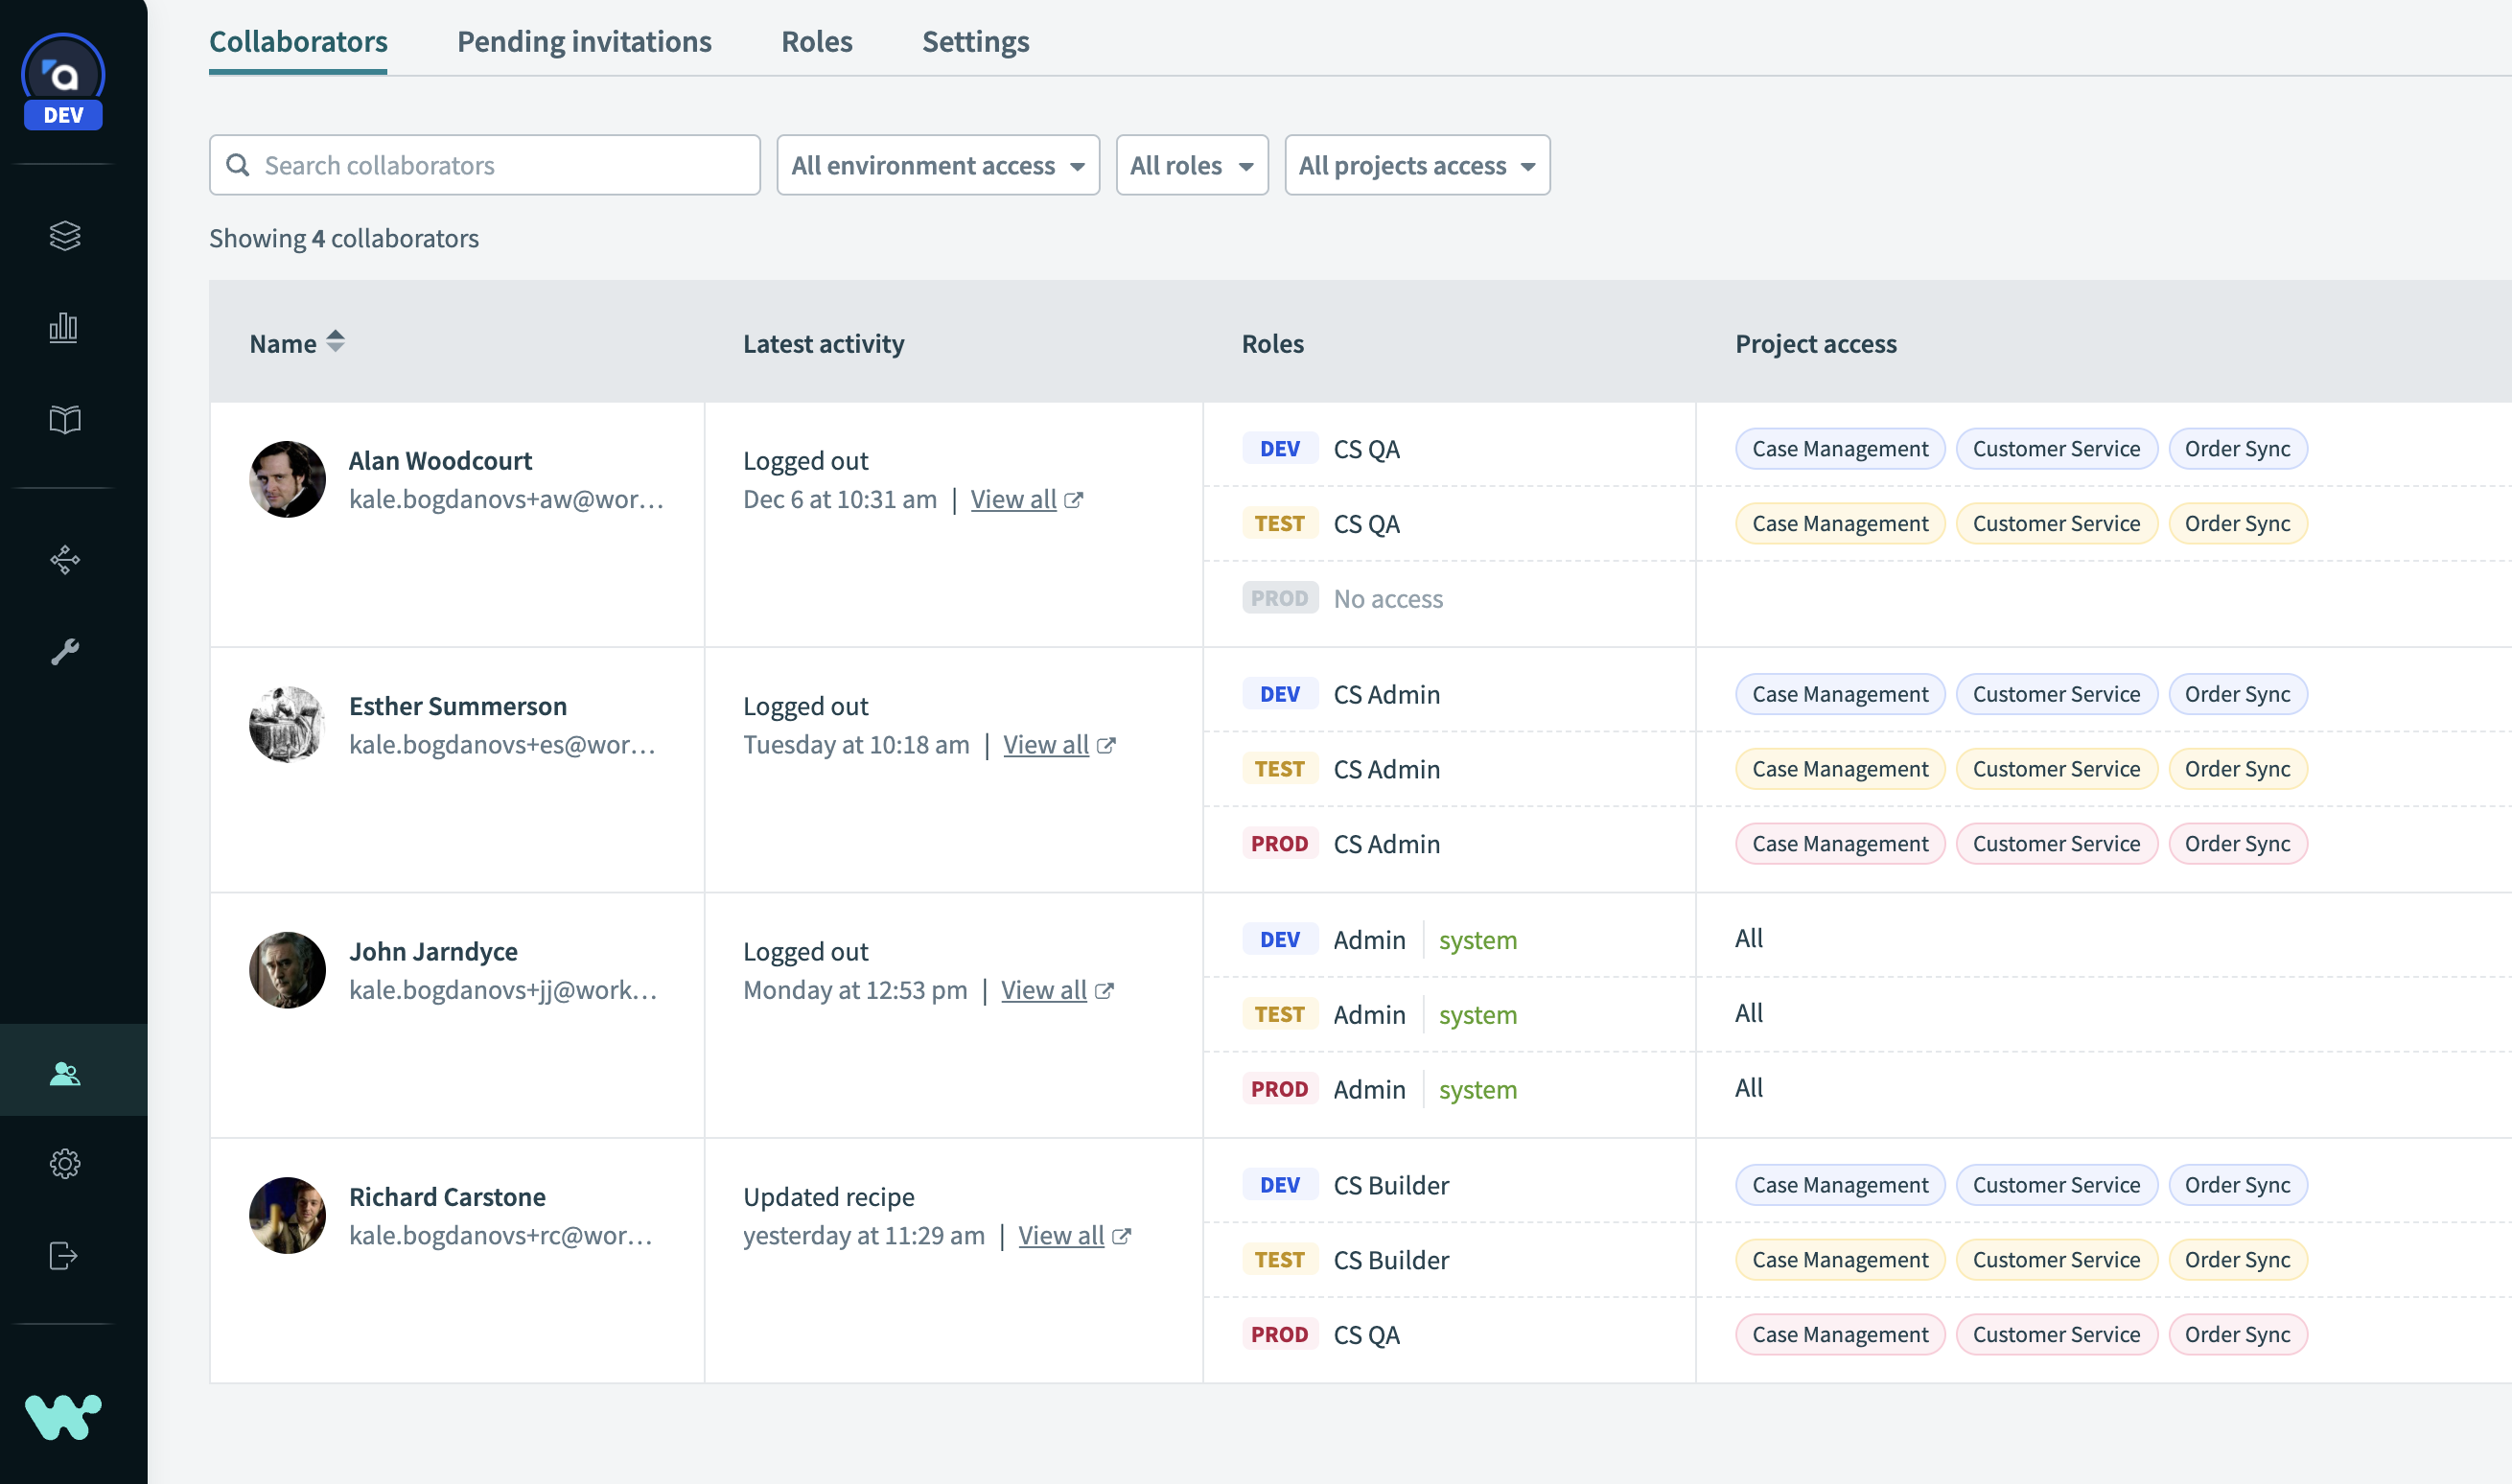
Example of team set-up
- John – the workspace admin, has full access to all environments and projects. He can also create new projects, invite other users, and assign roles.
- Richard – an integration builder, has full write access to the particular projects that he works on, but only in the
DevelopmentandTestenvironments. He cannot deploy a project toProduction. - Alan – a QA tester, has read-only access to the
DevelopmentandTestenvironments. He can review recipes and connections, and run tests, but cannot make any changes. - Esther – a project lead, has full access to the projects that she works on in all environments. When she is satisfied that the project is stable and working correctly, she can deploy it to
Production.
Setting up role-based access this way makes it easy to create a process to develop, review, and approve changes to a project, and prevent any regressions or accidental changes.
How to deploy projects between Environments
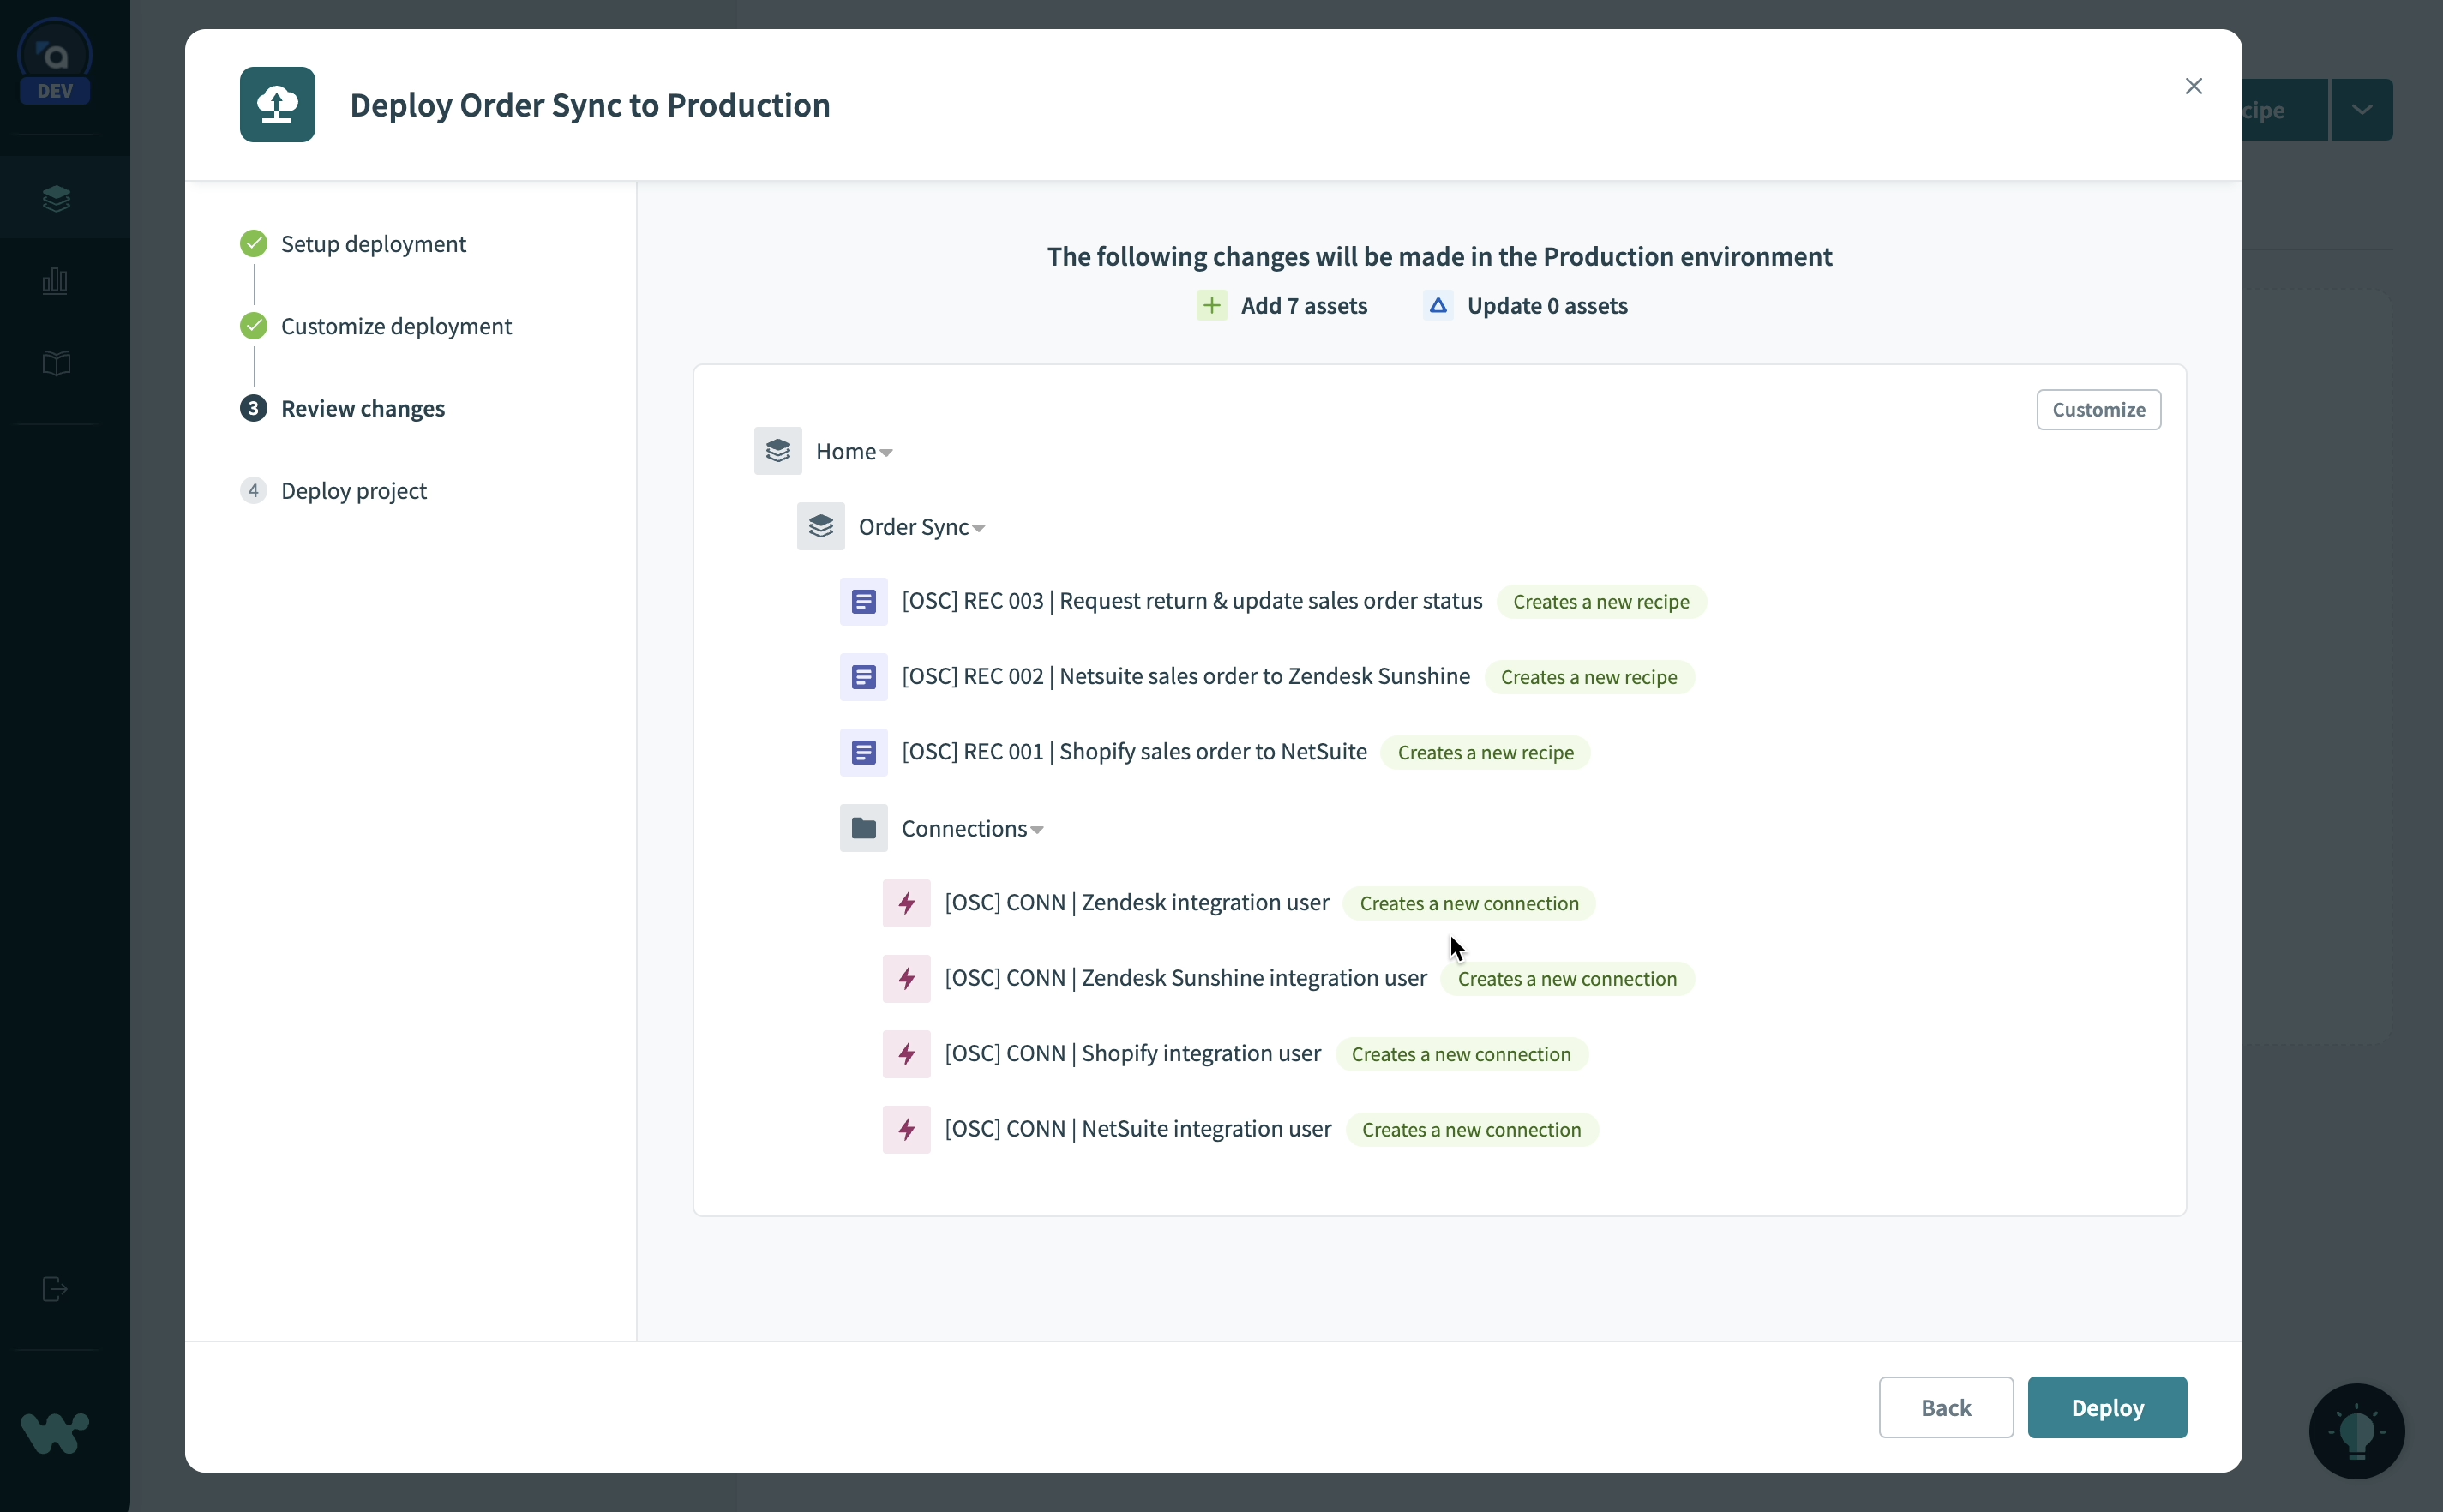
Deploying projects across Environments
Deploying a project is simple. No scripts, no external tools, no JSON manifests. Just head to the Deployments tab and click Deploy project.
- Any dependencies, like recipe functions, connections or lookup tables outside the project are automatically detected and included in the deployment by default.
- The deployment wizard automatically detects changes for you and builds a deployment package. You can customize the deployment package to control exactly which assets to deploy.
- Adding a note to your deployment is recommended for auditability, and can be used to add any version information required by your processes.
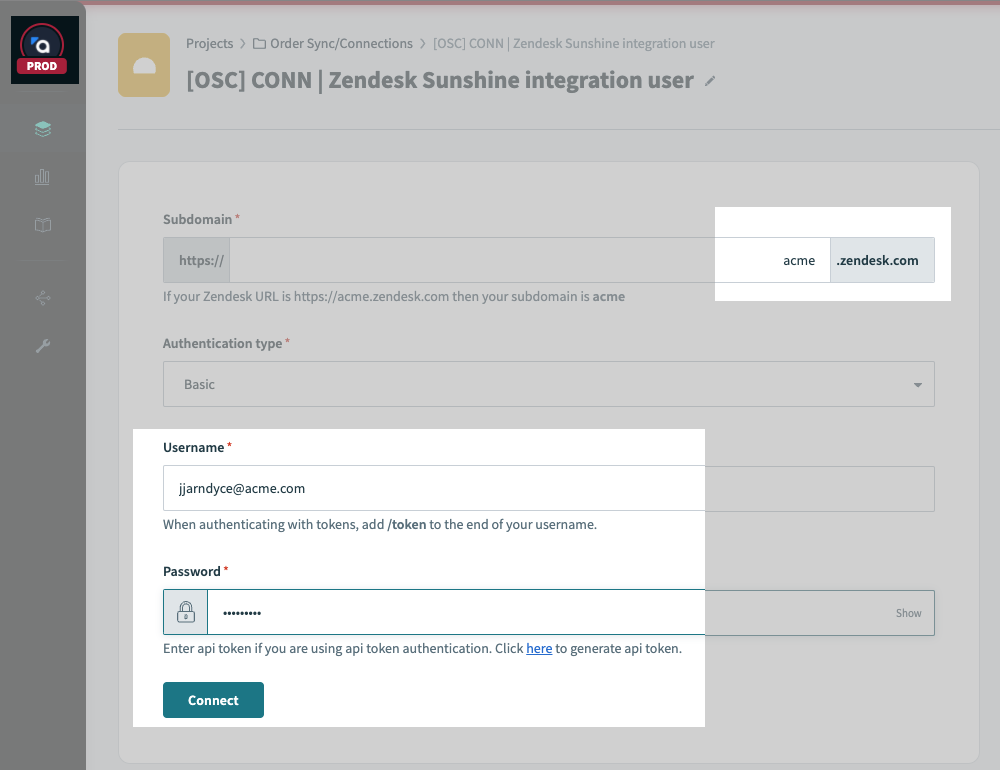
The first time you deploy a connection to a new environment, you will need to reauthenticate. This helps you to make sure that each environment connects to the appropriate instance of your apps.
Related: Deployment Tools in Recipe Development and Lifecycle Management
For example, connect your Zendesk app to a sandbox instance of Zendesk in Development, and your production instance in the Workato Production environment.
Deployment History: Know your history, and go back anytime
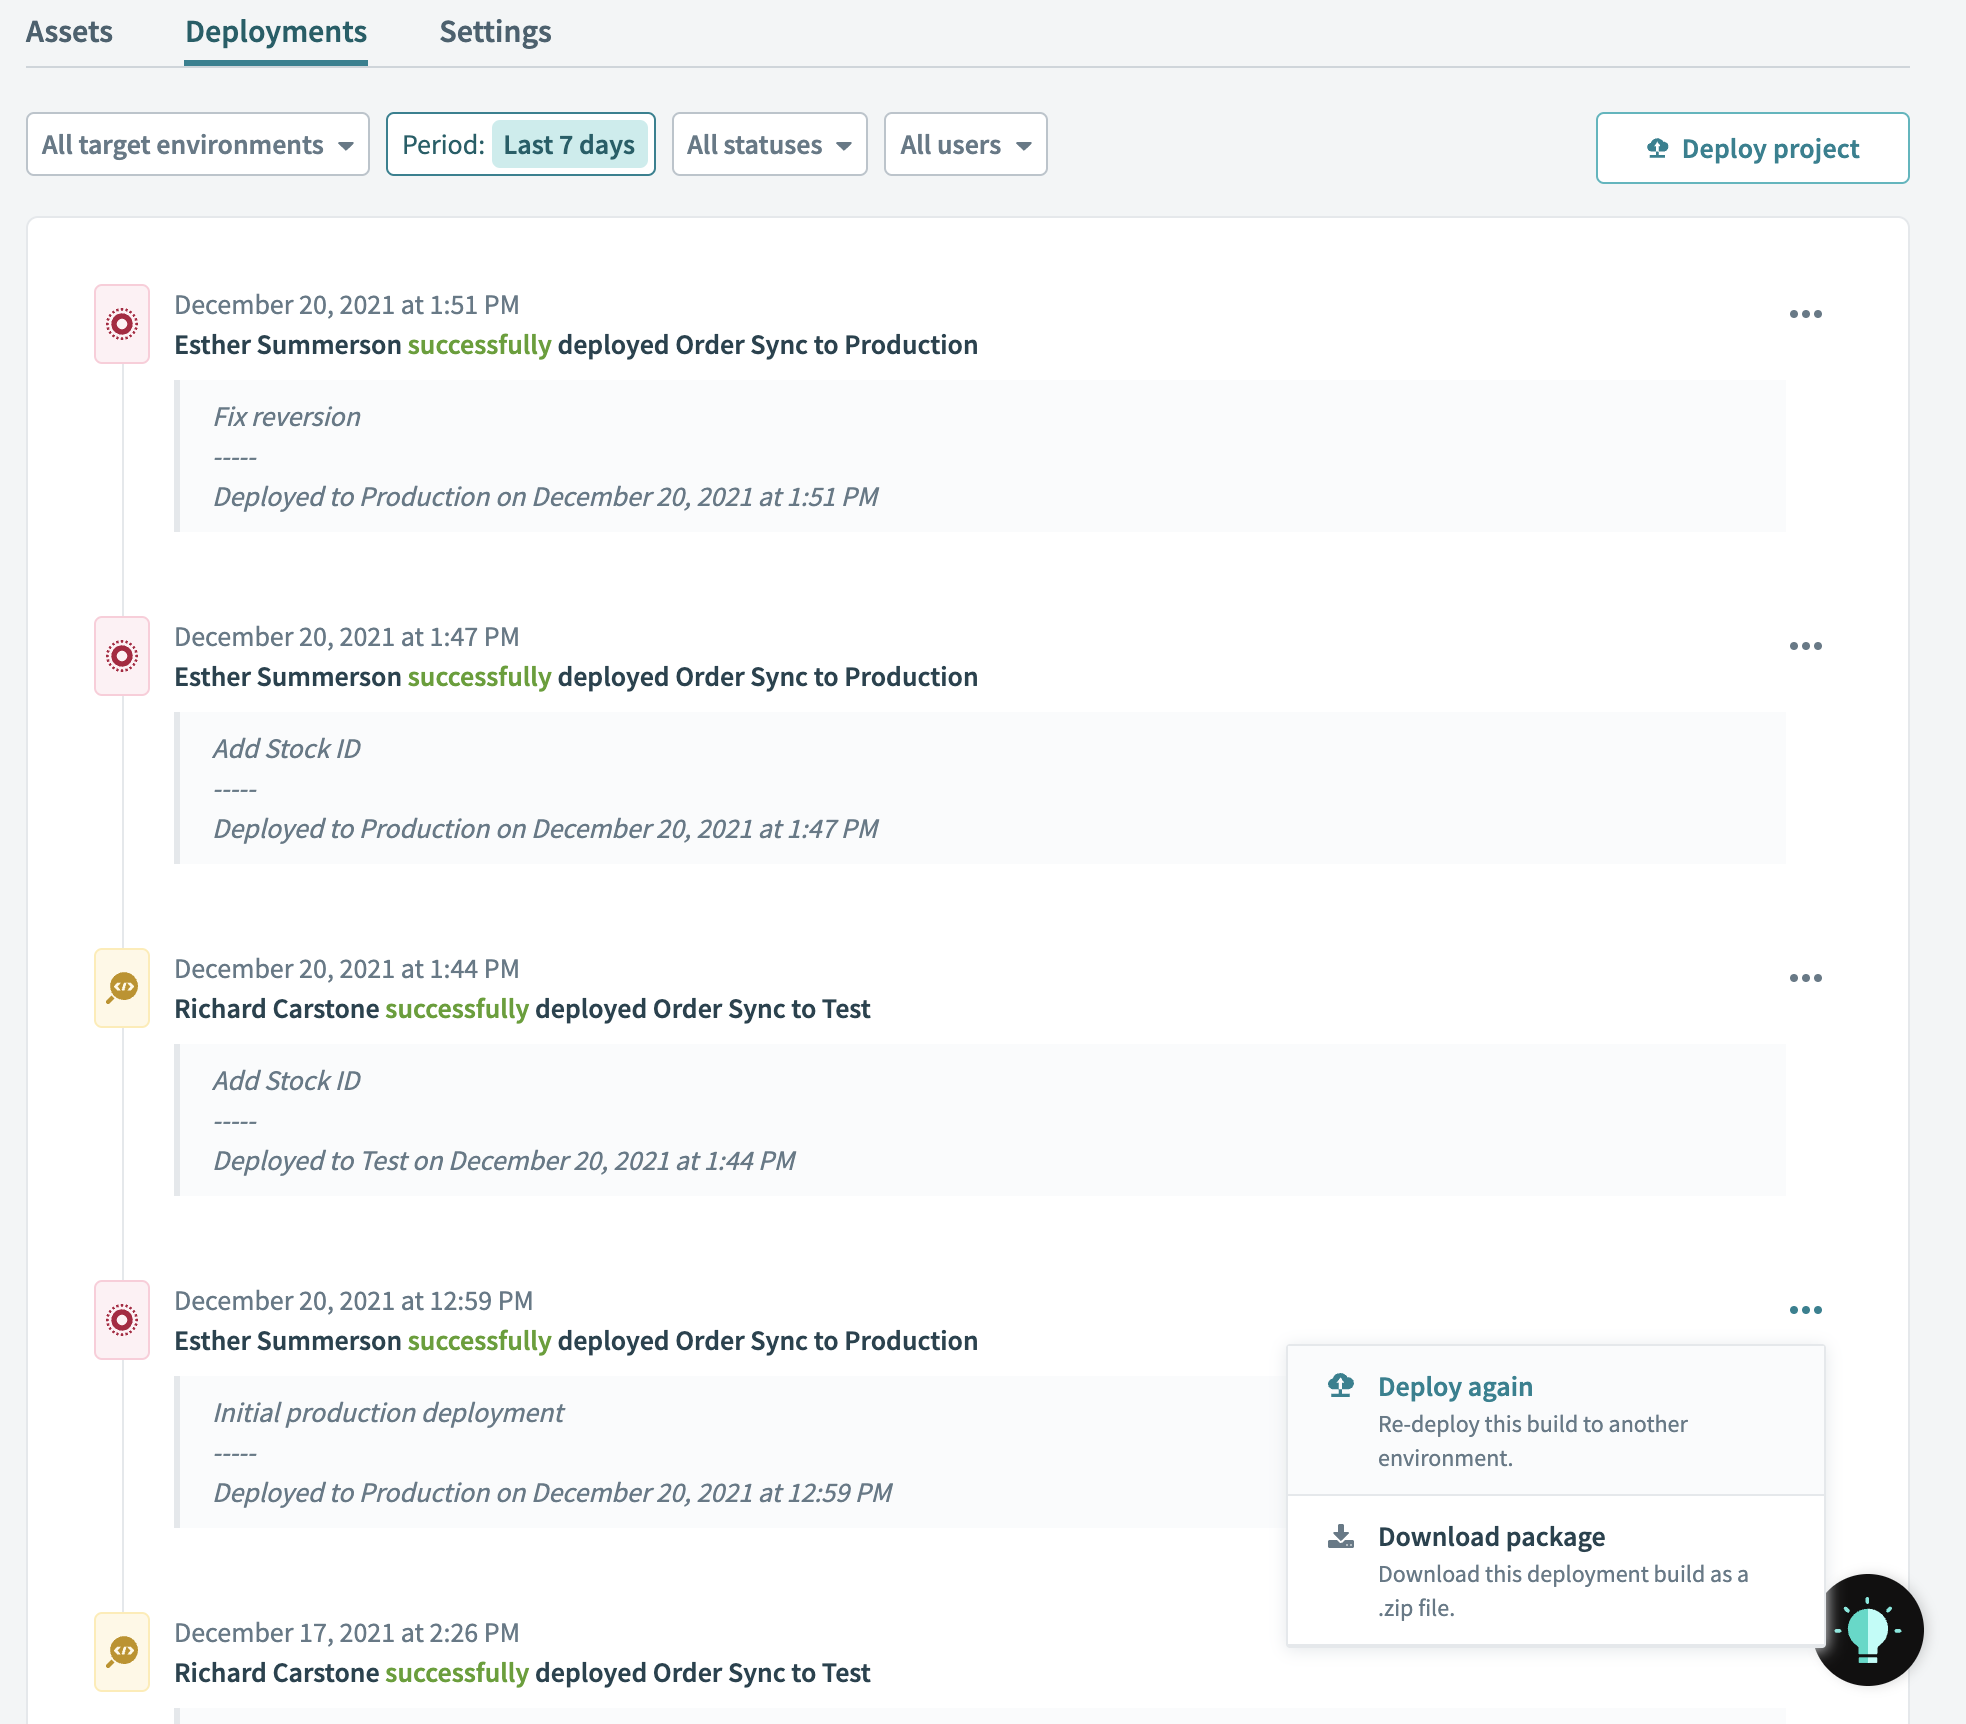
Deployment history across Environments
At any time, view a complete deployment history for a project in the deployments tab. You can see who deployed a project, to which environment, and why. You can also download any deployment as a JSON package if you need all the details.
Sometimes accidents happen, even with the best processes. If a change to your project causes an unexpected problem, don’t panic. You can roll back to a previous stable deployment from your deployment log at any time.
Integrate with your existing CI/CD processes
Environments empower your business users to develop robust change management processes without having to learn a new set of tools and skills. But what about your technical users? Your organization likely already has an established process for automating change management with version control and CI/CD tools.
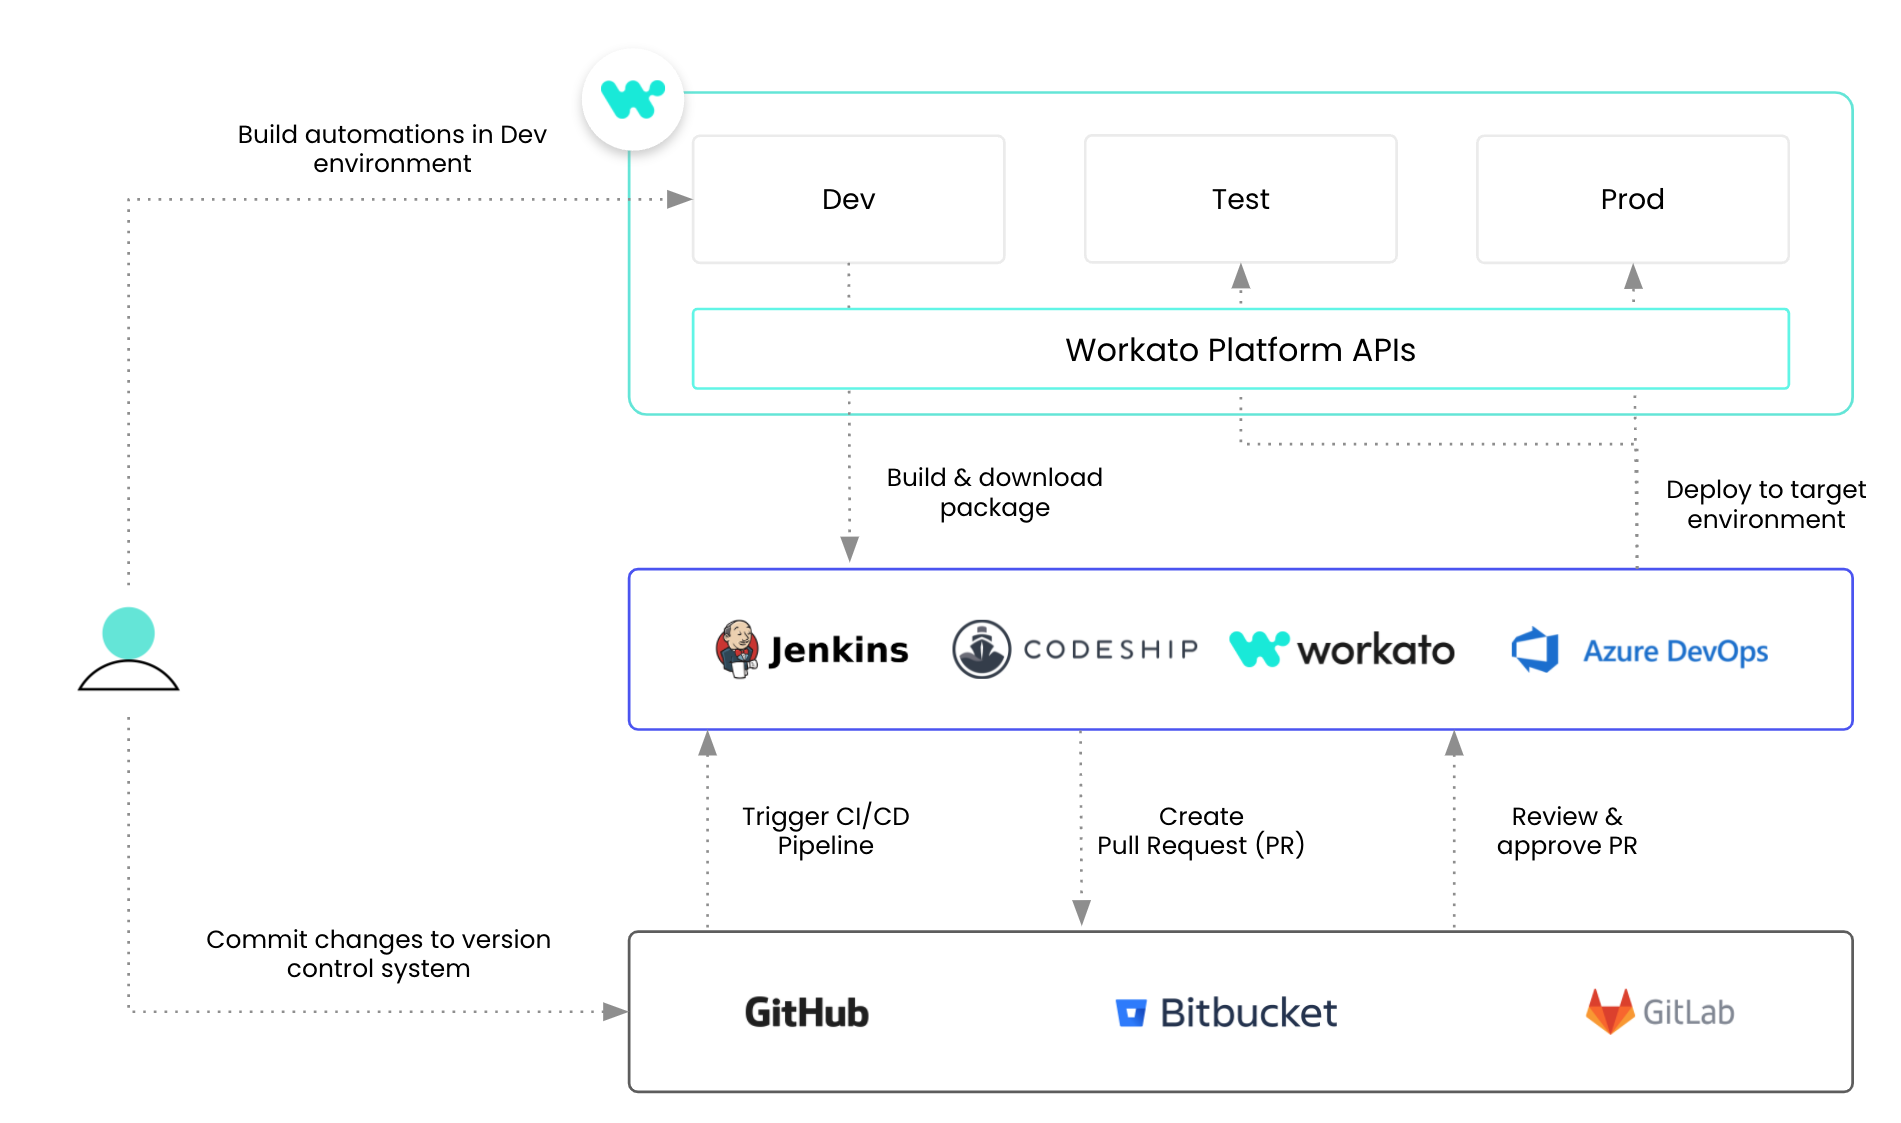
integrate Environments with existing CI/CD processes
Environments allow you to choose the process that works best for each project. In addition to the in-platform deployment, we’ve also released new platform API endpoints to download any deployment and deploy to an environment. Use the platform API to integrate Workato seamlessly into your existing CI/CD process.
Related: Best Practices for Recipe Lifecycle Management and CI/CD
Track usage across Environments
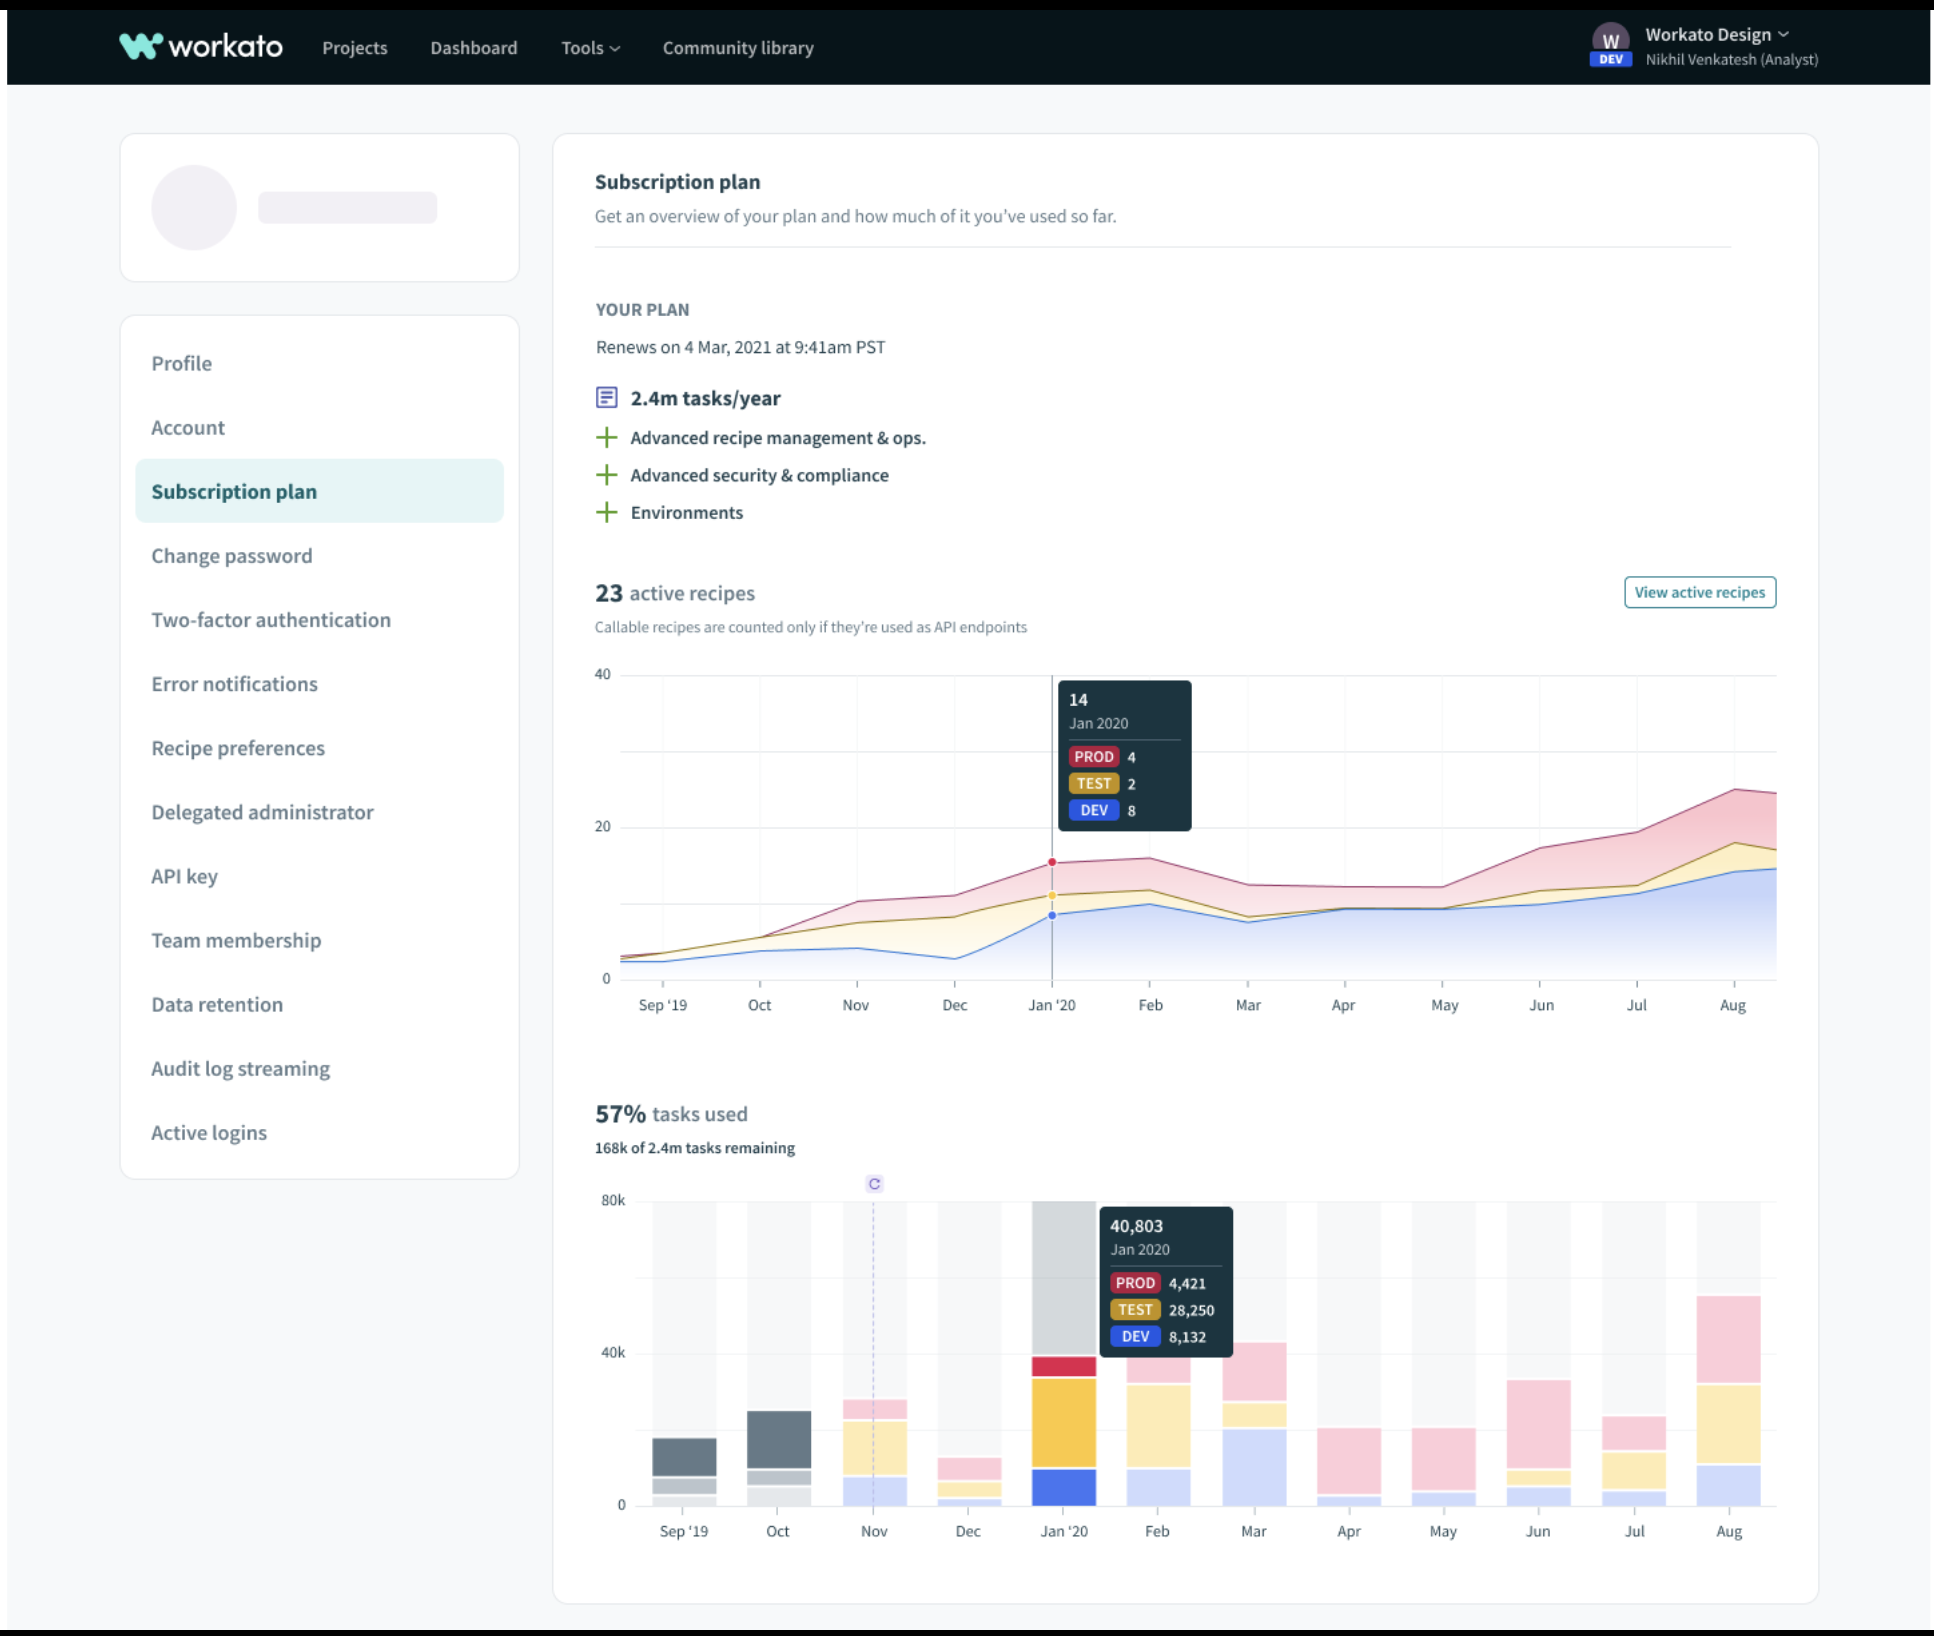
Usage tracking in different Environment
Even though your active recipes and task usage for each workspace happens across several different environments, you can get a birds-eye view of your overall usage at any time. See exactly how many resources you’re using and where, so you can get the most out of your plan.
How to get started with Environments
Currently, environments are available as an add-on for any new Workato workspaces. Migration for existing workspaces is on the way. Please reach out to your Customer Success manager if you’re interested in migrating to environments.
Coming soon
Projects and environments are part of a larger plan to enable enterprise-grade change management with low-code/no-code tools. Look out for more releases in this area in the near future.
Peer review
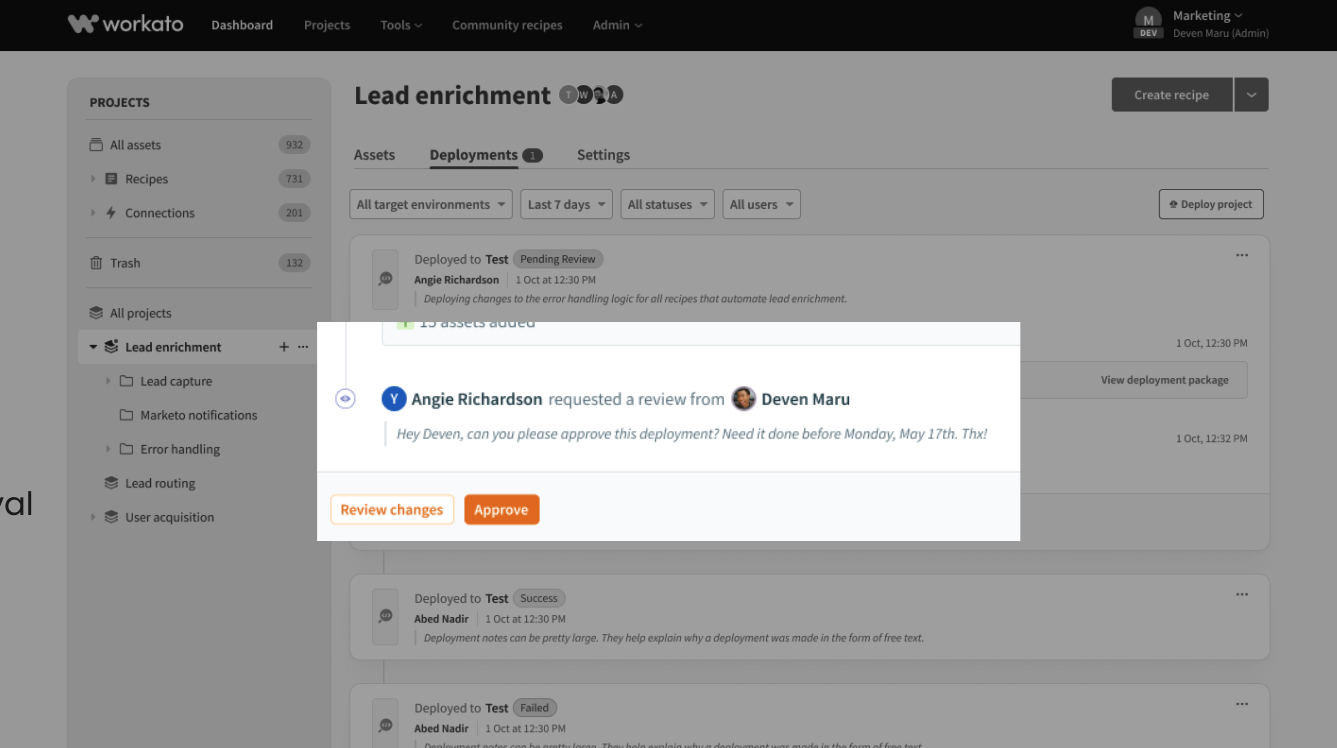
Peer Review
Environments already make it easy to enforce safe deployment processes through role-based authentication. Peer reviews take this one step further. Request approval for changes from another team member. They’ll receive a notification and can review and approve changes in Workato.
Recipe diff
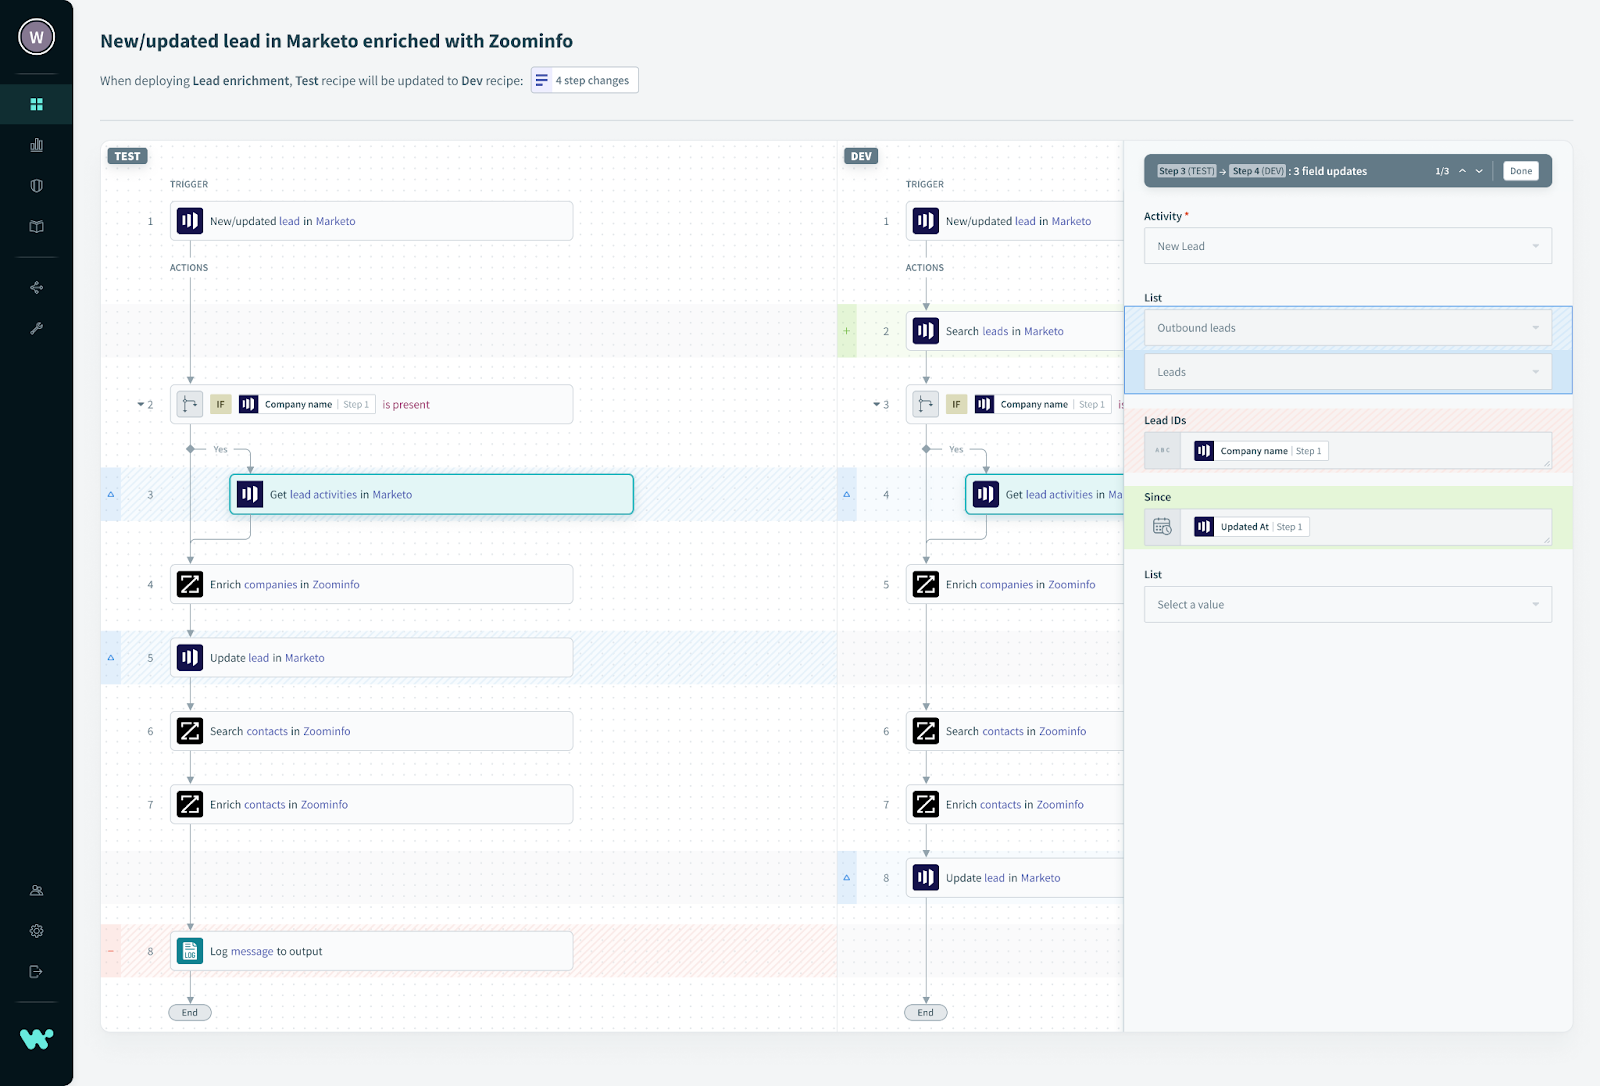
Compare recipe versions with Recipe diff
It’s much easier to review a change when you can see exactly what’s different. Recipe diff will allow you to compare any two versions of a recipe. Added, deleted or moved steps are highlighted, along with any changes to input fields, so you can review quickly and with confidence that you’ve seen every change.
Find out more
To find out more, read the full documentation on managing change in Environments.