

Workbot: A person’s best friend
Workbot is a nifty little helper; it can assist you with so many tasks (and it also never gets tired). Just say the word (or command), and it’ll go off executing all the tasks it’s instructed to do.
What (or who) is Workbot?
Workbot is an intelligent bot platform that automagically connects your favorite applications and Workato recipes – all from the comfort of your Slack workspace.
In this post, I’ll be sharing with you guys how to create a simple Workbot recipe that commands Workbot to create and assign a Github issue – in 5 minutes or less.
Overview
The basic structure of the Workbot recipes goes like this:
Trigger
- Command
Workbot will listen out for this command in Slack, and prompt you for more details to execute its actions.
Actions
- Create issue in Github
With the info Workbot received from you in the trigger step above, Workbot will create an issue in Github, and assign it to someone. - Command reply
Workbot replies with some basic info on the Github issue once it’s done creating and assigning it. How nice!
Easy right? Let’s get down to it.
Create a command
- Head to Recipes and create a new recipe
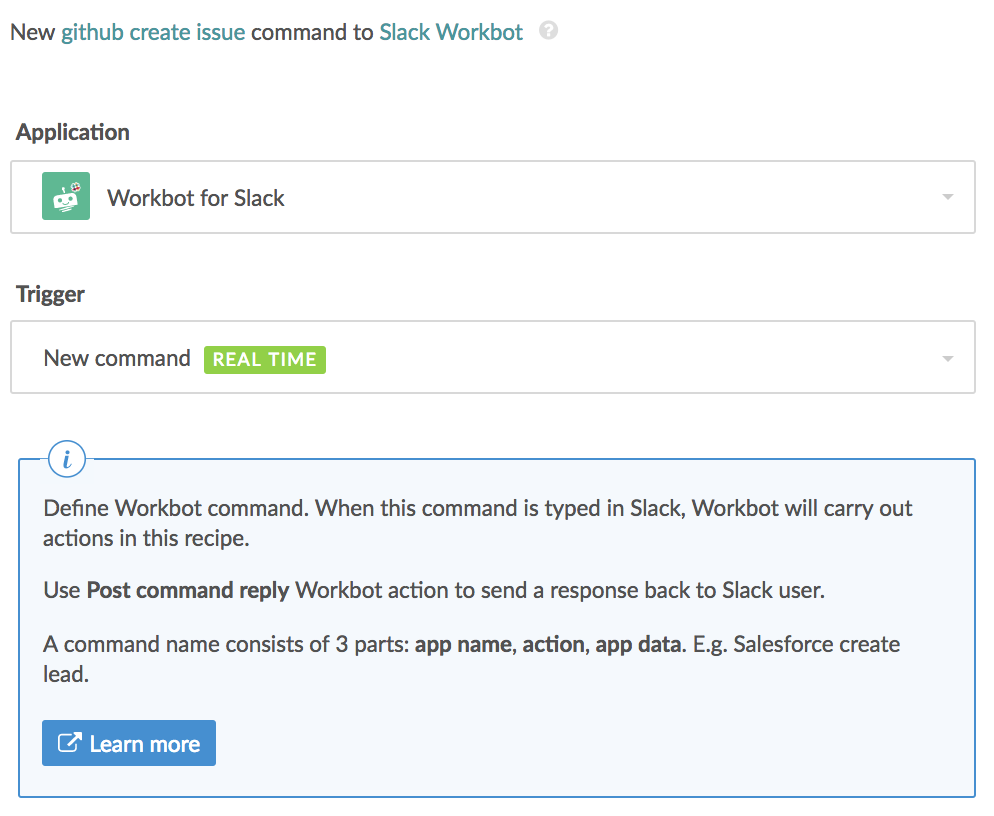
- Under Application, choose our new best friend Workbot for Slack
- Under Trigger, choose New Command

Creating a new command
Lastly, hit Connect to connect your Slack team to this recipe.
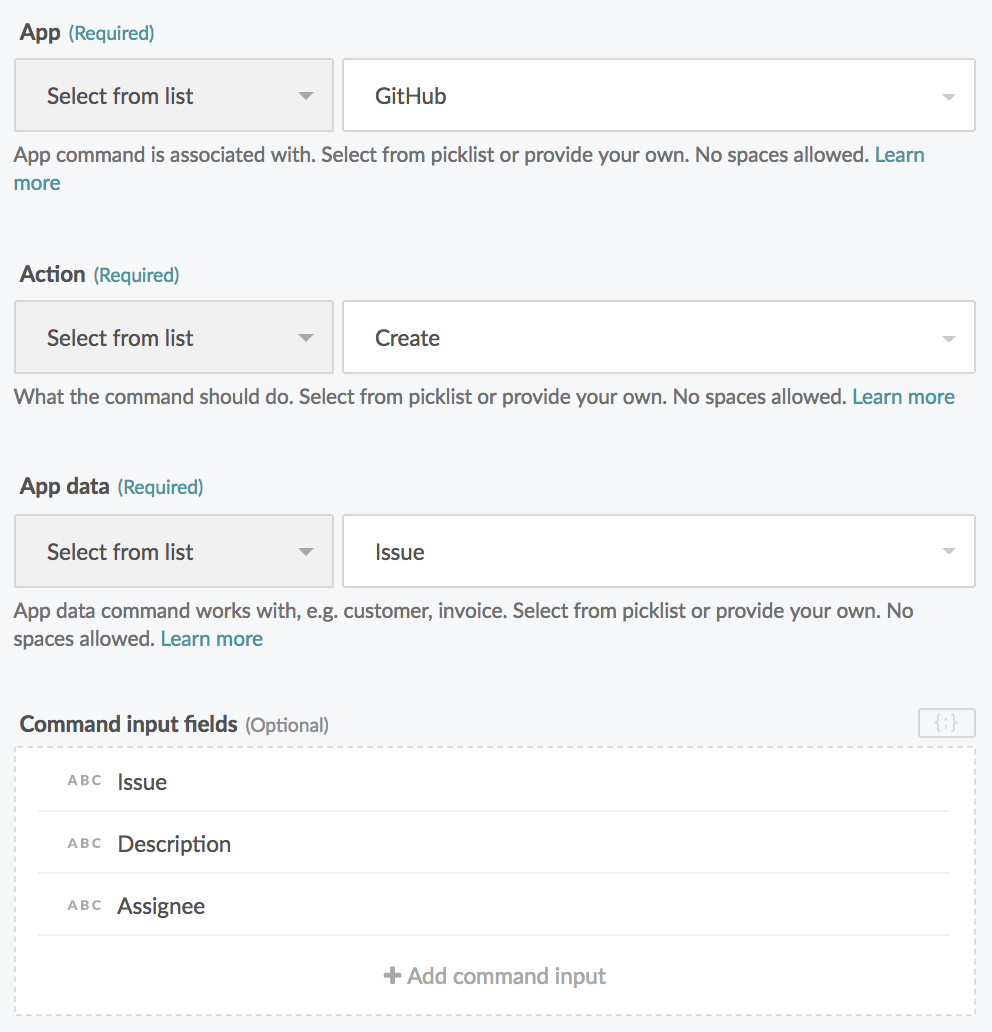
Define the command
Workbot understands commands in 3 parts: app action action-data. Because Workbot is smart (and by smart, I mean it has has built-in Natural Language Understanding capabilities), it’s flexible with how the command is phrased. You have the freedom to type in the commands in any sequence that’s most natural to you, e.g. “create an issue in Github”
- app : This is the 1st word of the phrase; it defines which application this command relates to. In this case, “Github” is the application we want.
- action : This is the 2nd part of the command; it defines what action to perform onto the action-data. “Create” is what we’ll go with here.
- action-data: The 3rd part of the command; it defines what sort of data to act on e.g. Opportunity, Issue, Invoice, etc. we’ll go with “issue” here.
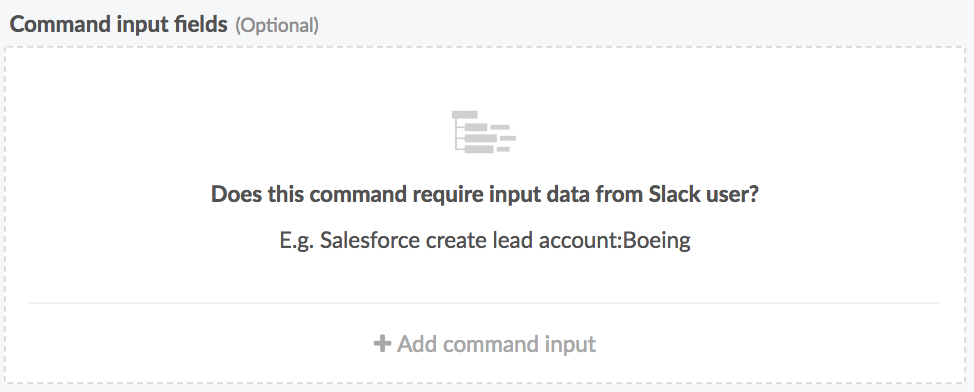
Define the command input fields
For this command, we want Workbot to ask you for some details about this Github issue before creating it. Command input fields let you define each input required. Click on + Add command input.
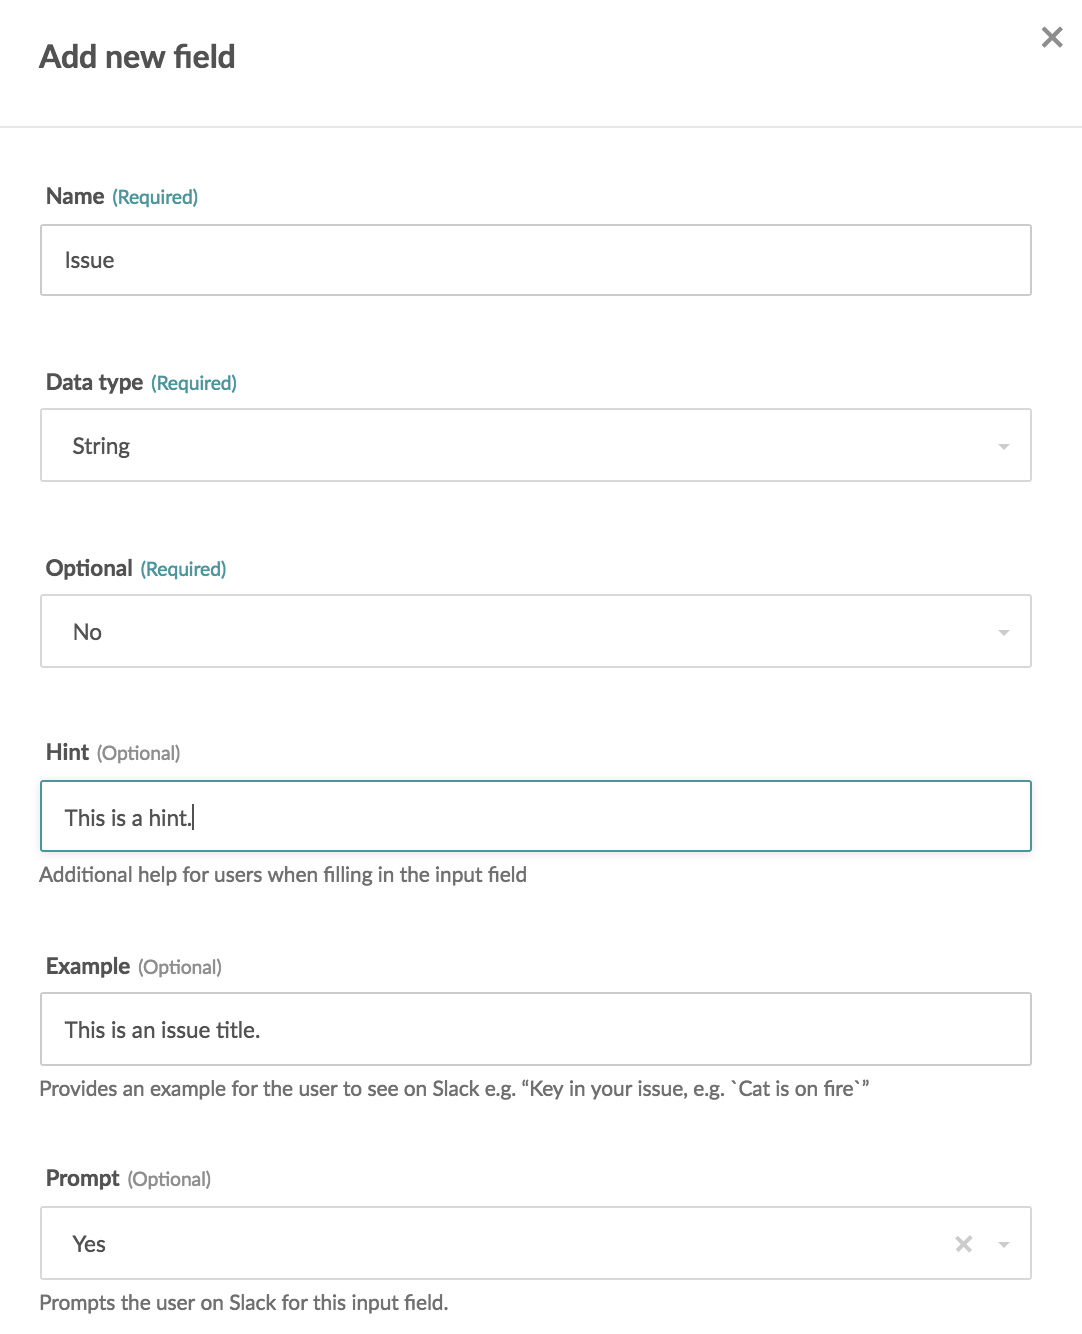
Adding Command input fields
When commanded, Workbot will need 3 things from you before it can create an issue in Github: the issue “title”, the “description” of the issue, and the “assignee” to assign the issue to. So let’s define title, description and assignee as the 3 command input fields. Since only name is required here, we’ll skip configuring the others for now.
Adding a command input field
If it’s all going well, this is how your form will look like right now:
Defining the command
Now, let’s define Workbot’s actions after receiving its command.
Creating issues on Github
When Workbot receives the command, we want it to create an issue on Github.
- Under Application, choose our Github
- Connect to your existing Github account
- Under Action, choose New Issue
- Set the Organization and Repository of your choice – this is where Workbot will create new Github issues.
The 3 command input fields we defined in the trigger are datapills we will use to create and assign the issue in Github. You can find them under Parameters.
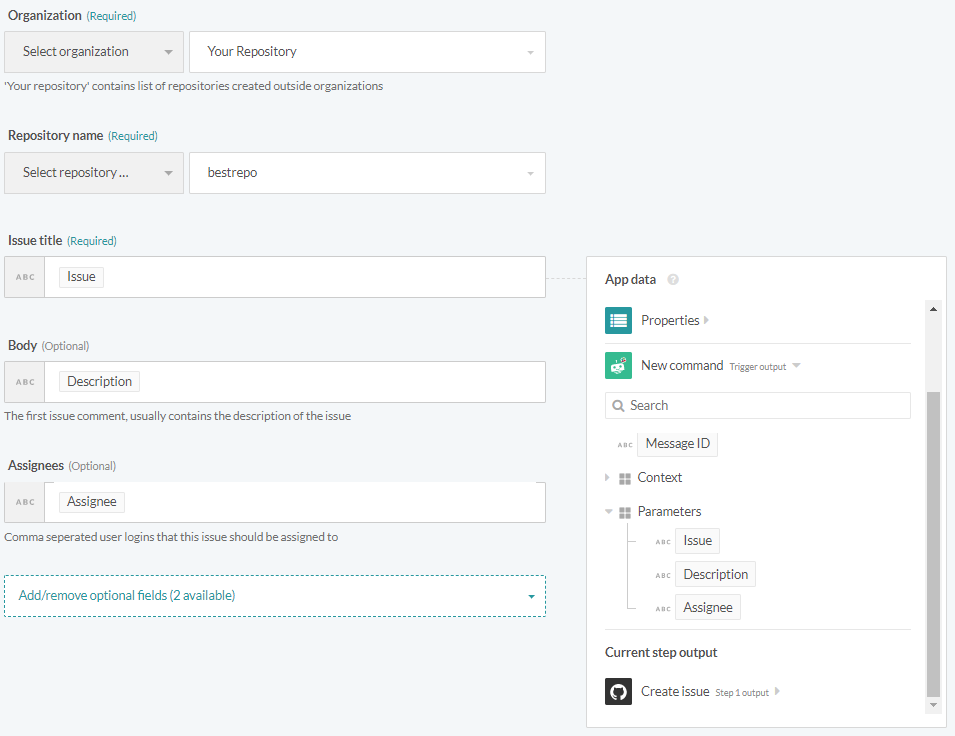
Mapping the command input fields to the Github issue
Define the command reply
We want Workbot to reply to you after it’s finished creating and assigning the issue in Github, furnished with some details.

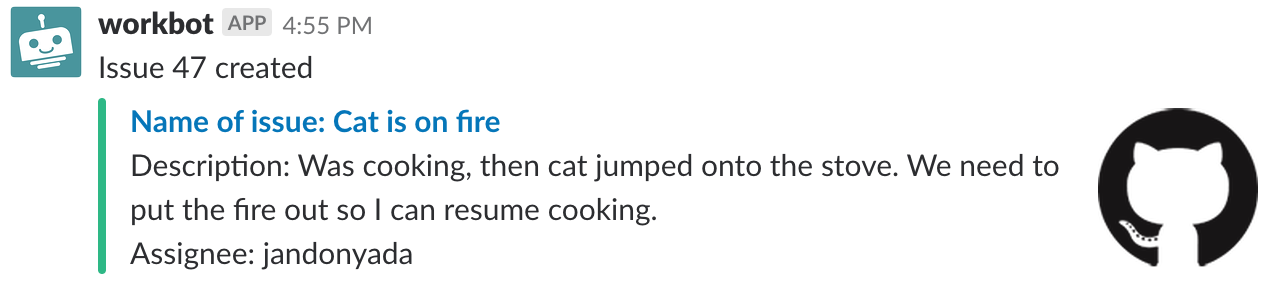
A command reply seen in Slack
The Slack message above is how we want Workbot’s command reply (to the user) to look like after successfully creating the rather unfortunate issue above in Github. Let’s configure the command reply to look that way.
- Add a new step and choose Action.
- Under Application, choose Workbot for Slack.
- Under Action, choose Post command reply.
Getting started with Command reply
Define the Command reply format
Next, let’s configure the formatting of the command reply. The command reply above actually comprises of message and message attachment fields.
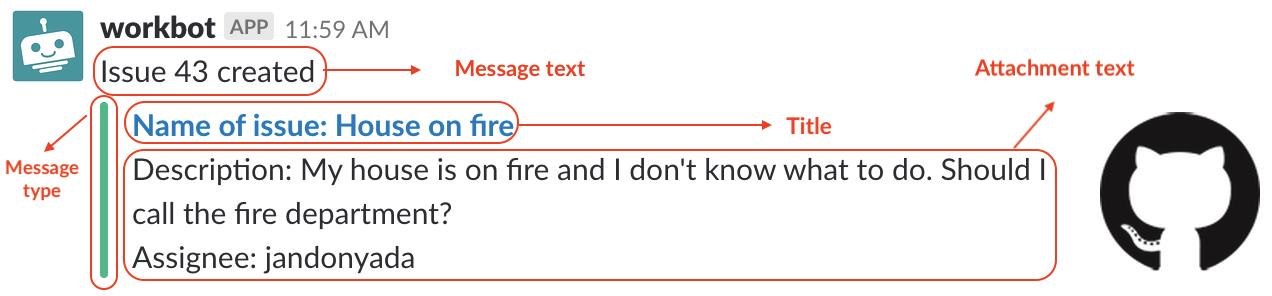
Message and message attachment fields explained
From the issue creation on Github, we can map the step’s output datapills to craft the command reply. Fill up the fields like so (you’ll have to expand Message attachment since it ‘s collapsed by default):
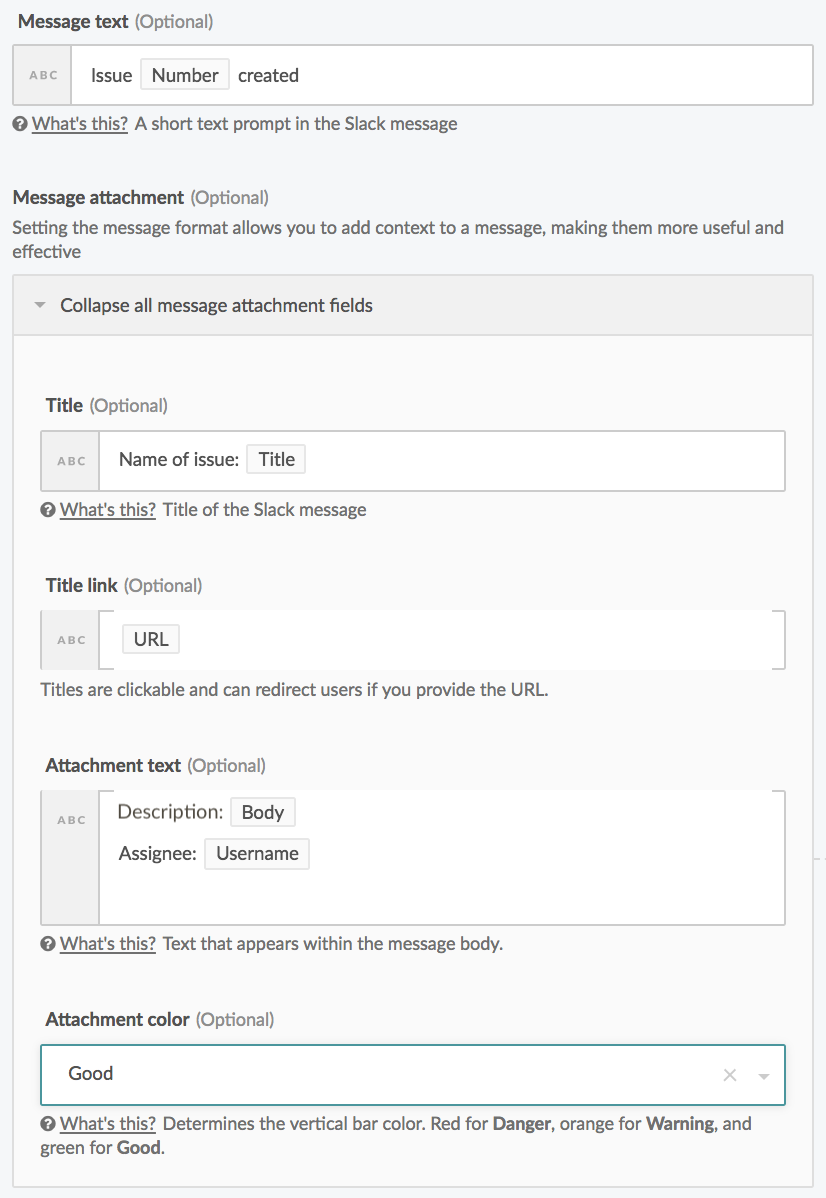
When you’re confident that you’ve configured the Message attachment correctly, hit Save.
With that, we’re done configuring the command reply! Let’s test it out by starting the recipe. You’ll also want to sign into both the Github repo that you’ve connected this recipe to (to check that the issue has indeed been created), as well as the Slack workspace with the installed Workbot (that’s connected to this recipe).
Testing the Workbot recipe
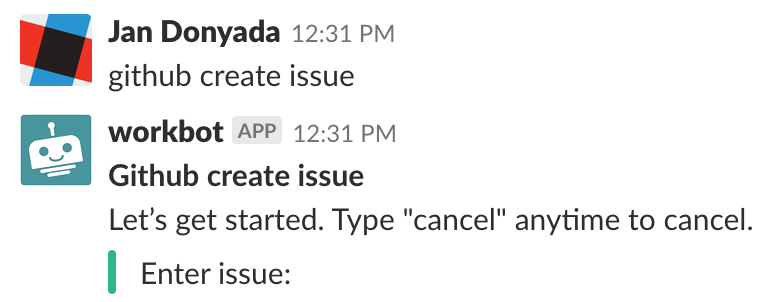
Start the recipe, then sign in to the Slack workspace where the connected Workbot is installed.
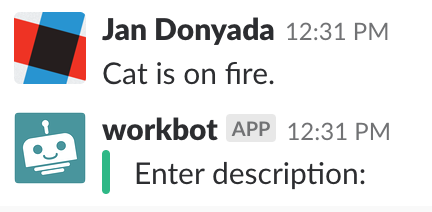
- Send a DM to Workbot, and say something like “create a github issue”
- Workbot should respond with “Enter issue:”

- Enter the issue title
- Workbot should respond with “Enter Description:”

- Enter the description of the issue

- Workbot should now have all the input he needs from you to create the issue in Github. You should see the command reply next:


And that’s it! That was fun wasn’t it (except for the poor burnt cat)?
You can make your command reply more interactive by including attachment fields fields, images, buttons, and even message menus. Buttons and menu options allow Workbot to pass commands back to multiple recipes to carry out more actions.
Head over to our Community Recipes and explore the hundreds of other ways our community has used Workbot in their day-to-day workflows.