Elevating Automation with Workato’s Embedded Environments: A Game Changer for Partners and Clients

In an era where digital transformation is not just an option but a necessity, Workato is thrilled to introduce the Embedded Environments feature, a revolutionary step forward in enhancing the automation and integration capabilities of our Embedded Partners (EPs) and their Embedded Customers (ECs).
What are Environments for Workato Embedded?
Consider a typical scenario: An EP implements an automation to streamline case management, initially setting up a simple workflow to transfer support tickets from a customer support platform to an issue tracking system in their own platform. As business needs evolve, this initial setup might expand to include sophisticated escalation rules, integration with communication tools like Slack for more efficient issue resolution, or even a shift to entirely new platforms for customer support or bug management.
Throughout these transitions, it’s imperative that the automation solutions deployed by EPs remain both functional and stable. However, managing these changes without disrupting ongoing operations or compromising the quality of service can be challenging. This underscores the necessity of a well-structured change management process within the automation framework provided by Workato’s Embedded Environments.
Customer workspaces with the Environments feature provisioned have the following environments:
- Development: Development is the main environment, serving as the primary area where the entire development process begins. This environment is uniquely equipped with certain exclusive features. It is designated for the development of recipes, deployment of projects to subsequent environments, and management of teams and account settings. The collaborators and API clients tabs are only accessible in the Development Environment, under the workspace admin section.
- Test: The Test environment is used to test recipes, perform quality assurance reviews, and perform user acceptance testing.
- Production: The Production environment is where automated processes are deployed after being tested, reviewed, and approved.
Why should you adopt environments for your customers?
Tailoring Change Management for Embedded Partners
For Embedded Partners, change management extends beyond individual automations to encompass the broader ecosystem of their embedded customers and the diverse environments they operate in. Here’s how Embedded Environments cater to the unique needs of EPs in managing automation changes:
- Multiple Isolated Workspaces: Embedded Environments facilitate the creation of separate workspaces for development, testing, and production, allowing EPs to implement and test changes without affecting live operations. This separation is crucial for maintaining stability while evolving automation.
Example diagram of environments utilized in isolated workspaces.
- Streamlined Deployment Processes: With the ability to deploy changes across environments easily, EPs can ensure that updates are thoroughly tested before being rolled out to end customers. This reduces the risk of disruptions and ensures that automations continue to function as expected, even as underlying systems or processes change. Admins can continue to implement RLCM to distribute integrations across customers. From the Development environment, projects can be deployed from Development to Test or from Development to Production as needed.
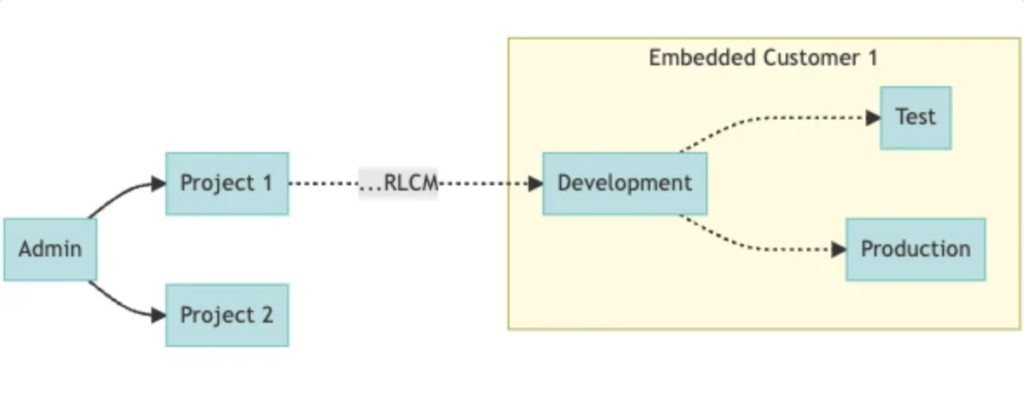
The deployment lifecycle of a project for an Embedded Customer (EC).
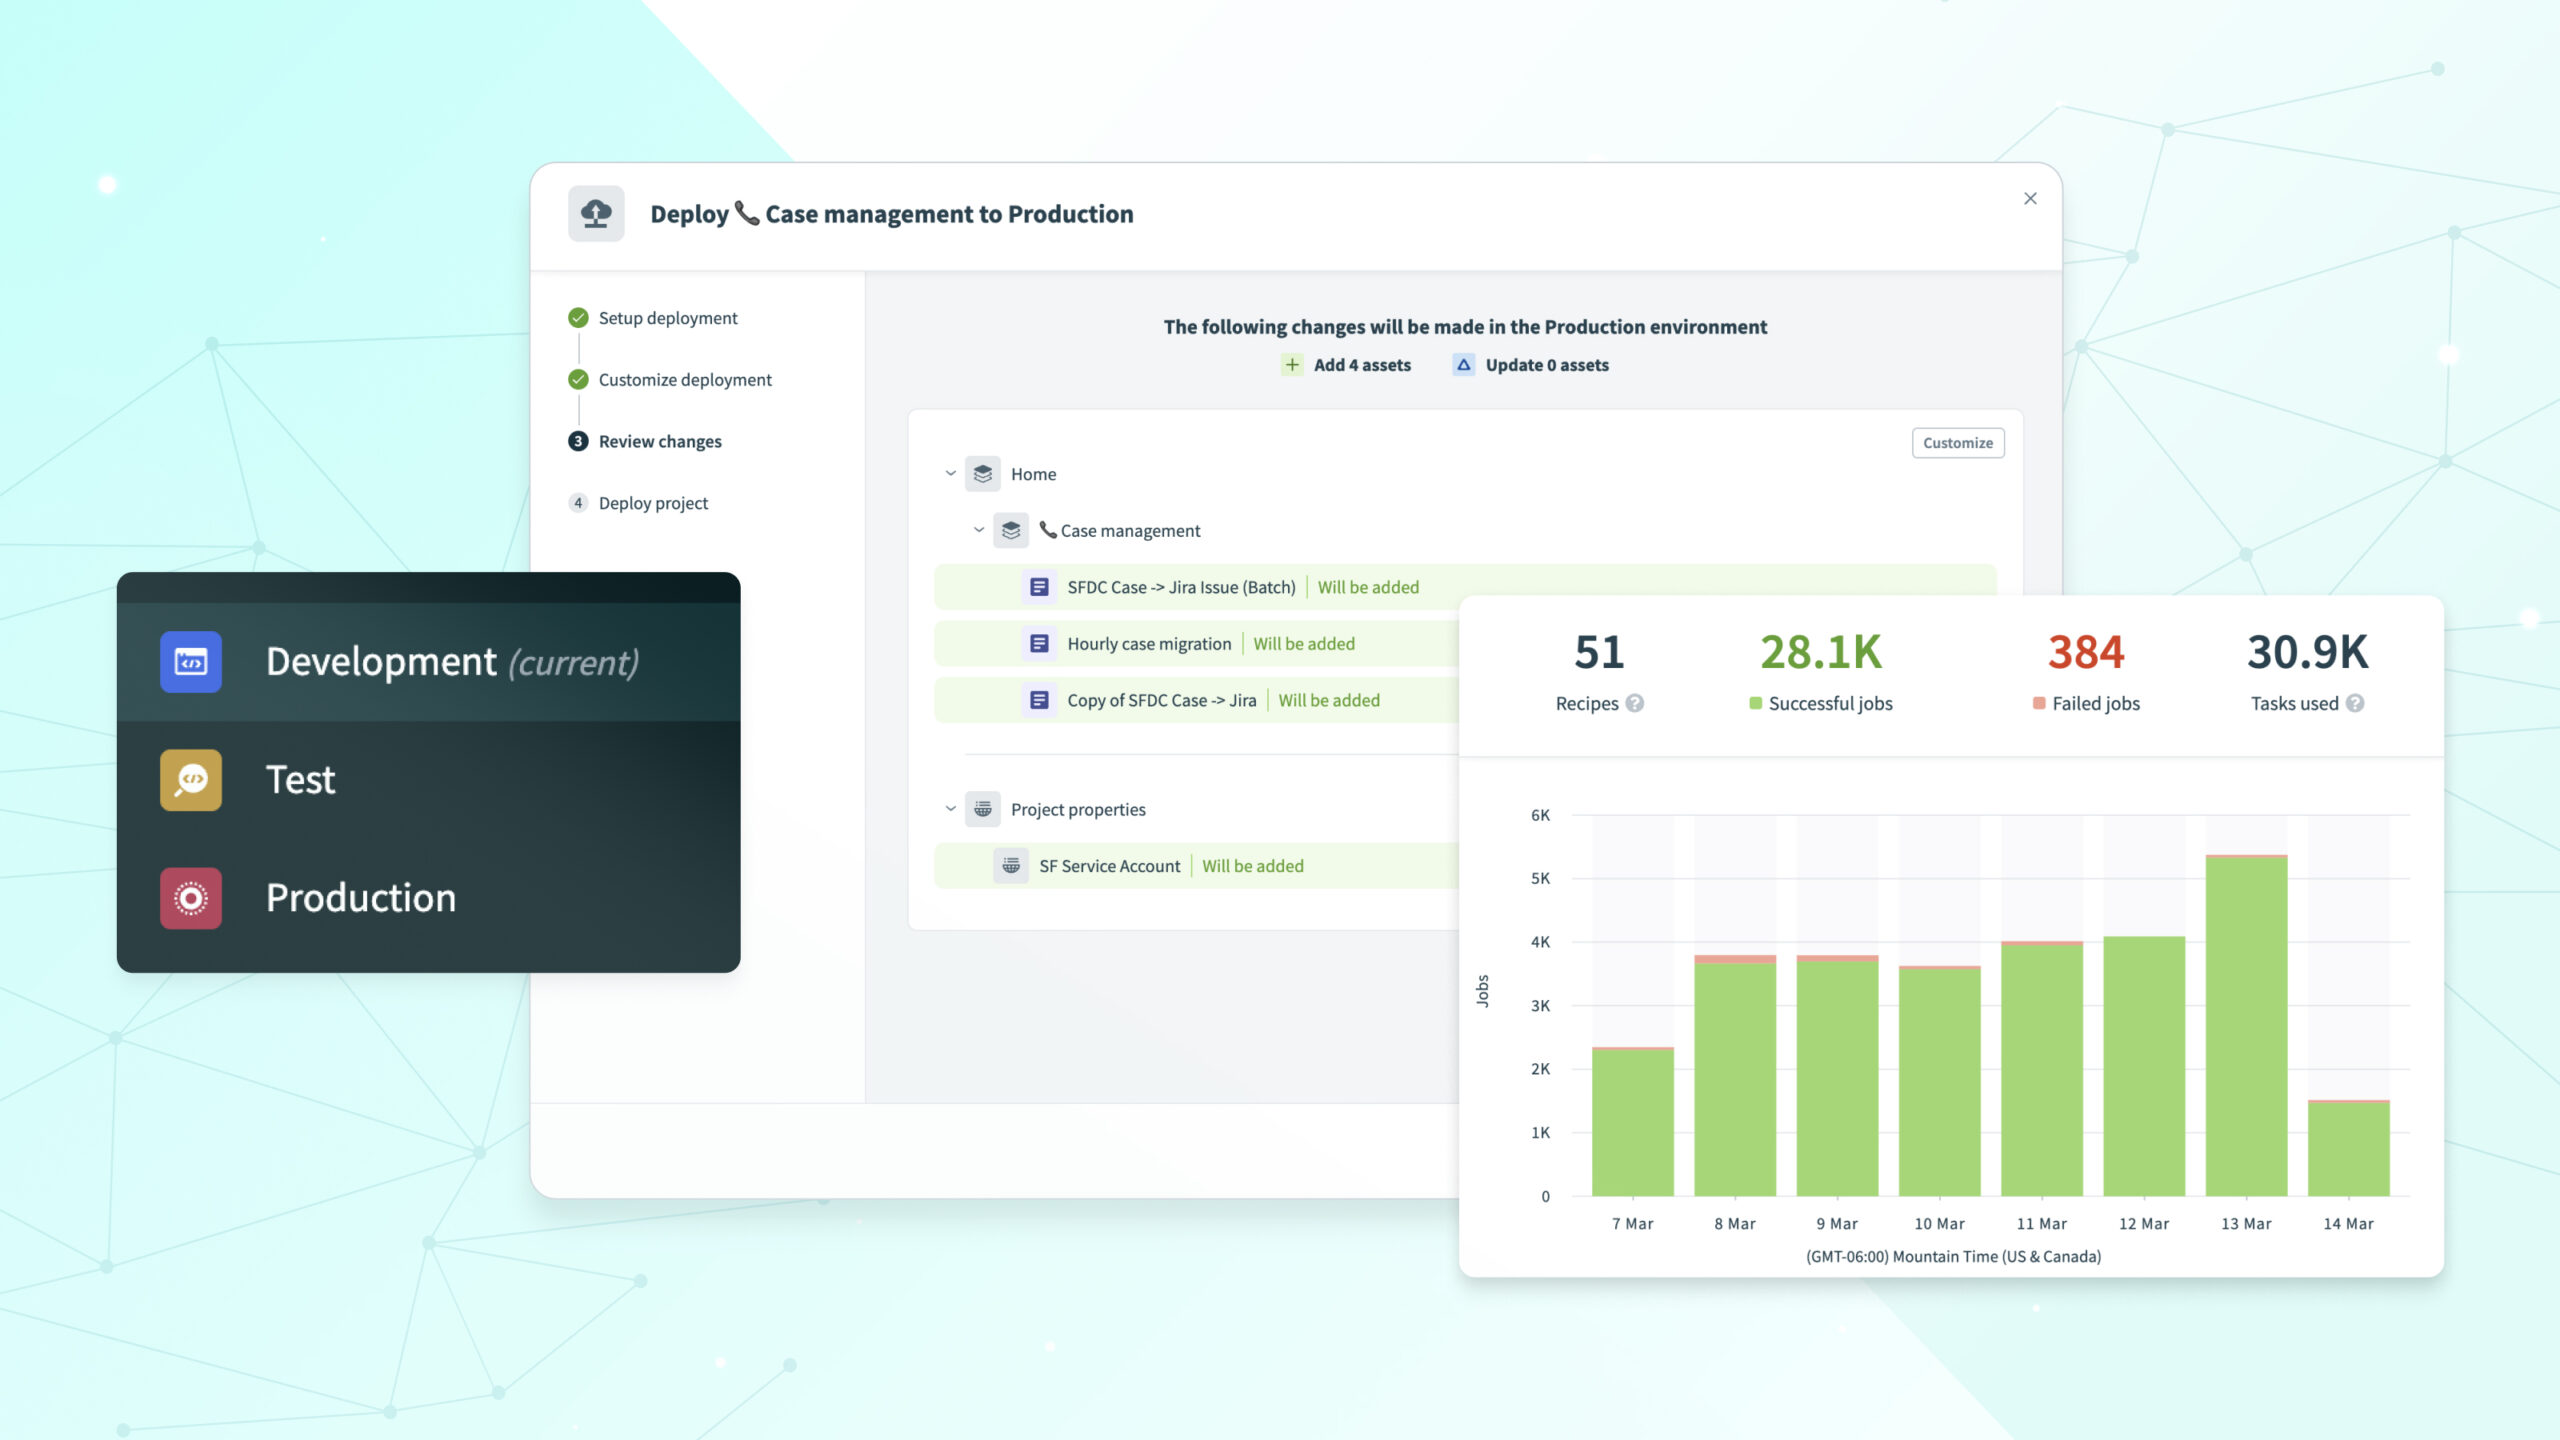
- Unified View and Control: Embedded Environments provide a centralized dashboard for EPs to manage and monitor automations across all customer environments. This unified view simplifies the oversight of changes, making it easier to identify and address potential issues before they impact end customers.
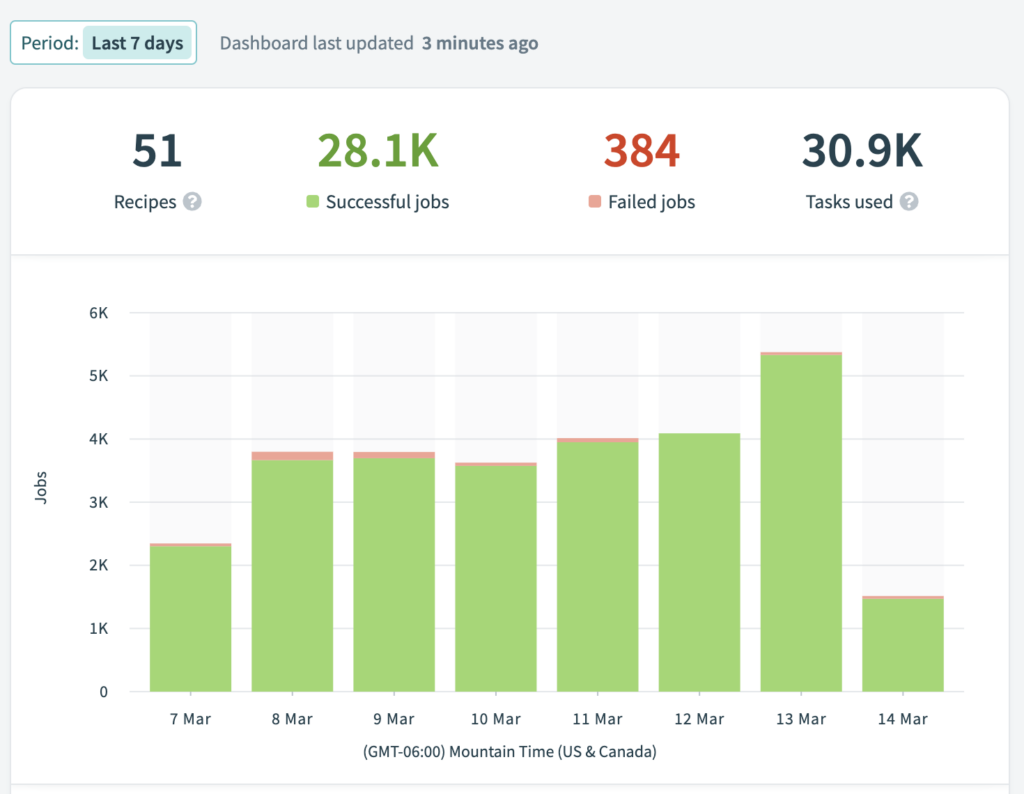
Customer dashboard with aggregated numbers across Development, Test, and Production environments.

Admin usage metrics aggregated across all customer environments.
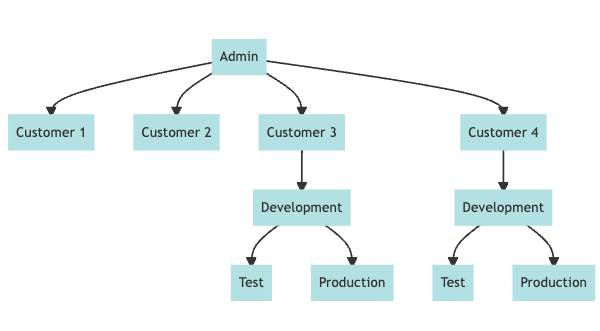
- Future-Proofing Through Flexibility: The flexibility to activate environments selectively for different customers allows EPs to tailor their approach to change management based on the specific needs and sophistication of each customer. Whether it’s a small tweak or a major platform overhaul, Embedded Environments support a scalable and controlled adaptation process. It’s up to you as admin to decide to provision environments to some or all of your customers.

Environments can be provisioned (or not provisioned) to customers as seen fit.
- Role-Based Access Control (RBAC): Embedded Environments enhance security and collaboration with RBAC, allowing EPs to assign specific roles and permissions for each collaborator across environments. This ensures collaborators access only what they need in development, testing, and production, streamlining change management and maintaining operational integrity.
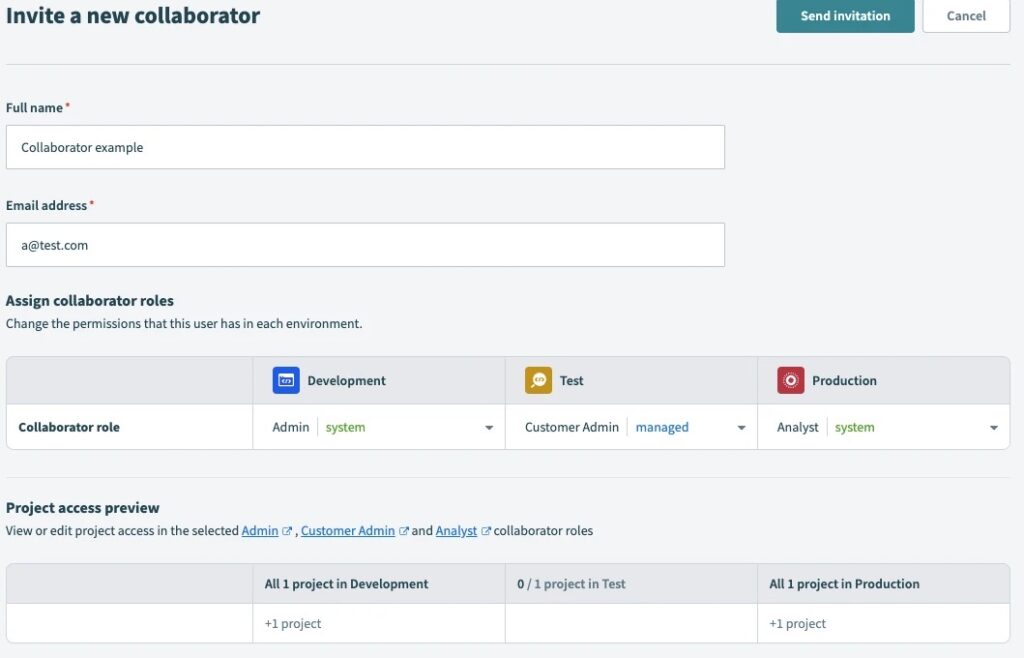
Roles can be assigned per environment to allow flexibility.
Let’s take a quick look at how these roles can be applied across environments by looking at a few team members:
- John, an admin company’s workspace administrator – he holds the keys to the kingdom with unfettered access across all environments and projects. Not only does he oversee project creation and environment allocation, but he also has the authority to invite collaborators from both the admin company and customer organizations, tailoring their roles to align with project needs.
- Richard, a developer specializing in integration from the admin company – he wields full write access to specific projects in the Development and Test environments. His domain is the realm of creation and refinement where he fashions and tests integrations, with a clear boundary set before Production, ensuring a quality checkpoint is met before any deployment.
- Alan, a meticulous QA tester from the customer’s team – he enjoys read-only access in the Development and Test environments. Tasked with the crucial role of quality gatekeeper, Alan scrutinizes recipes and connections and executes rigorous tests, safeguarding the sanctity of the integration quality without the capacity to modify.
- Esther, the project lead from the customer company – embodies the leadership role with comprehensive access to the projects she manages, spanning all environments. She is the orchestrator of the project’s journey, conducting the integration symphony from development through to its grand finale – a flawless deployment to Production.

Each user is provisioned access to each environment based on their roles and responsibilities.
Setting up role-based access this way makes it easy to create a process to develop, review, and approve changes to a project, and prevent any regressions or accidental changes
Provisioning Environments
Provision Environments for existing customers
- Click Manage customers in the left-side navigation menu.
- Select the customer you plan to provision Environments for in the Admin console customer table.
- Click Settings > Plan.
- Click Get started in the Provision environments for your customers box. The Provision Environments pop-up box opens with an overview of the Environments feature.
- Click Provision environments in the pop-up box to confirm your selection.
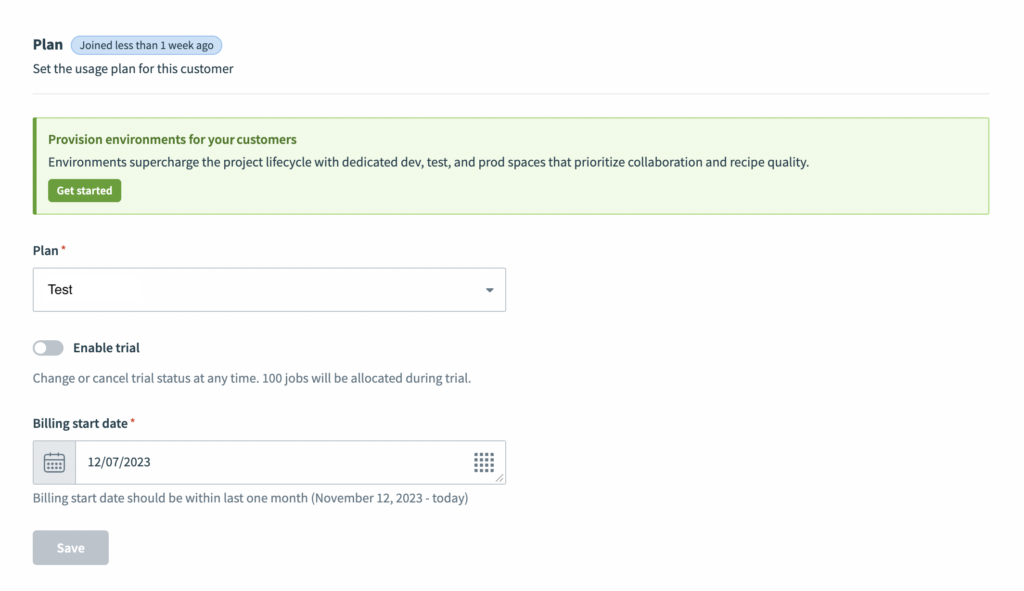
A new indicator will assist in provisioning environments for existing customers.
Verify access after Environments provisioning
After provisioning Environments for an existing customer, it is crucial to review and adjust Role-Based Access Control (RBAC) settings to ensure that your collaborators are granted the appropriate access across all environments (Development, Test, and Production).
After provisioning Environments for an existing customer, their pre-existing workspace becomes their Development workspace, which includes all running recipes. Recipes will not stop running at any point during the process. After the provisioning process is complete, the Test and Production environments will be available.
Provision Environments for new customers
- Click Manage customers in the navigation menu.
- Click Add customer.
- Enter a Name and Notification email, and select a Plan for the customer.
- Ensure the Provision environments toggle is on.
- Click Add customer.

New customers will have a toggle for provisioning Environments.
Deploying projects between Environments
Simple project deployment within Workato makes it easy to deploy from environment to environment.
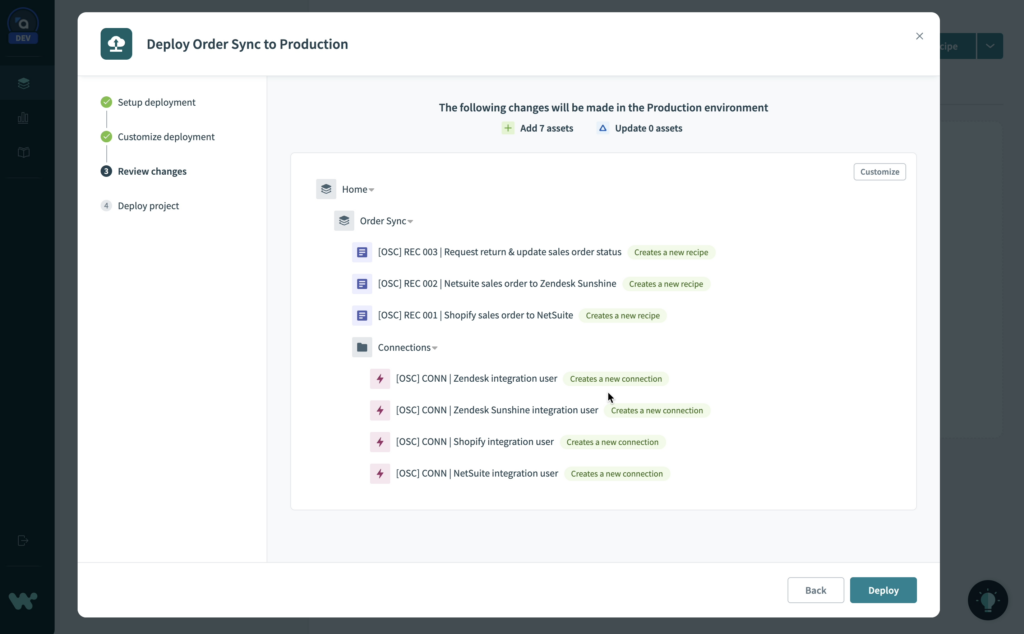
Deploying a project is simple. No scripts, no external tools, no JSON manifests. Just head to the Deployments tab and click Deploy project.
- Any dependencies, like recipe functions, connections or lookup tables outside the project are automatically detected and included in the deployment by default.
- The deployment wizard automatically detects changes for you and builds a deployment package. You can customize the deployment package to control exactly which assets to deploy.
- Adding a note to your deployment is recommended for audit ability, and can be used to add any version information required by your processes.
- We always recommend that you deploy the whole project.
The first time you deploy a connection to a new environment, you will need to reauthenticate. This helps you to make sure that each environment connects to the appropriate instance of your apps.
Embedded APIs and Environments
Embedded APIs are fully compatible with Embedded Environments. You can continue to use the same Embedded API across all environments by targeting the appropriate user ID. When provisioning Environments for an existing Embedded Customer, their user ID becomes their Development user ID, and two new IDs are generated for the Test and Production Environments.
Use the following API endpoints to target a specific environment within a customer’s account:
| Environment | Endpoint |
| Development |
api/managed_users/:user_id_dev
|
| Test |
api/managed_users/:user_id_test
|
| Production |
api/managed_users/:user_id_prod
|
For more resources and a guide on how to retrieve the correct user_id for each environment, please refer to our documentation.
Getting started with Embedded Environments
The Embedded Environments feature will be introduced silently to partners and carries no additional cost. Its implementation is designed to be non-disruptive, maintaining continuity in your integration operations while opening up new avenues for structured development and testing.
For more information on how to enable Embedded Environments for your customers or to discuss specific migration paths, please reach out to your Customer Success Manager. They will guide you through the process, ensuring a smooth transition and alignment with your operational goals.